Explore 'My Account'
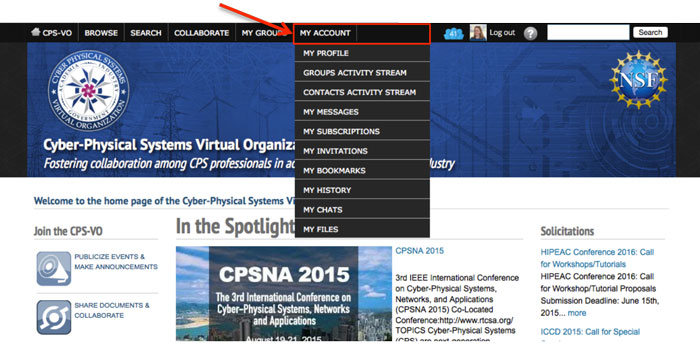 |
Get to your account page by clicking the “My Account” tab at the top of the CPS-VO website. There is a drop-down list of features associated with your account. |
 |
Clicking the “My Account” link will take you directly to your profile page which shows your profile information and recent activity from users you have added as contacts. From the left side menu, you can view your profile, your contributions, your "My Tools" menu and "My Groups". |
 |
The “Contributions” page can be accessed from the left sidebar or by clicking on the icon next to your photo at the top of the CPS-VO home page. |
 |
This page displays a table with your most recent contributions. |
 |
The “My Tools” toggle menu in the left sidebar contains several links that allow you to navigate the features of your account.
|
 |
The "My Groups" Toggle menu allows you to visit different groups you/ve joined. |
Edit Your Profile
Clicking the “Edit Profile” link in the “My Tools” toggle menu will take you to an area where you can edit your profile information.
 |
|
 |
|
My Contacts
Clicking the "My Contacts" link in the "My Tools" toggle menu will take you to an area where you can view or remove your contacts.
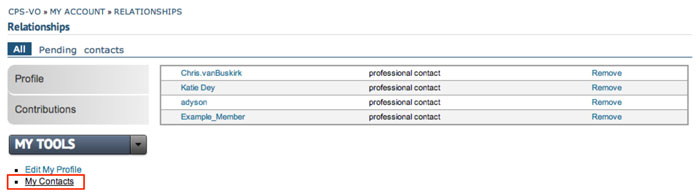 |
A link to your contact list can be found in the “My Tools” toggle menu. |
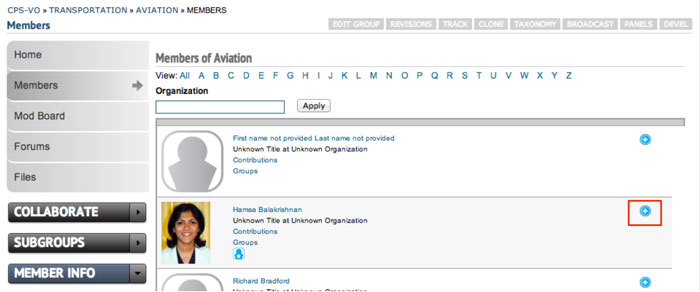 |
A request to add someone as your contact can be sent by:
1. clicking the plus sign next to their name on group member pages |
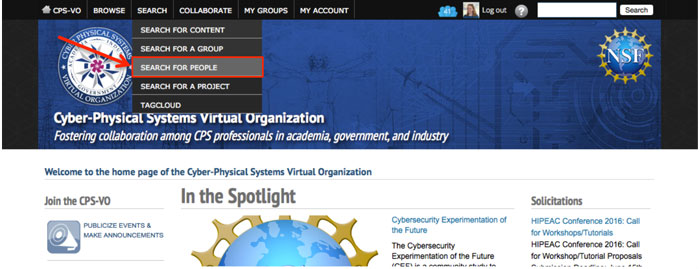 |
2. from “search for people” in the top navigation menu of the CPS-VO home page |
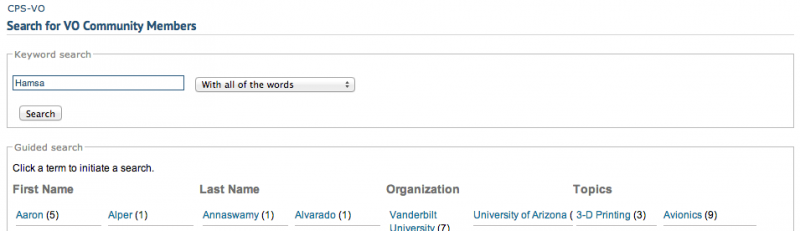 |
a. Enter name into keyword search navigation |
 |
b. then click the plus next to the name of the person you would like to request to add as your contact. |
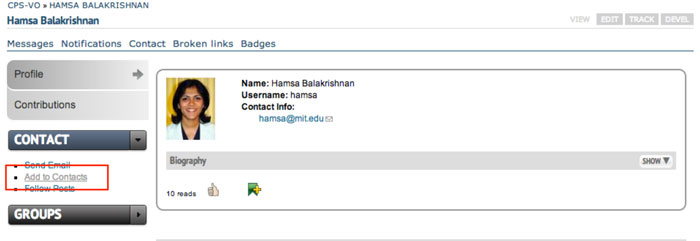 |
3. or by navigating to someone’s profile page and using the “Add Contact” link under the “My Tools” toggle menu on their page. |
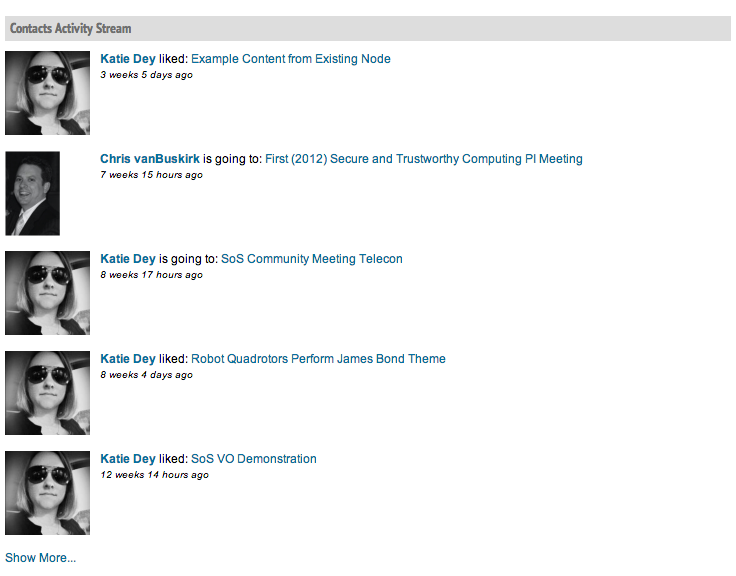 |
The “Contacts Activity Stream” shows beneath your profile information and can be found on your main profile page or by clicking on the “Contacts Activity Stream” link in the “My Tools” toggle menu. The stream shows recent activity from people you have added to your contact network.
When you click on the "thumbs-up" icon at the bottom of a post or the "going" icon at the bottom of an event (as shown left), your activity will populate the activity stream of the contacts in your network. |

Groups Activity Stream
The "Groups Activity Stream" shows beneath your profile information and can be found on your main profile page or by clicking on the "Groups Activity Stream" link in the "My Tools" toggle menu. The stream shows recent activity in the groups to which you belong.
 |
View new posts, files, news items, events meetings and other activity in your groups by clicking “Groups Activity Stream” under the “My Tools” toggle menu, or by clicking the “Group Activity” icon to the left of your photo at the top of the CPS-VO home page). |
 |
Select links to filter group posts by "Unread" or "Recent". Posts on the CPS-VO can be seen by clicking the last 2 links in the horizontal list: "CPS-VO: Recent" and "CPS-VO: By Date". |
 |
The feed can also be narrowed to a certain group by selecting a group name in the “Group” drop down menu. The default view will show posts from all of your groups. |
Notifications
Notifications are updates to content you've subscribed to.
Types of content are: Events, Files, Forum Topics, Projects, News Items, Meetings, Pages, Posts, Web Forms, Wiki Pages.
 |
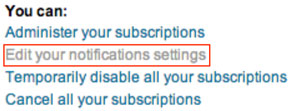
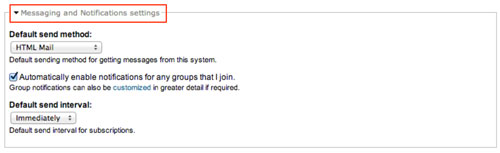
Change your default notification settings from the overview tab by clicking "Edit your notifications settings" in the "You can:" list. Scroll down to the section called "Messaging and Notification settings" where you can use the dropdown menus to change your settings. (You can alternatively change these settings by clicking on the "Edit" button at the top of your profile page.) |
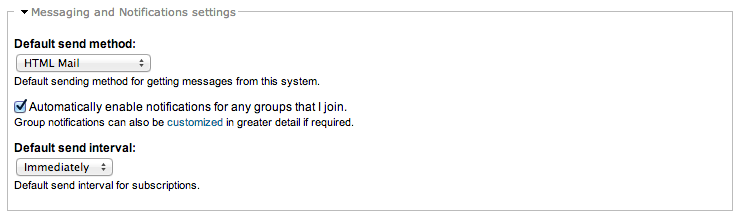 |
There are 3 choices in the drop down menu (The default method of receiving notifications from your subscriptions is via email twice daily):
|
My Messages
You will receive notifications according to the method you chose in your account settings - HTML Mail, Plain Text Mail, or via the VO Message center. If you choose to view your notifications via the VO Message center, you can see your notifications on your "Messages Page".
There are two ways to get to your Messages page.
 |
1. By selecting “My Messages” in the “My Account” menu at the top of the CPS-VO home page. |
 |
2. By selecting “My Messages” in the “My Tools” toggle menu on your account page. Messages from your subscriptions will be shown in a table. |
My Subscriptions
 |
|
 |
|
 |
The "Subscribe to" link takes you to the subscription confirmation page, where you can choose how often to check whether the item or its comments have been updated. If any change is noticed, an email will be sent to the email address you registered with. |
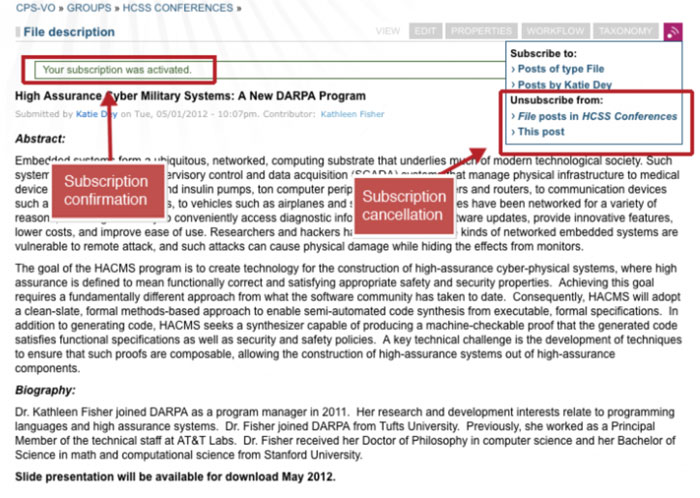 |
After subscribing you will see a confirmation in a green outline box. The "Subscribe to: This Post" link then changes to "Unsubscribe from: This Post" for canceling the subscription. (Note: You can also manage all your subscriptions via your "My Account" page by selecting the "My Subscriptions" link in the left sidebar toggle menu as described here.) |
Update group subscriptions
 |
Go to your group subscriptions page by clicking the “My Subscriptions” menu item in the “My Tools” toggle menu. This is the page where you can bulk manage your subscriptions and notifications settings for the groups to which you belong. |
 |
Configure multiple subscriptions by checkmarking selections and choosing an action from the dropdown menu. |
Follow the instructions below for more granular control of your subscription notifications.
 |
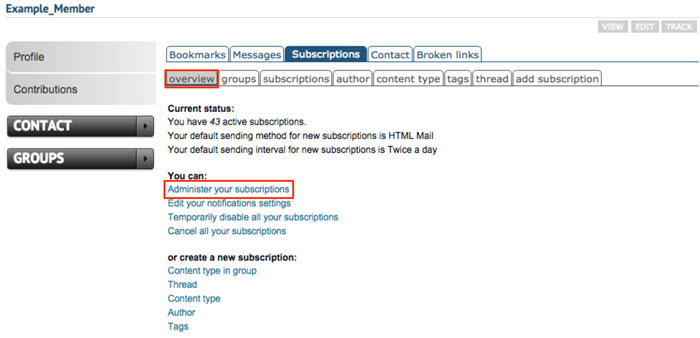
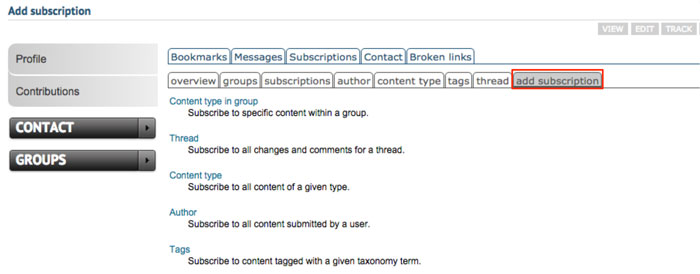
Go to your subscriptions overview page by clicking the “Subscriptions” tab. This is the page where you can manage all of your subscriptions and notifications settings on a granular level.
|
 |
Click on "Administer your subscriptions" (outlined in red) to configure your subscriptions. |
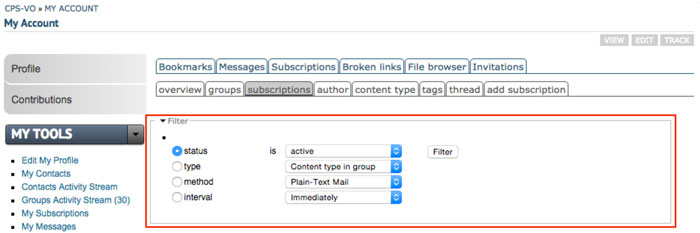 |
Filter your subscriptions by status, type, method or interval. Edit settings or delete a subscription with the "edit" or "drop" links to the far right of each subscription in the operations column of the table. |
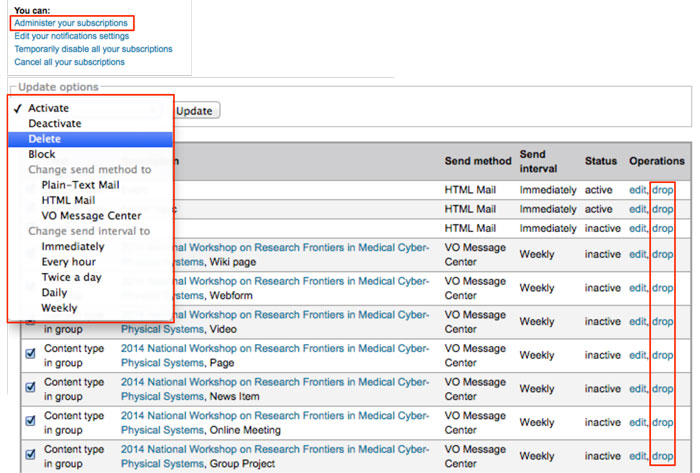 |
You can configure multiple subscriptions by checkmarking selections and choosing an action from the dropdown menu. NOTE: "Delete" in the bulk operations dropdown menu is equivalent to the "drop" link in the table rows. |
|
|
Change your default notification settings by clicking "Edit your notifications settings" in the "You can:" list.
Scroll down to the "Messaging and Notifications settings" . Use the dropdown menus to change your settings (as described in the notifications page). |
My Invitations
You can view your meeting and event invitations two different ways.
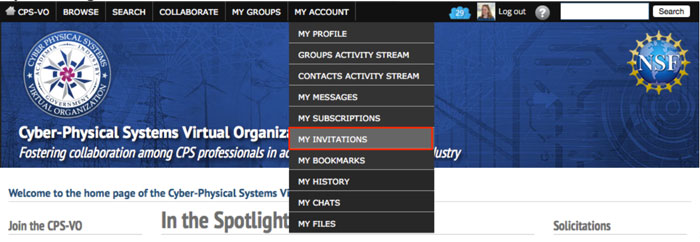 |
1. By selecting "My Invitations" in the "My Account" tab on the global menu at the top of the CPS-VO home page. |
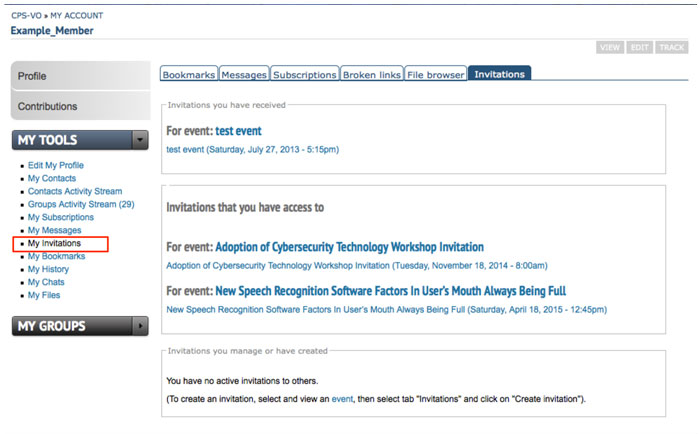 |
2. By clicking “My Invitations” in the “My Tools” toggle bar (located in the left sidebar of your Account page). In this page you will be able to view the invitations for events you have been invited to and also view and manage invitations you have created. |
My Bookmarks
You can view your bookmarks two different ways.
 |
1. By selecting "My Bookmarks" in the "My Account" tab on the global menu at the top of the CPS-VO home page. |
 |
2. By clicking “My Bookmarks” in the “My Tools” toggle bar (located in the left sidebar of your Account page). In this page you will be able to view and remove the bookmarks you have created. You may also remove a bookmark by clicking on the red bookmark icon beneath the post which you originally bookmarked. |

My History
You can view history of the pages you have visted on the CPS-VO in two different ways.
 |
1. By selecting "My History" in the "My Account" tab on the global menu at the top of the CPS-VO home page. |
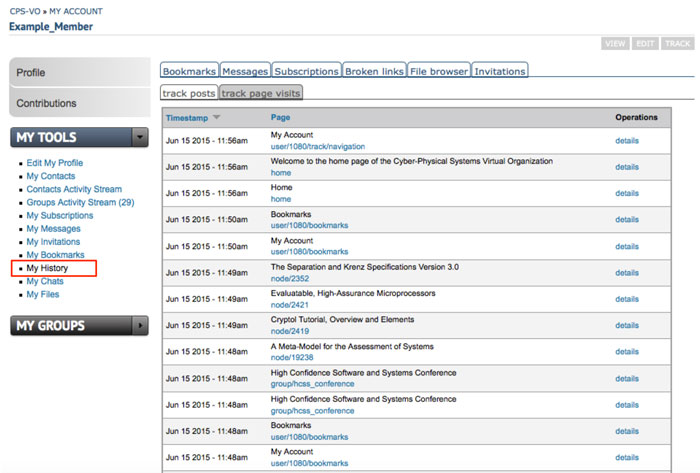 |
2. By clicking “My History” in the “My Tools” toggle bar (located in the left sidebar of your Account page). |
My Chats
You can view history of your chat conversations in two different ways.
 |
1. By selecting "My Chats" in the "My Account" tab on the global menu at the top of the CPS-VO home page. |
 |
2. By clicking “My Chats” in the “My Tools” toggle bar (located in the left sidebar of your Account page). |
My Files
You can upload and edit media files to use in posts and pages that you create.
(e.g. logos, photographs, videos and compressed files)
- Maximum file size per upload: 10 MB
- Permitted file extensions: gif, png, jpg, jpeg, mp4, tgz
- Maximum image resolution: 800x600
- Maximum number of files per operation: 1
There are 3 ways to get to the file browser.
 |
1. By selecting "My Files" in the "My Account" tab on the global menu at the top of the CPS-VO home page. |
 |
2. By clicking “My Files” in the “My Tools” toggle bar (located in the left sidebar of your Account page). |
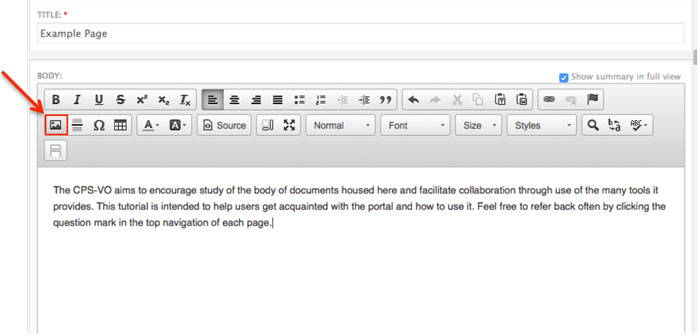 |
3. By clicking the image icon from within the rich text editor which you use to create or edit a page or a post. |
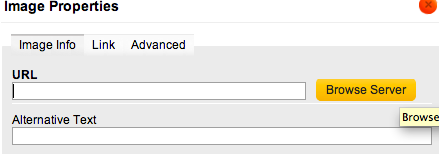 |
Click the "Browse Server" button. |
Once you are in the file browser, Upload a file via the "Upload" button.
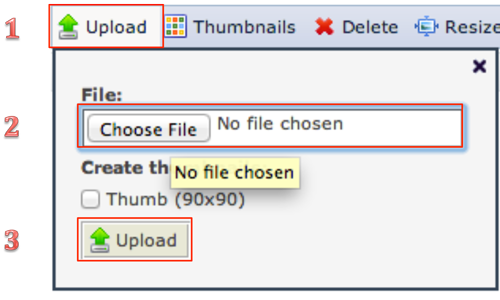 |
Browse and choose a file from your computer and click the bottom upload button |
 |
Resize or delete a file by clicking it's name in the file list then clicking the corresponding icon in the light blue bar above the file list. |