Kinds of Panel Pages
Different layouts can be chosen to best display the content for each custom page. Content can then be added to different regions of the page via widgets.
Creating a Home Page
Creating a basic custom home page versus creating a dashboard style home page.
Creating a Basic Home Page
After editing your group settings your home page will have a left menu with 3 tabs: Home, Forums, and Files.
 Video example
The content area of your home page will include the mission statement and an activity stream (a dynamic listing of content as it is added to the group). Many times groups do not want the activity stream on their home page. In order to remove it you will need to set up a custom home page.
 |
1. Click on the gray “Panels” tab above the content area. |
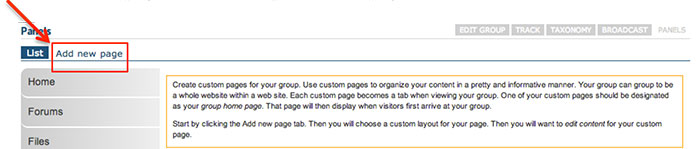 |
2. This will take you to a page where you can add a new panel page. Start by clicking the “Add new page” tab at the top left of the page. |
 |
3. Type “Home” in the page title input area and add the word home after the slash in the path input area. Click the “Create Page” Button.
|
 |
4. Click the radio button next to your new page and then click the “Save settings” button. |
Once you have created the new home page you can customize the content.
 |
1. Click the “Edit content” link to re-insert your mission statement into your home page without the activity stream beneath it.
|
 |
2. This will bring you to the settings display of your panel page. The top area is where you will add your mission statement widget. Click on the gear icon in the upper left corner of the ‘top’ region. |
 |
3. Then select “Add content” from the dropdown menu.
|
 |
4. From the left menu select “Organic groups”. Then click on "OG Mission". |
 |
5. This will take you to window where you can override the title by clicking the checkbox. You can either leave the title empty or add any title you wish to show on your home page content area. Click the "Finish" button. |
 |
6. Click "Save" to take you back to your panel pages list. The home page will now be set to your custom content page and will no longer show the activity stream. |
Creating a Dashboard-Style Home Page
After creating a basic home page for your group, you may want to change the layout to accommodate more features.
View a video example for creating a Dashboard Home Page
Video example
 |
Step 1: In the area where you edit panel pages, click the “Change layout” link. |
 |
Step 2: Choose the number of columns and click the radio button to select a layout. Click the “Next” button. |
 |
Step 3: Click the “Save” button in the next window. |
For instructions on how to add widgets and custom content to your dashboard-style home page see page adding widgets to your panel page and adding "custom" content page. Adding slides to your slideshow widget is covered in the next tutoral section "Adding a Spotlight Slideshow". See the widget reference table for further description of available widgets.
View a video example for adding news, events and spotlight slideshow widgets to your Dashboard Home Page
Video example
Adding A Spotlight Slideshow
You might want to add a slideshow to your home page.
Video example
|
You will first need to add the Spotlight widget. Click the "Edit content" link. |
 |
You will be taken to a page that shows the regions of your panel page. Click on the gear icon in the upper left corner of a region. |
 |
Then select "Add content" from the dropdown menu. |
 |
This will take you to a page where you can add widgets and custom content (for more detail see pages adding custom content and Widgets Table).
Click "Widgets, group dashboard" in the left side menu. Then select "Spotlight [group]" from the available widgets.
|
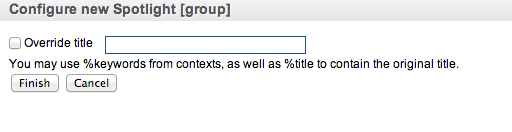 |
Change the Spotlight title if desired, then click "Finish" to set your changes. |
 |
Step 5: After adding widgets, click "Save" to take you back to your panel pages list. |
Adding Content to the Spotlight Slideshow
Only group Managers, Moderators, and Members who have been granted the 'Trusted User' status have permissions to add content to the group spotlight slideshow.
 |
After creating an “Event” or “News item", scroll down to the area that is titled “Slideshow Image”. Click the “Choose File” button to retrieve an image from your computer. Click the “Upload” button to upload the image. |
 |
If your upload is successful, the image will display next to a button giving you the option to “Remove” it.
|
How to add content to your spotlight slideshow (usually found on the group home page).
 |
If you want the slideshow image and title to link to something other than the node URL (default), enter a custom "slideshow link" to make the spotlight link to a custom page with the setting below. Checkmark "Open URL in a New Window" if you want the browser to launch a new window upon click. If it's an external link, it needs to be a fully qualified URL, ie. http://www.somesite.com If it's internal, it should be sufficient to put a relative URL, ie. node/1234. |
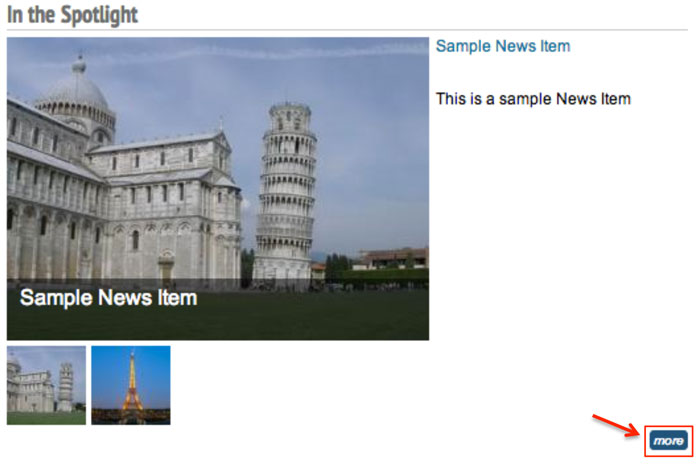 |
There is also a "more" button at the bottom right of the slideshow that links directly to the CPS-VO news item or event rather than the custom link. |
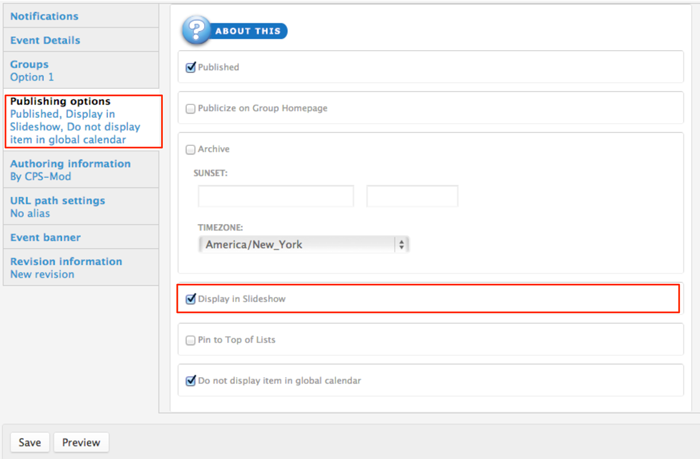 |
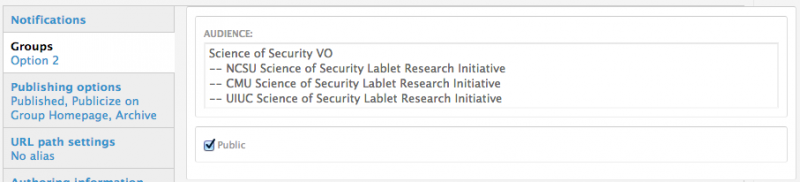
Next, click on the gray tab titled “Publishing options” and checkmark the box next to “Display in Slideshow”. Click "Save" to publish your event and show it in the spotlight. |
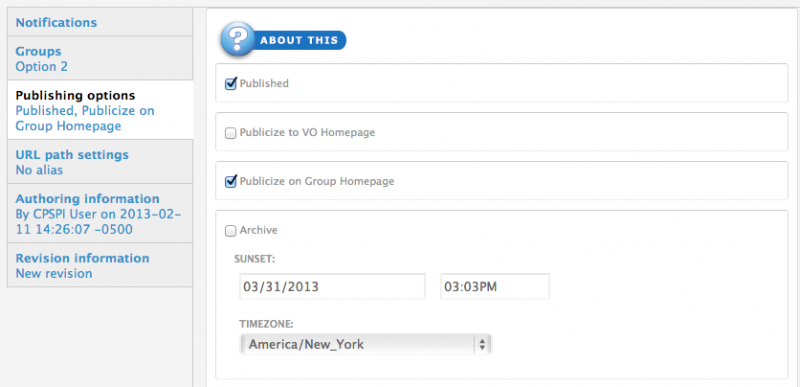
About Publishing Options
- Publish: Uncheck this option if you don't wish for this content to appear on the VO yet. Useful for saving drafts of content that requires editing before going live/published.
- Publicize on Group Homepage: This option will place your post on your group's homepage in the corresponding section (Recent News, Upcoming Events, etc…)
- Archive: Will remove this post from displaying publicly (or to members of your group) and add it to a historical archive listing. You may also want to type in a date and time in the “Sunset” section to control when your event or news item is automatically archived.
- Display in Slideshow: Will place this post, along with its image (or video), in a slideshow. Must be used with either Publicize to Entire VO or Publicize on Group Homepage options.
- Pin to Top of Lists: This option will make this post appear at the top of content listings, regardless of any other settings. Useful for denoting important content or content that has a "call to action" associated with it.
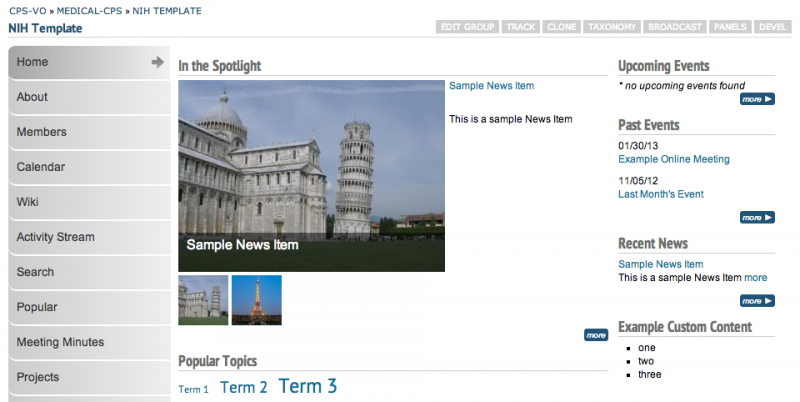
After adding content to your slide show you can expect to see something like the example below.
Creating a Projects Page
Creating a projects page is a convenient way to post your group research projects in one easily accessible location.
Video example
First create a "Projects" Page by adding a new page in Panels. (see Creating Custom Pages for additional instructions).
 |
When your page is set up and named, click the "Edit content" link to the right of the title of your "Projects" panel page. |
 |
You will be taken to a page that shows the regions of your panel page. Click on the gear icon in the upper left corner of a region. The "Project" widget works best if placed in the Top or Bottom region of your panel page display settings due to its horizontal layout. |
|
Select "Add content" from the dropdown menu. |
 |
This will take you to a page where you can add widgets and custom content. There are 3 widgets associated with Group Projects content.
Click the "Research Projects, All [group], Research Projects, Archived [group], or Research Projects, Current [group]" widget link - which is found under the left menu item called “Widgets, group menu-items”. This will insert the widget into the chosen panel-page region (top or bottom). |
 |
A new page will launch with a "Finish" button. Click the "Finish" button to insert the widget. Only one widget at a time may be added using this process. Click the "Save" button at the bottom of your panel regions page to set your changes.
|
 |
Initially the "Projects" page will read "no projects found". |
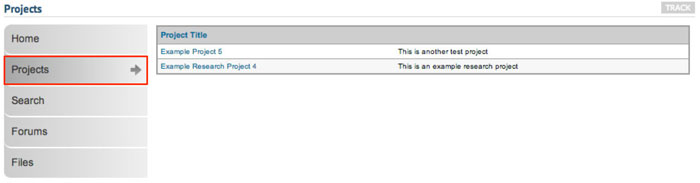 |
Linked project titles will display on the "Projects" page in a table as group members add projects (Further instructions to members about contributing projects can be found in this tutorial at Creating a Group Project). |
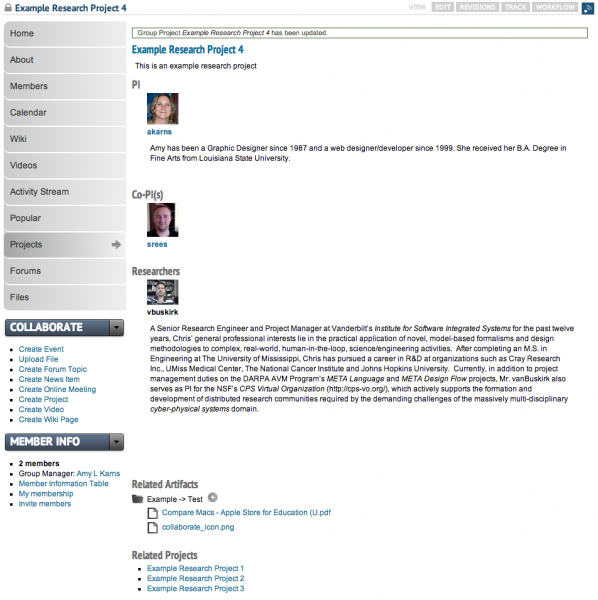
Clicking on the linked project title will lead to the individual project page (which will appear as below).
Creating an About Page
Creating an "About" page is a way to provide a brief overview of your group.
 |
When you initially created your group, you added your group “Description” and a “Mission statement”. This content can be included in your “About” page by using widgets. |
 |
First create an "About" Page by adding a new page in Panels. (see Creating Custom Pages for additional instructions).
When your page is set up and named, click the "Edit content" link to the right of the "About" panel page title. |
|
You will be taken to a page that shows the regions of your panel page. Click on the gear icon in the upper left corner of the region in which you want your content to appear. |
|
Select "Add content" from the dropdown menu to add widgets and custom content. |
 |
Click either the "OG description" or "OG Mission" link to add the desired content to your page and click “Finish”. |
 |
You may also add new custom content or content from an existing node to your "about" page by following the “Add Custom Content” instructions.
Click on the widget name to insert that widget. A new page will launch with a "Finish" button. Click the "Finish" button to insert the widget. Only one widget at a time may be added using this process.
After both widgets are added, click the "Save" button at the bottom of your panel regions page to set your changes.
|
 |
Your description and mission statement will now show on your "About" page. |
Creating a Members Page
A "Members" page is a convenient alphabetical listing of all members in a group with easy access to features such as adding to contacts, viewing contributions, linking to profile, etc.
 |
First create a "Members" Page by adding a new page in Panels. (see Creating Custom Pages for additional instructions). When your page is set up and named, click the "Edit content" link to the right of the title of your "Members" panel page. |
 |
You will be taken to a page that shows the regions of your panel page. Click on the gear icon in the upper left corner of the full-width region where you want your members list to display. The top or bottom region is best for this widget. |
|
Select "Add content" from the dropdown menu. |
 |
This will take you to a page where you can add widgets and custom content.
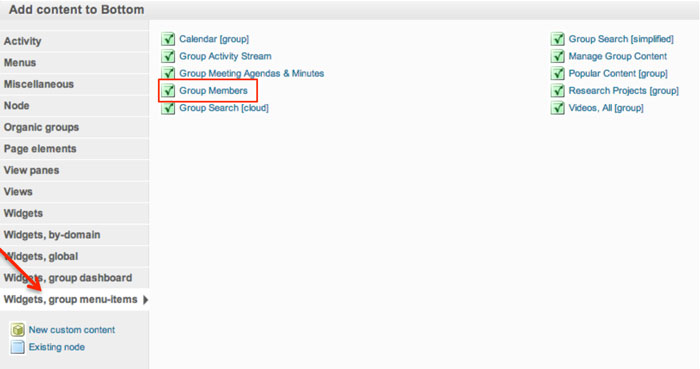
The “Group Members” widget can be found by selecting the left menu item “Widgets, group menu items”.
|
 |
Click on the widget name to insert that widget. A new page will launch with a "Finish" button. Click the "Finish" button to insert the widget. Only one widget at a time may be added using this process.
Click the "Save" button at the bottom of your panel regions page to set your changes.
|
 |
Example of a "Members" directory page.. |
Creating a Calendar Page
A "Calendar" page is a convenient place to post a group event calendar.
 |
First create a "Calendar" Page by adding a new page in Panels. (see Creating Custom Pages for additional instructions). When your page is set up and named, click the "Edit content" link to the right of the title of your "Calendar" panel page. |
|
You will be taken to a page that shows the regions of your panel page. Click on the gear icon in the upper left corner of the region in which you want your search widget to display. |
|
Select "Add content" from the dropdown menu. |
 |
This will take you to a page where you can add widgets and custom content.
The “Calendar [group]” widget can be found by selecting the left menu item “Widgets, group menu items”.
Add the widget by clicking on its title.
|
 |
Click on the widget name to insert that widget. A new page will launch with a "Finish" button. Click the "Finish" button to insert the widget. Only one widget at a time may be added using this process.
Click the "Save" button at the bottom of your panel regions page to set your changes.
|
 |
A calendar will then be added to your "Calendar" page. |

Creating an Activity Stream Page
The content area of a basic home page will include the mission statement and an "activity stream" (a dynamic listing of content as it is added to the group). Many times groups do not want the activity stream on their home page. In order to remove it you will need to set up a custom dashboard style home page.
Creating an"Activity Stream" page is encouraged if you remove the activity stream.
Follow the directions below to create an "Activity Stream" page.
 |
First create an "Activity Stream" Page by adding a new page in Panels. (see Creating Custom Pages) for additional instructions). |
|
You will be taken to a page that shows the regions of your panel page. Click on the gear icon in the upper left corner of the region in which you want your content to appear. |
 |
Select "Add content" from the dropdown menu to add widgets and custom content. |
 |
The “Group Activity Steam” widget can be found by selecting the left menu item “Widgets, group menu items”.
|
 |
The "Recent Comments" widget is found in the “View Panes” category in the left menu. |
 |
Click on the widget name to insert that widget. A new page will launch with a "Finish" button. Click the "Finish" button to insert the widget. Only one widget at a time may be added using this process.
Click the "Save" button at the bottom of your panel regions page to set your changes.
|
 |
When activity and comments begin to populate in your group, you can expect it to look like the image on the left. Notice the option of filtering recent posts by type. |
Creating a Wiki
Managers can create Wikis for their group where they and their group members will be able to add and edit shared pages (see "Creating a Wiki Page")
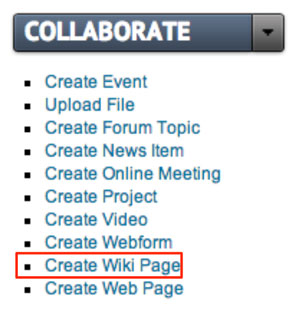 |
Make sure you have already created your first wiki page before you add the wiki widget to your group. If not, you can use the "Collaborate" toggle menu to get started. Click "Create Wiki Page" to launch the rich text editor. |
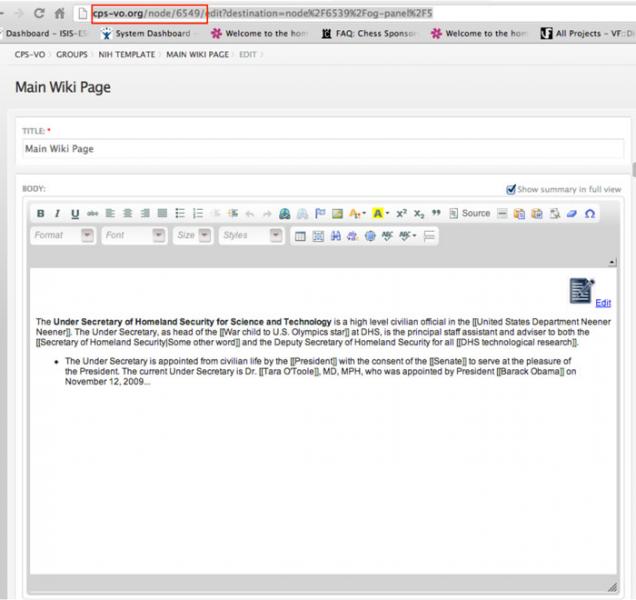 |
You can then find the node ID number in the top address bar. |
 |
After you create your first wiki page, create a panel page and name it "Wiki" (see “Creating Custom Pages”). Click “Edit content” link to the right of the title of your "Wiki" panel page. |
|
You will be taken to a page that shows the regions of your panel page. Click on the gear icon in the upper left corner of the full-width region in which you want your wiki to display. The "Wiki" widget works best if placed in the Top or Bottom region of your panel page display settings due to its horizontal layout. |
|
Select "Add content" from the dropdown menu. |
 |
This will take you to a page where you can add widgets and custom content. Click the "Existing node" link in the bottom left menu to begin. |
 |
This will launch a form. Type the node ID number of your first wiki page in the first text field. |
 |
Don’t forget to click the “Finish” button when you’re done typing. |
 |
Click the "Save" button at the bottom of your panel regions page to set your changes. |
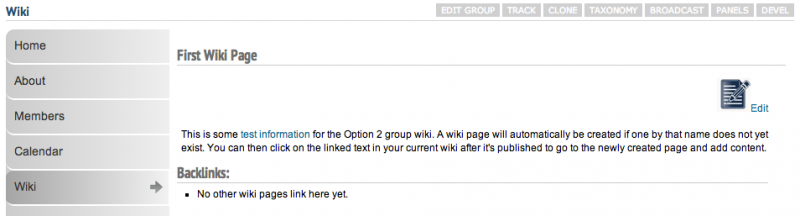 |
Your first wiki page will now be displayed on your "Wiki" panel page. Group members can now add and edit shared pages (see "Creating a WIki Page"). |
Creating a Popular Content Page
A popular content page is helpful for perusing the most viewed and used group content.
 |
First create a "Popular Content" Page by adding a new page in Panels. (see Creating Custom Pages for additional instructions). When your page is set up and named, click the "Edit content" link to the right of the title of your "Popular Content" panel page. |
|
You will be taken to a page that shows the regions of your panel page. Click on the gear icon in the upper left corner of the region in which you want your search widget to display.
|
|
Select "Add content" from the dropdown menu. |
 |
This will take you to a page where you can add widgets and custom content.
Click to add the “Popular Content (group)” widget (which can be found by selecting the left menu item “Widgets, group menu items”).
|
 |
A new page will launch with a "Finish" button. Click the "Finish" button to insert the widget. Only one widget at a time may be added.
Click the "Save" button at the bottom of your panel regions page to set your changes.
|
 |
As content is developed in your group, a table will display on the page like the example below. |
Creating a Videos Page
A "Videos" page is a convenient way to provide a place for group members to share embedded videos from services such as TED, Vimeo, or YouTube.
 |
First create a "Videos" Page by adding a new page in Panels. (see Creating Custom Pages for additional instructions). When your page is set up and named, click the "Edit content" link to the right of the title of your "Videos" panel page. |
|
You will be taken to a page that shows the regions of your panel page. Click on the gear icon in the upper left corner of the region in which you want your search widget to display. |
|
Select "Add content" from the dropdown menu. |
 |
This will take you to a page where you can add widgets and custom content.
Click on the “Videos, All [group]” widget (which can be found by selecting the left menu item “Widgets, group menu items”).
|
 |
The "Video, Featured [group] widget" is found in the “Widgets, group dashboard” category in the left menu. A video must be set to "public" in the group settings and in the publishing options as "published" and "publicized to group home page" in order to show up in the featured videos category. (see bottom of page for more about featuring a video). |
 |
Click on the widget name to insert that widget. A new page will launch with a "Finish" button. Click the "Finish" button to insert the widget. Only one widget at a time may be added using this process.
Click the "Save" button at the bottom of your panel regions page to set your changes.
|
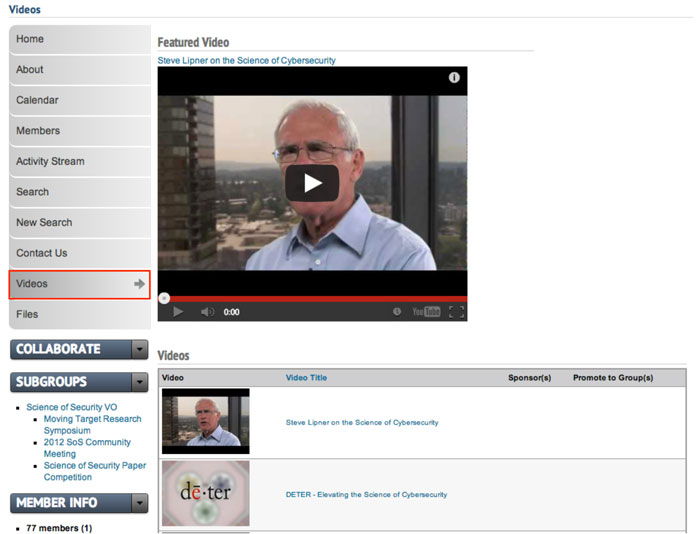 |
You and group members can now begin adding videos to your "Video(s)" page (see "Creating A Video"). You can expect the video page to look similar to the example below. |
More About Featured Videos
 |
Make sure the video is set to"public" in the group settings. |
 |
Publishing options should be checked as "published" and "publicized to group home page". Be certain the video is not archived by the sunset date (described above). |
Creating a Moderation Board Page
A Moderators Board page is helpful for editing, deleting and moving group content.
 |
First create a "Modboard"* Page by adding a new page by that name in Panels. (see Creating Custom Pages for additional instructions). When your page is set up and named, click the "Edit content" link to the right of the title of your "Modboard" panel page. *Some groups choose to name this page differently, but the standard CPS-VO terminology is "Modboard". |
|
You will be taken to a page that shows the regions of your panel page. Click on the gear icon in the upper left corner of the region in which you want your search widget to display. |
|
Select "Add content" from the dropdown menu. |
 |
This will take you to a page where you can add widgets and custom content.
Click to add the “Manage Group Content” widget (which can be found by selecting the left menu item “Widgets, group menu items”).
|
 |
A new page will launch with a "Finish" button. Click the "Finish" button to insert the widget. Only one widget at a time may be added.
Click the "Save" button at the bottom of your panel regions page to set your changes.
|
 |
As content is developed in your group, a table will display on the page like the example below. A set of dropdown menus give you bulk-editing capabilities. |
Creating an Agenda and Meeting Minutes Page
An "Agenda and Meeting Minutes Page" page is a convenient way to store and search meeting documentation.
 |
An "Agenda and Meeting Minutes" page collects and displays anything tagged with 'Meeting Minutes' or 'Agenda' from the 'Document Type' taxonomy (located to the right of the text editor when creating group content). |
 |
First create a "Meeting Minutes" Page by adding a new page in Panels. (see Creating Custom Pages for additional instructions). When your page is set up and named, click the "Edit content" link to the right of the title of your "Meeting Minutes" panel page. |
|
You will be taken to a page that shows the regions of your panel page. Click on the gear icon in the upper left corner of the region in which you want your search widget to display. |
|
Select "Add content" from the dropdown menu. |
 |
This will take you to a page where you can add widgets and custom content.
Click on the “Videos, All [group]” widget (which can be found by selecting the left menu item “Widgets, group menu items”). The "Group Meeting Agendas & Minutes widget" is found in the “Widgets, group dashboard” category in the left menu. Click on the widget name to insert that widget. A new page will launch with a "Finish" button. Click the "Finish" button to insert the widget. Only one widget at a time may be added using this process.
Click the "Save" button at the bottom of your panel regions page to set your changes.
|
Initially your Meeting Minutes page will be empty. However, the search features will automatically populate as content is added and tagged with 'Meeting Minutes' or 'Agenda' taxonomies from the 'Document Type' taxonomy (located to the right of the text editor when creating group content).