Tutorial
Registering
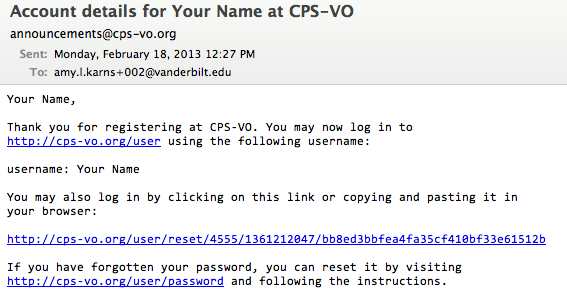
If not logged in, you should see log in form at the top of each page on the CPS-VO. A window with a "Click here to register!" is highlighted beneath the log-in field. Click that and follow the instructions in this tutorial for "Creating an account".
Logging in
If not logged in, you should see log in form at the top of each page on the CPS-VO. Type your registered username and password to log in.
Refreshing your password
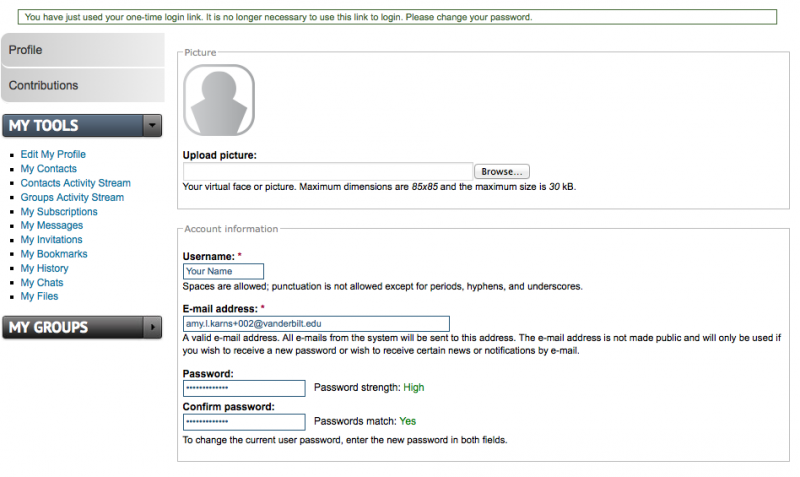
A window with "Forgot username or password?" is highlighted beneath the log-in field. Click that and provide either your VO username or the email address that is tied to that username. You will next be sent an email with a one-time hyperlink that will take you to a form to reset your password. Be sure to check your spam folders, if you don't see the email in your inbox.
The CPS-VO aims to encourage study of the body of documents housed here and facilitate collaboration through use of the many tools it provides. This tutorial is intended to help users get acquainted with the portal and how to use it. Feel free to refer back often by clicking the question mark in the top navigation of each page.
Navigate this Tutorial
Use the arrows at the bottom of each tutorial page to navigate forward and backward page by page. Clicking on the link pointing to the left navigates back one page. Clicking on the link pointing to the right advances one page. Selecting "up" takes you a step up within the table of contents. To the left of each page you will find an outline which you can use to jump to other sections of the tutorial.
Create an Account
Memberships in web sites are often required because the services that they provide are driven by information that the member needs to manage. Keeping track of passwords is a burden, but receiving the added services can be worth it.
You will need a valid email address to become a member of the CPS-VO.
User Roles
Global Roles
"Anonymous Users" are users who are not logged in (or have not yet joined the CPS-VO). They can browse the site, but are not able to contribute content to the portal.
"Authenticated Users" are entry level users with the most basic level of membership. Authenticated users can join groups but must request 'Trusted User' status before contributing content to the global repository, calendar, and forums.
 "Trusted Users" are Established Community Members (indicated by the badge shown to the left) - a member who has been vetted and approved by site managers and site administrators. This trusted member will then be able to post information to the CPS-VO home page. CPS-VO members can apply for elevated "trusted user" status via the "Contact Support" link under the "Home" tab in the global menu at the top of every CPS-VO page.

 A "Site Moderator" (indicated by the badge shown to the left) is a member who has permissions to modify and delete content and administer comments on the CPS-VO.
 A "Site Administrator" has global access to all VO content. This means that a Site Administrator has the privileges of a group manager and moderator in all groups. They can add/ remove members, broadcast messages, and create/remove group admins. Additionally, they can configure group services, add/ban group members, and also have full control over group content.
Group Roles
"Group Members" can contribute to the group repository by uploading files, posting videos, and creating events & news items. They can also contribute to the forums, conduct online meetings, and create projects and wiki pages. (join groups at cps-vo.org/og)
![]() "Group Moderators" do not have general administrative capabilities, but do have full control over your group's content. Therefore, while a mod will not be expected to manage the groups members/services, they will perform an editorial function. Moderators are responsible for grooming the content of your group and ensuring that publicly viewable content is appropriate, correct, and complete to your group's own standards.
"Group Moderators" do not have general administrative capabilities, but do have full control over your group's content. Therefore, while a mod will not be expected to manage the groups members/services, they will perform an editorial function. Moderators are responsible for grooming the content of your group and ensuring that publicly viewable content is appropriate, correct, and complete to your group's own standards.
![]() "Group Managers" have privileges and responsibility for activities such as:
"Group Managers" have privileges and responsibility for activities such as:
- Group Menu Structure - creating and deleting panel pages, configuring panel page publishing settings, posting content to panel pages.
- Group Membership - adding and banning group members, moderating membership requests, configuring member roles
- Group Taxonomy Structure - creating and managing group vocabularies.
- Group Forum Structure - creating forums, administrering froum privacy settings
- Broadcast Messages - emailing all group members with a copy of your message.
![]() "Primary Manager" of the group. Has all privileges of Group Moderators and Managers.
"Primary Manager" of the group. Has all privileges of Group Moderators and Managers.
Participate in Groups
The CPS-VO Portal provides extensive support for Special Interest Groups.
Exemplars of types of groups are:
- R&D SIGs
- Federal Agency
- PI Projects
- Websites for workshops and conferences
- Planning meeting groups for workshops and conferences
- Program committee groups for workshops and conferences
- Working groups
Groups may be formed to meet different needs. Typical use cases include:
- Planning R&D Workshops, Meetings, and Conferences
- Birds of a Feather (e.g. technical or policy issues)
- Archival of Proceedings
- Managing Research Projects
- Publicizing Research Results
- Competitions / Challenge Problems
- Open, Educational Resources
The services provided to Groups include:
- Customized Branding with a Configurable Dashboard/Homepage
- Configurable Security Policy
- Calendaring Services
- iCal Support
- Online, Desktop Sharing Meetings
- Meeting Invites
- A Virtual Filesystem (incl. revision control)
- Electronic Discussion Forums
- Wikis
- Group-specific Vocabularies (or 'taxonomies; for labelling documents; incl. associated, domain-specific Search engines)
- Email Broadcasting to Group Membership
- Customized Forms (e.g. a tailored attendee registration page for upcoming conference)
- Inviting Other Potential Members
- Creating Subgroups (i.e. hierarchical families of Groups)
Request to form a group by clicking here
Look for Groups
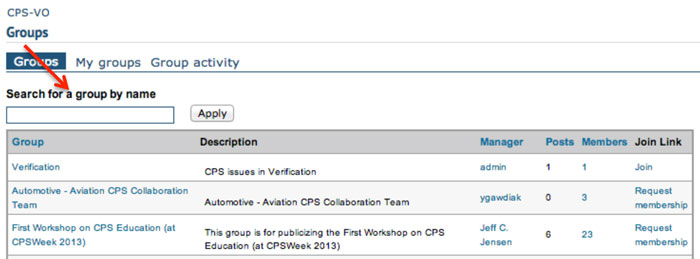
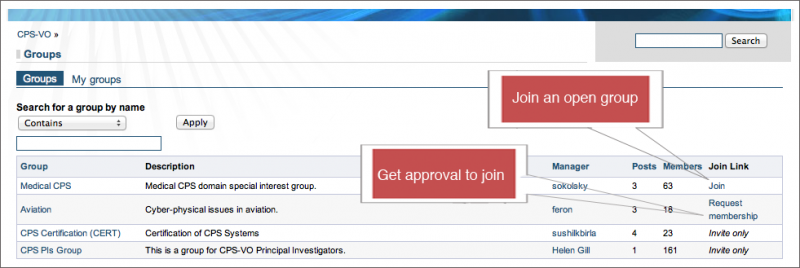
Groups are either public or private. The listing of public groups will show some basic information about the group (like the group name which links to the group's home page, a short description about the group, the group manager and the number of posts and members, and options for joining the group (covered in the next segment of this tutorial).
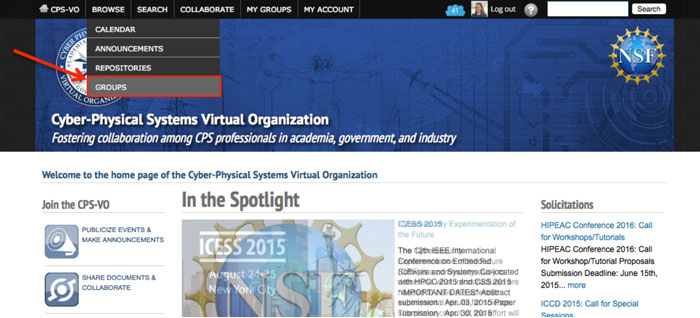
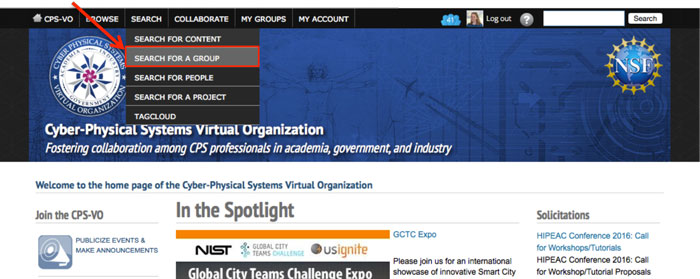
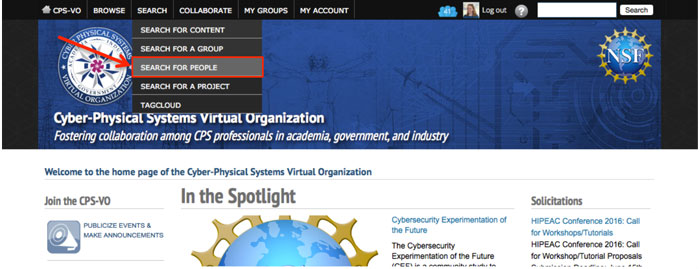
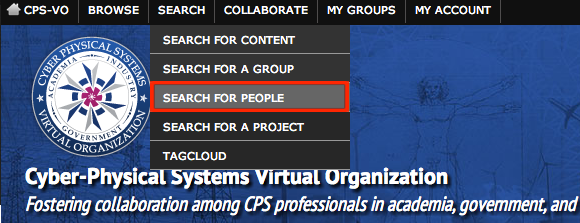
A guided search is also available under the global menu at the top of the CPS-VO home page.
The following steps show how to use the search menu to find a group:
Join a Group
Much of the collaboration services that this portal provides are based on groups. Groups are compiled of associated members.
Each Portal user can browse the list of the public groups or see a list of the groups that they belong to in "My Groups". My Groups is listed as a tab on the "groups list" page and also as a dropdown menu at the top of the website.
The following steps show how to join groups.
Leave a Group
Members of a group may leave the group at any time.
Leaving your group involves two steps.
Note: Administrators must keep in mind that they can only leave their group if there is at least one other administrator designated in the group. If there is not then they will not see the above "Leave this group" link.
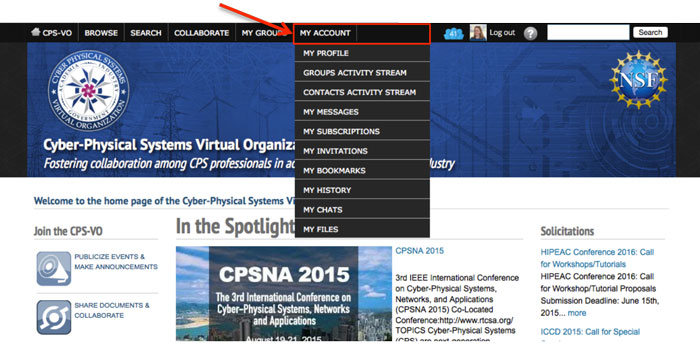
Explore 'My Account'
Edit Your Profile
Clicking the “Edit Profile” link in the “My Tools” toggle menu will take you to an area where you can edit your profile information.
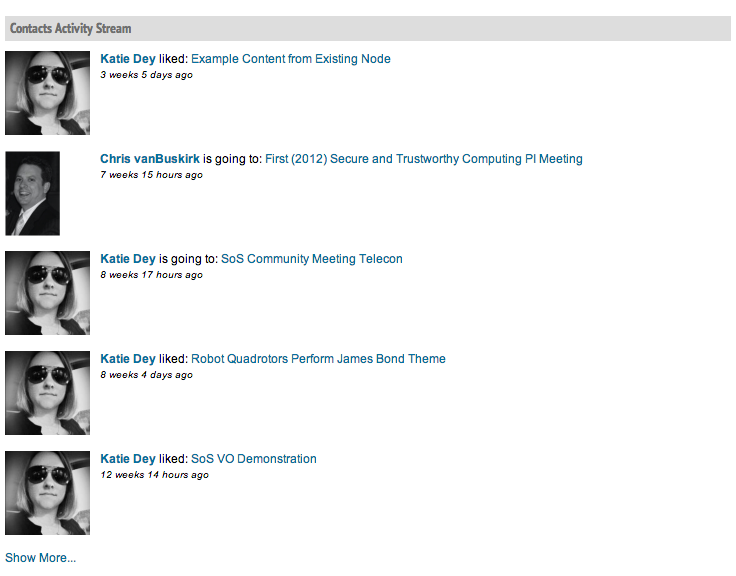
My Contacts
Clicking the "My Contacts" link in the "My Tools" toggle menu will take you to an area where you can view or remove your contacts.
Groups Activity Stream
The "Groups Activity Stream" shows beneath your profile information and can be found on your main profile page or by clicking on the "Groups Activity Stream" link in the "My Tools" toggle menu. The stream shows recent activity in the groups to which you belong.
Notifications
Notifications are updates to content you've subscribed to.
Types of content are: Events, Files, Forum Topics, Projects, News Items, Meetings, Pages, Posts, Web Forms, Wiki Pages.
My Messages
You will receive notifications according to the method you chose in your account settings - HTML Mail, Plain Text Mail, or via the VO Message center. If you choose to view your notifications via the VO Message center, you can see your notifications on your "Messages Page".
There are two ways to get to your Messages page.
My Subscriptions
 |
|
 |
|
 |
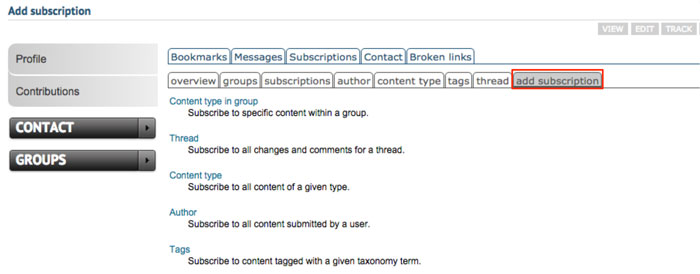
The "Subscribe to" link takes you to the subscription confirmation page, where you can choose how often to check whether the item or its comments have been updated. If any change is noticed, an email will be sent to the email address you registered with. |
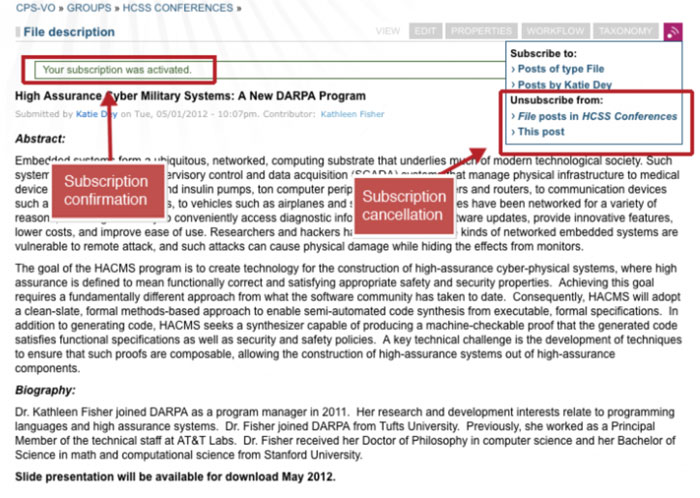 |
After subscribing you will see a confirmation in a green outline box. The "Subscribe to: This Post" link then changes to "Unsubscribe from: This Post" for canceling the subscription. (Note: You can also manage all your subscriptions via your "My Account" page by selecting the "My Subscriptions" link in the left sidebar toggle menu as described here.) |
Update group subscriptions
Follow the instructions below for more granular control of your subscription notifications.
 |
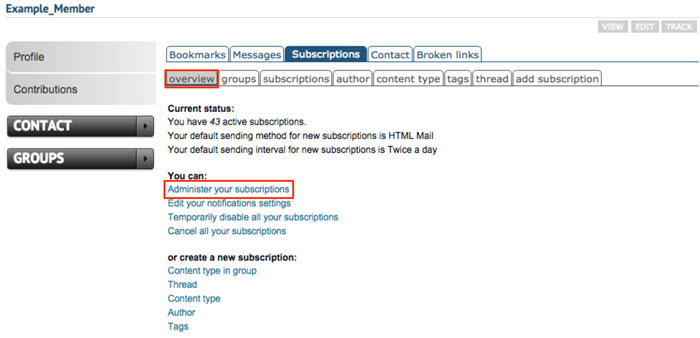
Go to your subscriptions overview page by clicking the “Subscriptions” tab. This is the page where you can manage all of your subscriptions and notifications settings on a granular level.
|
 |
Click on "Administer your subscriptions" (outlined in red) to configure your subscriptions. |
 |
Filter your subscriptions by status, type, method or interval. Edit settings or delete a subscription with the "edit" or "drop" links to the far right of each subscription in the operations column of the table. |
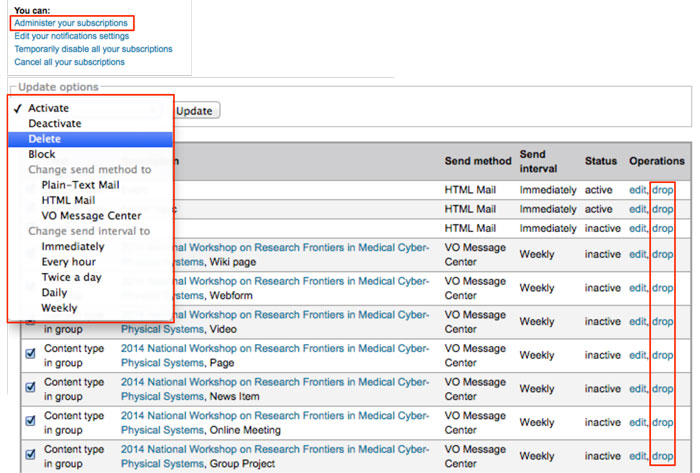 |
You can configure multiple subscriptions by checkmarking selections and choosing an action from the dropdown menu. NOTE: "Delete" in the bulk operations dropdown menu is equivalent to the "drop" link in the table rows. |
|
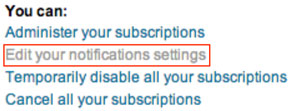
Change your default notification settings by clicking "Edit your notifications settings" in the "You can:" list.
Scroll down to the "Messaging and Notifications settings" . Use the dropdown menus to change your settings (as described in the notifications page). |
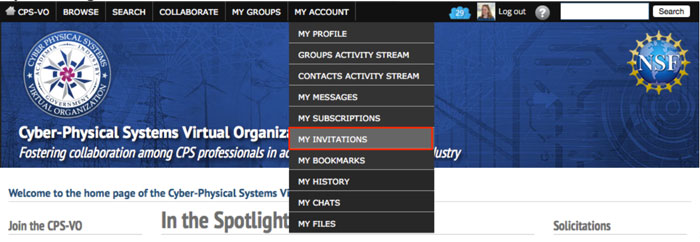
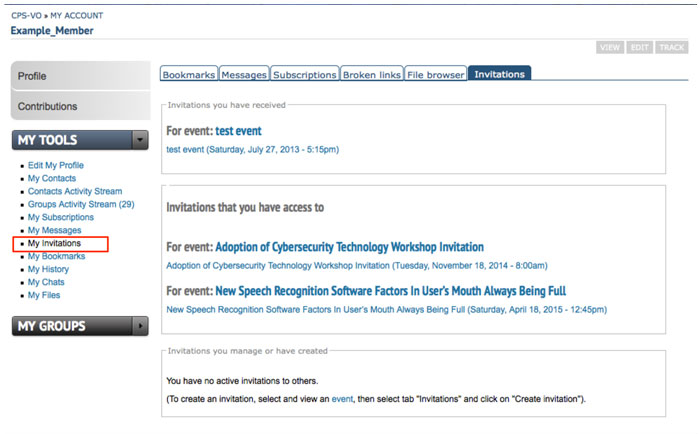
My Invitations
You can view your meeting and event invitations two different ways.
My Bookmarks
You can view your bookmarks two different ways.

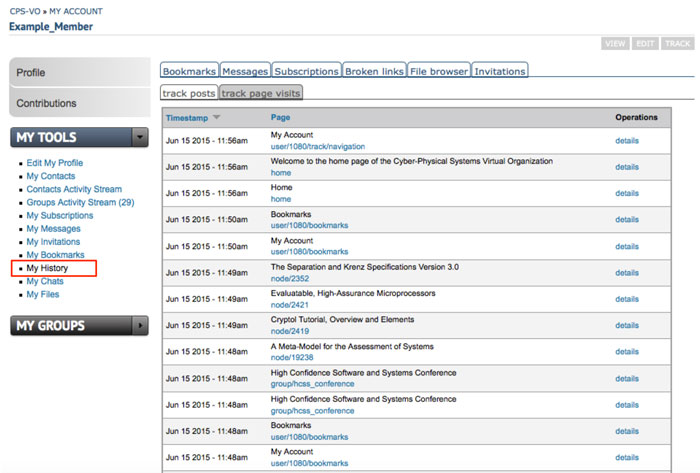
My History
You can view history of the pages you have visted on the CPS-VO in two different ways.
My Chats
You can view history of your chat conversations in two different ways.
My Files
You can upload and edit media files to use in posts and pages that you create.
(e.g. logos, photographs, videos and compressed files)
- Maximum file size per upload: 10 MB
- Permitted file extensions: gif, png, jpg, jpeg, mp4, tgz
- Maximum image resolution: 800x600
- Maximum number of files per operation: 1
There are 3 ways to get to the file browser.
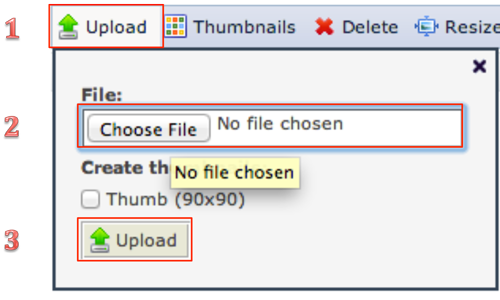
Once you are in the file browser, Upload a file via the "Upload" button.
Find Posts and Publications
Structures and discovery mechanisms for the items in the CPS-VO are provided to help find them. These are based on vocabulary tagging and term labeling. There are file browsers and search functions that aid in finding those items that you are looking for. An important distinction between the file browsers in the CPS-VO and one on your computer is that the same item maybe found under different folders. This increases the chances for you to find items that have been placed in more than one category. There are two main search engines that also help you to find material. One looks for some text in descriptions and the other looks for labels.
Browse Documents
The portal organizes files in a repository according labeling terms. The labeling terms form a taxonomy that arranges the terms as a tree structure, similar (but not the same) as a folder hierarchy. When a file has one or more labeling terms, the file will be shown in the tree at those nodes that have the same labeling terms. In other words, a file may be found using more than one path in the tree. For example, a report on cybersecurity research may be found by navigating through Document Type -> Report path or Topics -> Foundations -> Security path.
 |
Step 1: Select "Repositories" under the "Browse" tab in the global menu on the CPS-VO home page to go to the archives. |
 |
Step 2: Click on the folders to locate documents. |
Tags, Terms and Labels
Taxonomies of terms are used for organizing content. Taxonomies are a set of 'Vocabularies' which can contain 'Terms'. Because of their impact on finding and accessing items on the site, creating and modifying taxonomies can only be done by Site and Group Administrators. However, the description of this process is helpful for all Portal users. Users posting content to the portal should tag content with relevant terms.
SEARCHING BY TERMS
Terms associated with content can be found below the content as clickable links. The example below is a file in the SURE group tagged with a series of terms created within that group. The term "Evaluation and experimentation" is highlighted as the mouse hovers over the link. Clicking on this link will take you to a page listing all the materials tagged with that term.

DEFINING VOCABULARIES AND TAXONOMIES
- Each vocabulary consists of a set of terms.
- A site can have an unlimited number of vocabularies each containing an unlimited number of terms.
- Within a taxonomy, terms can be ordered into hierarchies.
- Vocabularies may be designated as Free tagging in which users creating new content don't have to classify it with terms from a "controlled vocabulary", previously defined. Instead users can freely define keywords, or "tags".
- Vocabularies can be set to allow terms to define related terms. This function is similar to "See also" in a dictionary.
- Vocabularies define whether users may attach only a single term to a content node or whether users may attach multiple terms to a content node.
- Topics – providing terms for major CPS domains and research areas
- Keywords – including free tags selected by users who uploaded content
- CPS-Events – providing terms for finding CPS Events organized by year
- Document Type – categorizing CPS documents uploaded to the Portal
- Document Source – categorizing the source of content
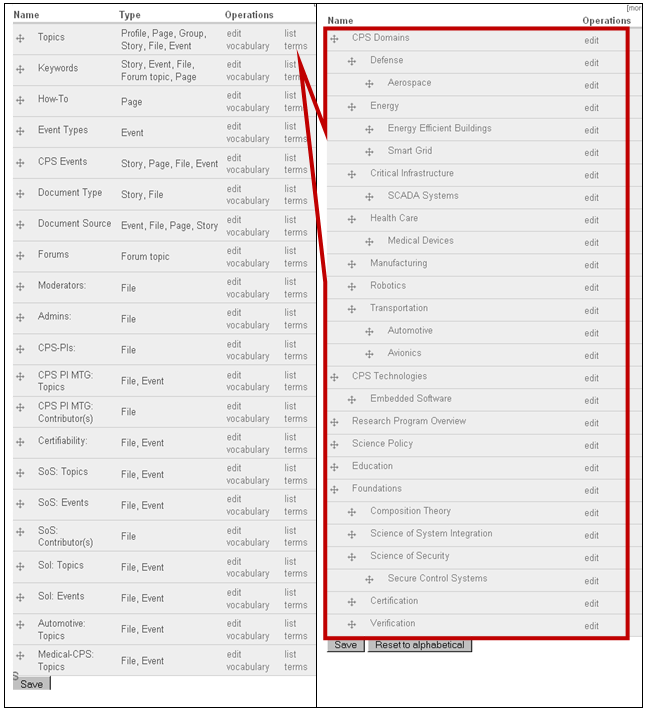
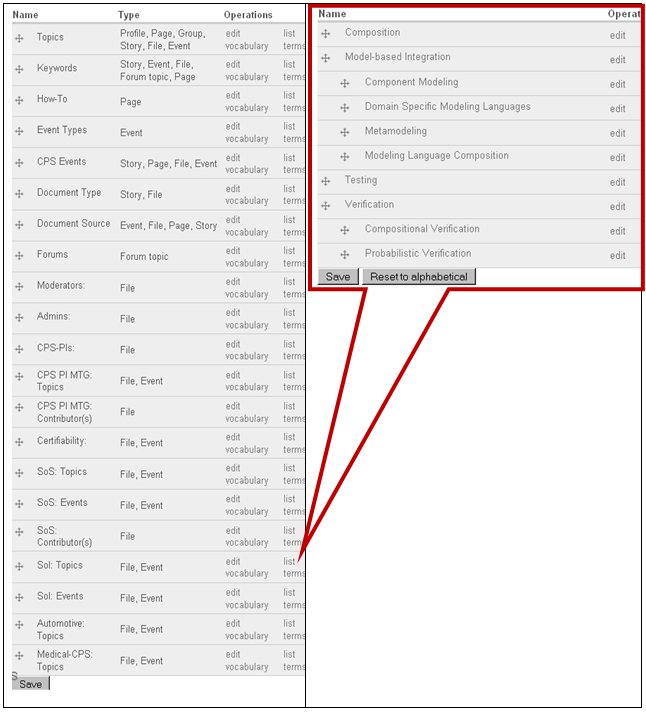
Site-wide vocabularies (‘Topics’, ‘Keywords’, ‘CPS Events’, ‘Document Type’, ‘Document Source’) are generic and can be used for labeling content in all groups. Group vocabularies (E.g. SoI: Topics; the ‘Topics vocabulary of the Science of Integration Group) are specific to individual groups (and there is no automatic protection against conflicting use of terms). It is recommended (but not enforced) that each Group sets up a ‘Topics’ vocabulary, which is the refinement of the Group’s topic area named in the site-wide ‘Topics’ vocabulary. For example, ‘SoI: Topics’ is a refinement of the Science of System Integration term in the site-wide ‘Topics’ vocabulary:
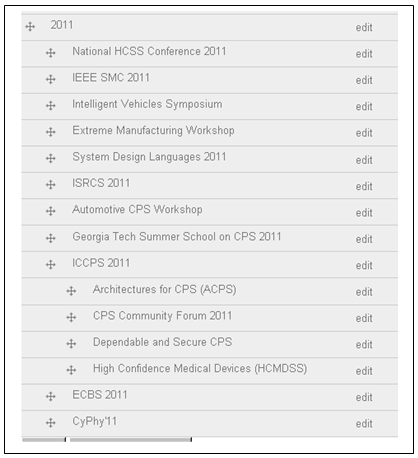
The ‘CPS Events’ vocabulary has unique role among site-wide vocabularies. New CPS Events that can count on community-wide attention are listed as a new term in this vocabulary which is categorized by years. When content is created that belongs to CPS Events (such as a Calendar Event, Announcement, Call for Papers, or event related supplemental documents) its term can be used for labeling. The Year 2011 segment of the CPS Events vocabulary is shown below.
NOTE: In the files section of your group: Vocabularies are identified by an arrow icon. Terms are identified by a folder icon.
Taxonomic Search
The CPS Portal includes two search facilities: Keyword search and Guided Search. The keyword search finds strings in item descriptions and the item body. The guided search looks for Portal items based on the label it has been marked with. Some items may have been marked with more than one label allowing the guided search to be refined. The organization of labels and terms is called taxonomy.
Search Popular Terms
Portal items that are associated with a label can be found from a tag cloud. A tag cloud is an image of words whose sizes are varied by how many associations it has. They can be clicked through to bring up the list of items that are marked with them.
 |
Step 1: Select the "Tagcloud" link under "Search" tab in the global menu on the CPS-VO home page. |
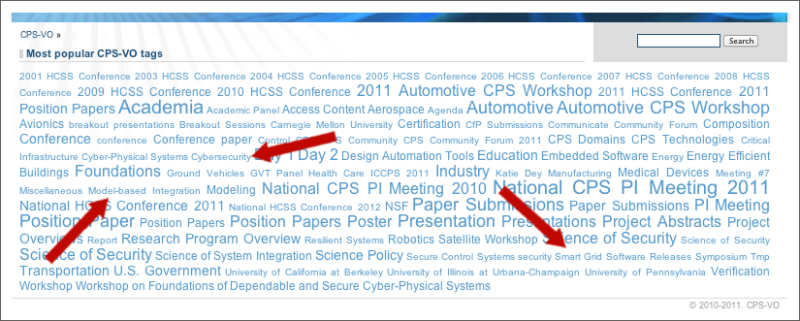 |
Step 2: Click on the labels to bring up the related content. |
View Events
The CPS-VO calendar displays event notices that can be clicked through for more information on them. Events can have a specified audience, in which case only for those group members will the notices show. If no audience is specified then they will be global events visible by all authenticated members of the portal.
Collaborate with Colleagues
Listening and allowing others to be heard makes for a productive outcome. Facilitating this is essential to advance our goals. Support for working with and building groups is a way to accomplish such success. Users are provided with services that set up and enable infrastructure for groups working together.
Seek out Colleagues
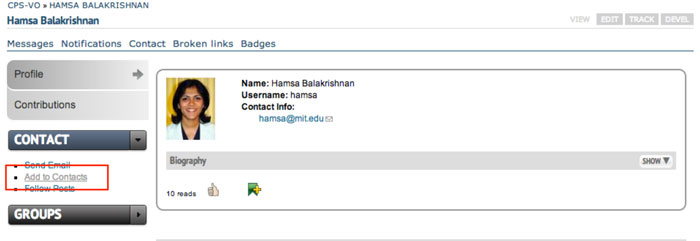
CPS-VO members can be searched by first name, last name, topics, keywords and author.
Contribute to Forum Discussions
Each group has a forum where active discussions can be started, commented on and viewed. A privilege of group membership is that forum discussions can be initiated. Group administrators may make discussions inactive.
Forums provide a place where discussions can be tracked. These discussions come in the form of initiated topics. Forums can be made public or private within a group. A forum must first exist before a topic can be initiated because the topic must be placed inside a forum. Only the initiator of a forum topic and group administrators have permissions to edit the topic content. After discussions are opened in a forum they may be commented on by group members.
 Video example
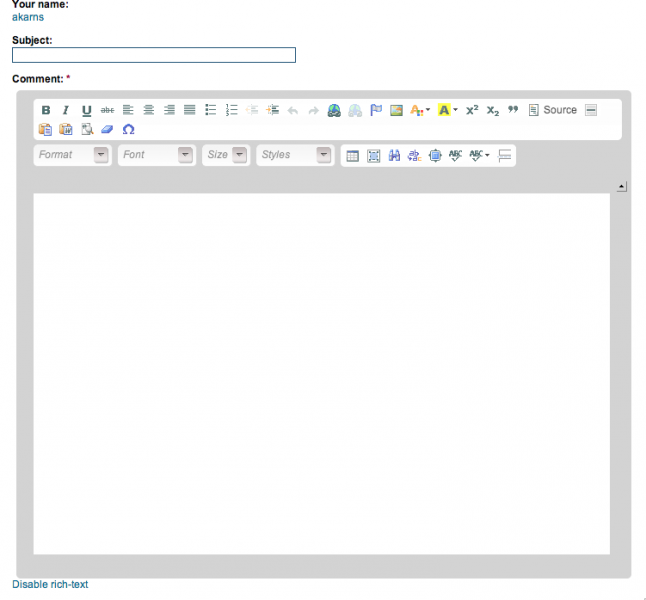
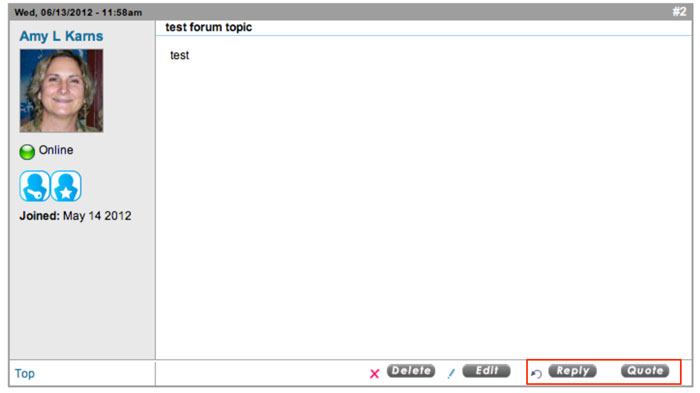
To participate in a forum discussion, use the following steps:
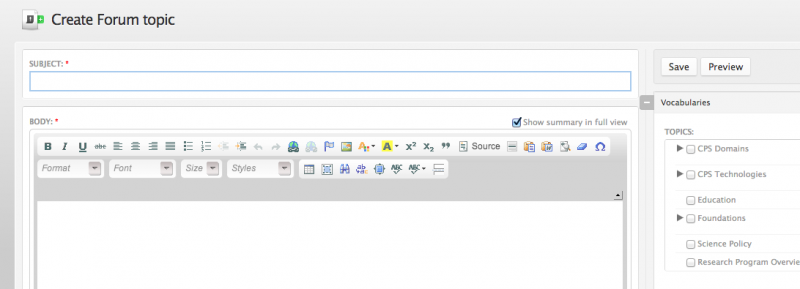
There are two ways in which to start a new forum topic:
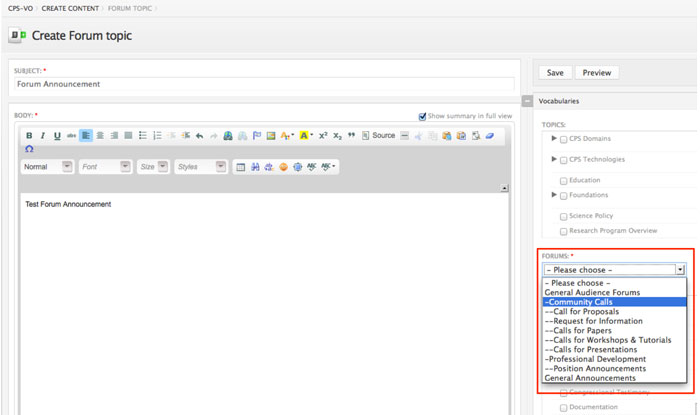
Create a Global Forum Announcement
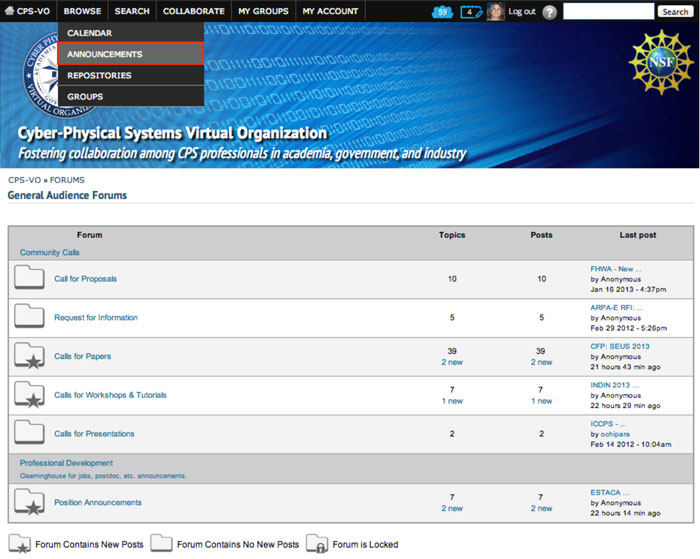
There may be announcements you want to broadcast to the global forums on the CPS-VO.
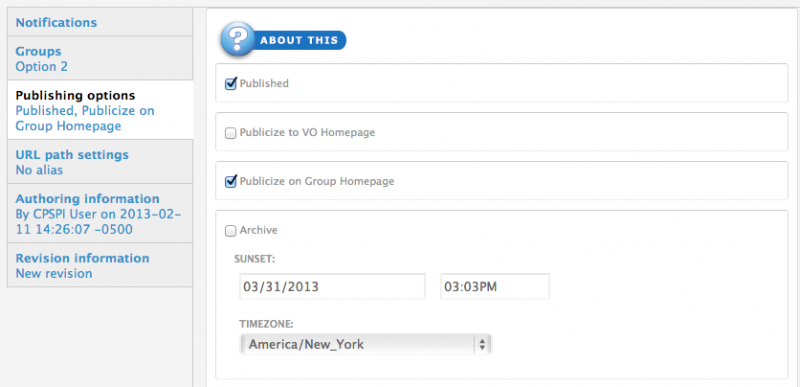
About Publishing Options
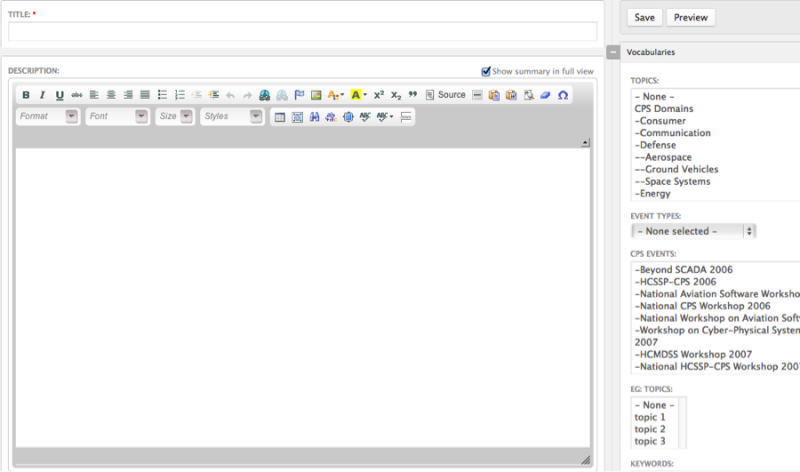
- Publish: Uncheck this option if you don't wish for this content to appear on the VO yet. Useful for saving drafts of content that requires editing before going live/published.
- Publicize to Entire VO: Selecting this option will place this post on the VO homepage. Exercise caution when using this option.
- Publicize on Group Homepage: This option will place your post on your group's homepage in the corresponding section (Recent News, Upcoming Events, etc…)
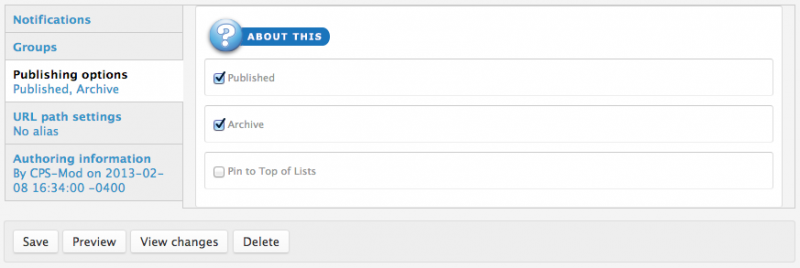
- Archive: Clicking the archive checkbox hides this content from global and group home pages. However, the content will still be accessible in other areas of the site. Unchecking the archive checkbox allows this content to display on global and group home pages.
- Sunrise: Setting a sunrise date will de-archive this content at the set date and time (midnight is the default if a time is not set). The content will then display on global and group home pages.
- Sunset: Setting a sunset date will automatically archive this content at the set date and time (midnight is the default if a time is not set). The content will no longer display on global and group home pages after the sunset date/time, but will still be accessible in other areas of the site.
- Display in Slideshow: Will place this post, along with its image (or video), in a slideshow. Must be used with either Publicize to Entire VO or Publicize on Group Homepage options.
- Pin to Top of Lists: This option will make this post appear at the top of content listings, regardless of any other settings. Useful for denoting important content or content that has a "call to action" associated with it.
Create a Calendar Event
CPS-VO events are postings in the calendar. Events have important details such as a Title, a start date, a location. It may also have a description and a URL. Events also have "Audiences". Audiences are CPS-VO groups and you may be a member to any number of them. If no audience is marked for an event or it is marked public then it will only show in the global calendar for all CPS-VO users. If you have selected groups in the audience section, the event will show on the selected group calendars and activity stream pages.
To post events in the calendar follow the instructions outlined in steps 1 and 2 below.
STEP 1:
STEP 2: Before submitting the event details it is suggested that you fill out as much information as possible about your posting. Required items are marked with a *red star. (Details below):
Use the advanced options to select specific months and days to repeat on.
Promote and publish news items to the group home page in the "events" section and/or spotlight slideshow.

About Publishing Options
- Publish: Uncheck this option if you don't wish for this content to appear on the VO yet. Useful for saving drafts of content that requires editing before going live/published.
- Publicize to Entire VO: Selecting this option will place this post on the VO homepage. Exercise caution when using this option.
- Publicize on Group Homepage: This option will place your post on your group's homepage in the corresponding section (Recent News, Upcoming Events, etc…)
- Archive: Clicking the archive checkbox hides this content from global and group home pages. However, the content will still be accessible in other areas of the site. Unchecking the archive checkbox allows this content to display on global and group home pages.
- Sunrise: Setting a sunrise date will de-archive this content at the set date and time (midnight is the default if a time is not set). The content will then display on global and group home pages.
- Sunset: Setting a sunset date will automatically archive this content at the set date and time (midnight is the default if a time is not set). The content will no longer display on global and group home pages after the sunset date/time, but will still be accessible in other areas of the site.
- Display in Slideshow: Will place this post, along with its image (or video), in a slideshow. Must be used with eitherPublicize to Entire VO or Publicize on Group Homepage options.
- Pin to Top of Lists: This option will make this post appear at the top of content listings, regardless of any other settings. Useful for denoting important content or content that has a "call to action" associated with it.
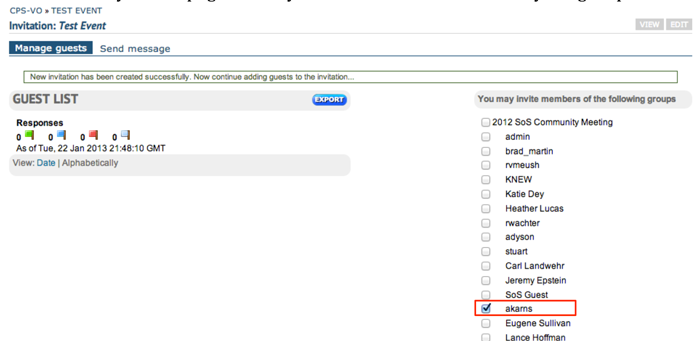
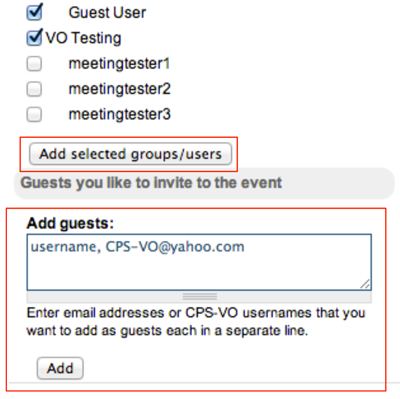
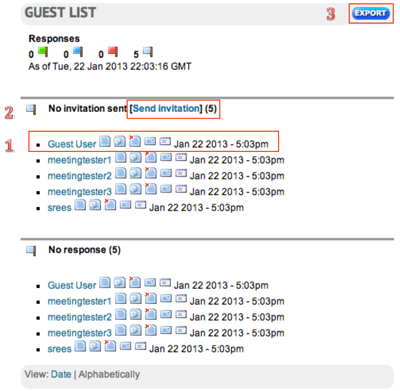
Create Event and Meeting Invitations
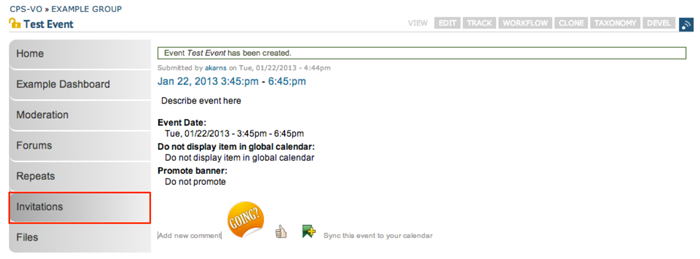
After you have created your event or online meeting you will want to invite others to attend.
Upload a File
A File can belong to the general CPS-VO portal / community or it may be associated with one or more groups. Submission of a file can be made through the Primary Menu (see Step 1 figure) or when within the context of a Group, the primary menu disappears, and group-specific file upload mechanism appear (details are provided in the following section). If a file is submitted through the primary menu then the audience by default will be for all site users unless the Audience is specifically marked. If a file is submitted through the group browser then the default audience is that group. In this case additional groups can also be marked to see the file so that the file is cross-posted in multiple groups concurrently. Additionally, files may be marked Private so that only members of the group have access, or it can be checked as Public and thus visible to all site users.
 Upload a File -Video example
Submit a file from the global menu either as public for all CPS-VO users or to select groups
Upload a file within a group
 Upload a file within a Group - Video example
Upload multiple files within a group using the bulk uploader
 Bulk Uploader - Video example
Link to a term within a folder
 |
Step 1: Determine the node ID of the group (which can be found by hovering over the “edit group button”). |
 |
Step 2: Select the gray “taxonomy button” to navigate into the list of group vocabularies. |
 |
Step 3: Select “list terms” to the right of its vocabulary parent to go to a list of its terms. |
 |
Step 4: Scroll to the target term by navigating to that term in the taxonomy listing and hover over the linked name to determine its node ID. |
 |
Step 5: Provide a link to the term following this syntax: node/{groupid}/browser?target_term={termid} |
Activity Messaging
The Notification service allows you to subscribe to notifications of updates to items (such as Events, Files, etc.). For example, you will receive an email each time the author updates a document to which you have subscribed or when details about an event change.
Below are the steps demonstrating how manage subscriptions.
 |
Step 1: To receive notifications about updates and new comments on the item, select the "Subscribe to: This post". If you want to subscribe to posts by the authors of the item, use the "Subscribe to: Post by USERNAME" link. |
 |
Step 2: The "Subscribe to" link takes you to the subscription confirmation page, where you can choose how often to check whether the item or its comments have been updated. If any change is noticed, an email will be sent to the email address linked to your account. |
 |
Step 3: After subscribing you will see a confirmation in a green outline box. The "Subscribe to: This Post" link then changes to "Unsubscribe from: This Post" for canceling the subscription. (Note: You can also manage all your subscriptions via your "My Account" page by selecting the "My Subscriptions" link in the left sidebar toggle menu as described here.) Read more about managing your subscriptions from your Account |
An exemplar email is shown below. Click on the hyperlink provided in the email to navigate to the content that has been updated.

Logging and Viewing Revisions
A revision is saved each time content is edited. Add a log message to help identify changes made to the content.
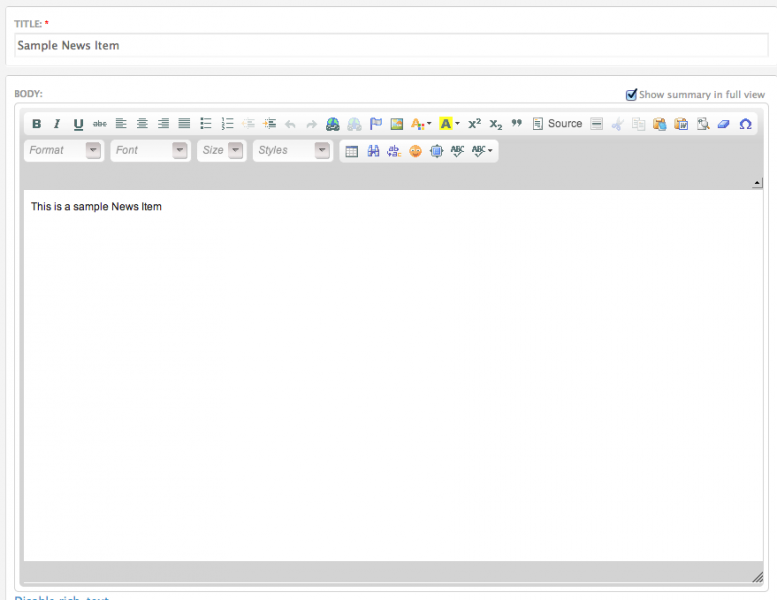
Create a News Item
As a member of a group you can post news items which will show up in the activity stream and can be set by the group manager to show up in the Spotlight Slideshow and the Recent News section of the group's home page.
For Moderators and Managers:
To edit publishing options on a news item:
About Publishing Options
- Publish: Uncheck this option if you don't wish for this content to appear on the VO yet. Useful for saving drafts of content that requires editing before going live/published.
- Publicize to Entire VO: Selecting this option will place this post on the VO homepage. Exercise caution when using this option.
- Publicize on Group Homepage: This option will place your post on your group's homepage in the corresponding section (Recent News, Upcoming Events, etc…)
- Archive: Clicking the archive checkbox hides this content from global and group home pages. However, the content will still be accessible in other areas of the site. Unchecking the archive checkbox allows this content to display on global and group home pages.
- Sunrise: Setting a sunrise date will de-archive this content at the set date and time (midnight is the default if a time is not set). The content will then display on global and group home pages.
- Sunset: Setting a sunset date will automatically archive this content at the set date and time (midnight is the default if a time is not set). The content will no longer display on global and group home pages after the sunset date/time, but will still be accessible in other areas of the site.
- Display in Slideshow: Will place this post, along with its image (or video), in a slideshow. Must be used with either Publicize to Entire VO or Publicize on Group Homepage options.
- Pin to Top of Lists: This option will make this post appear at the top of content listings, regardless of any other settings. Useful for denoting important content or content that has a "call to action" associated with it.
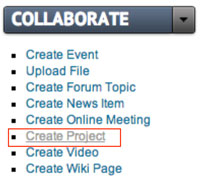
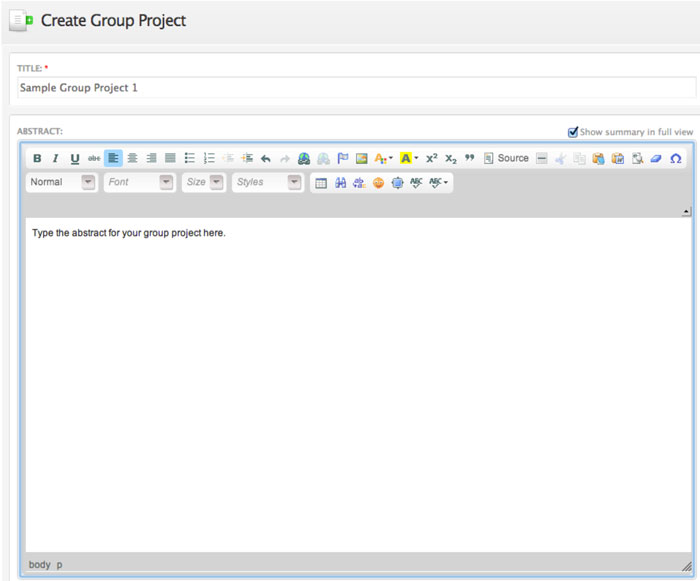
Create a Group Project
Your group may have a "Projects" page where you can share your project within that area of interest.
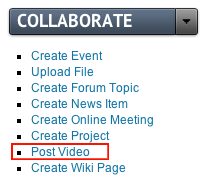
Post a Video
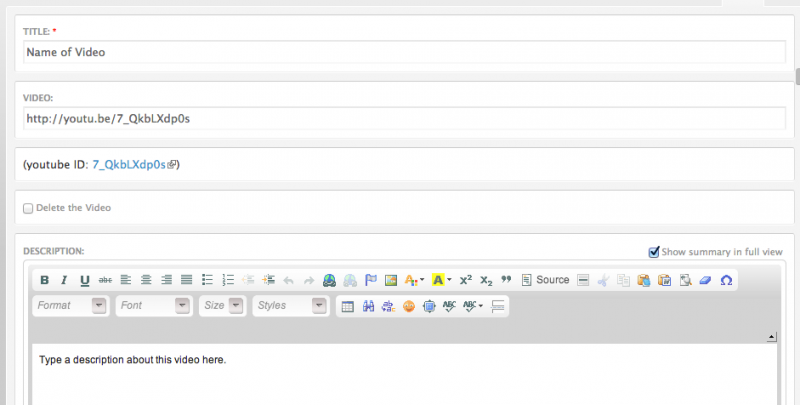
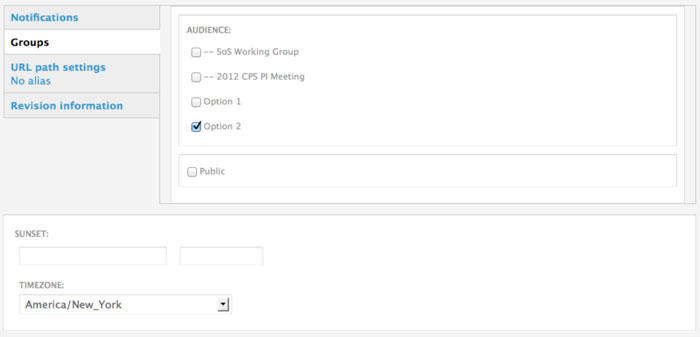
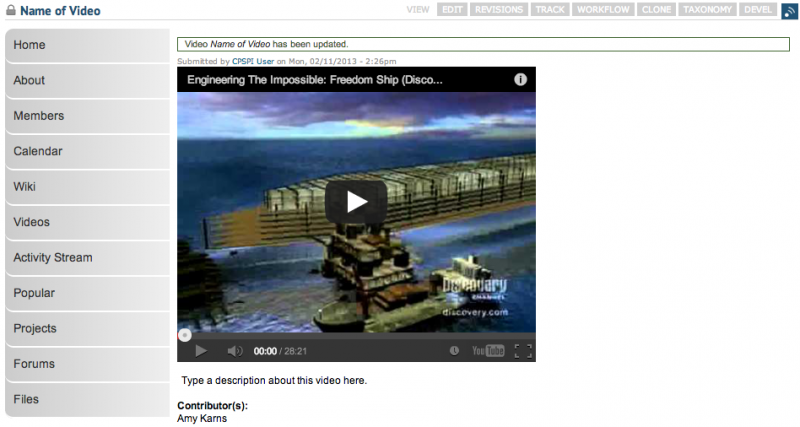
Videos can be shared from TED, Vimeo, or YouTube.
Setting a video as a Featured Video
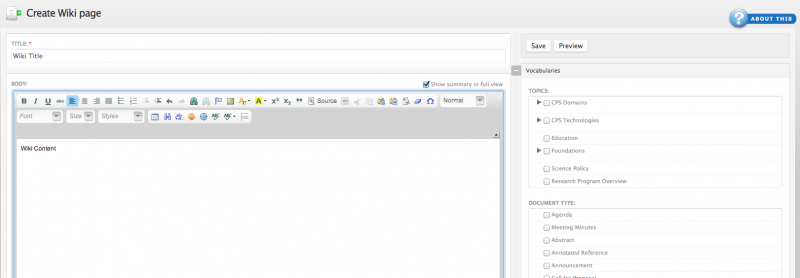
Create Wiki Pages
If the group manager has set up a wiki feature, group members can create wiki pages. (Managers see the tutorial page: "Creating a Wiki" for instructions on adding the wiki feature to your group.)
 Create Wiki Pages - Video example
There are 2 different ways for users to create a wiki page.
1. Create a wiki page from the "Collaborate" menu

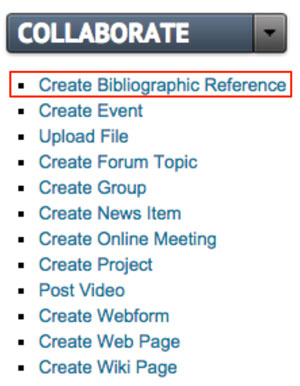
Create a Bibliographic Reference
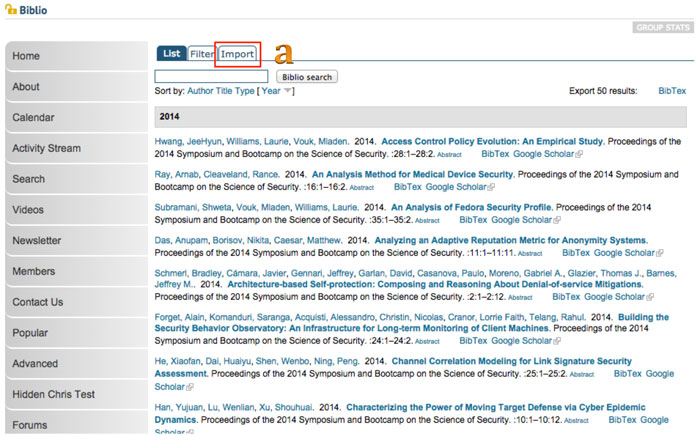
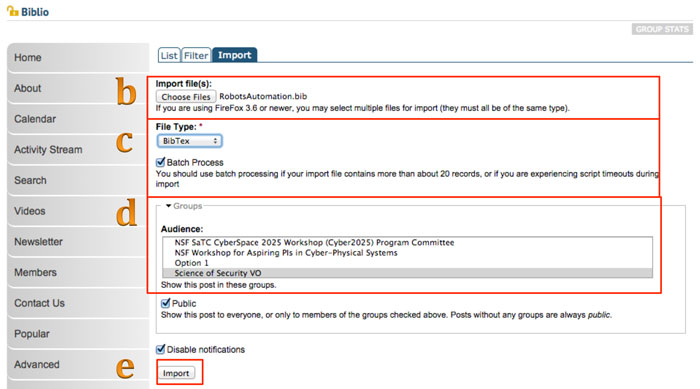
As a member of the CPS-VO, you can create a bibliographic reference that can be added to the groups of which you are a member. If you are a "Trusted User", you have permissions to import a batch of bibliographic references using a BibTeX file.
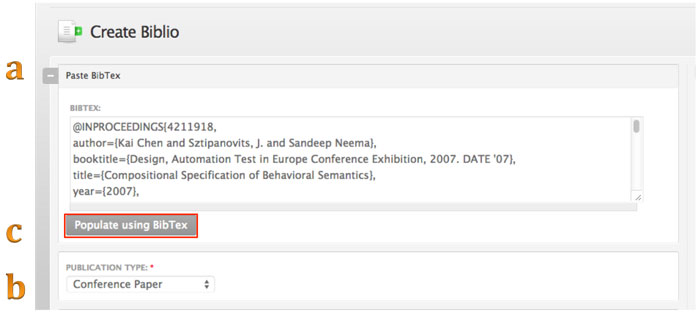
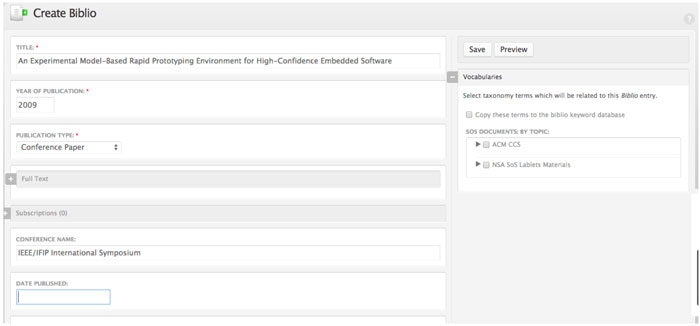
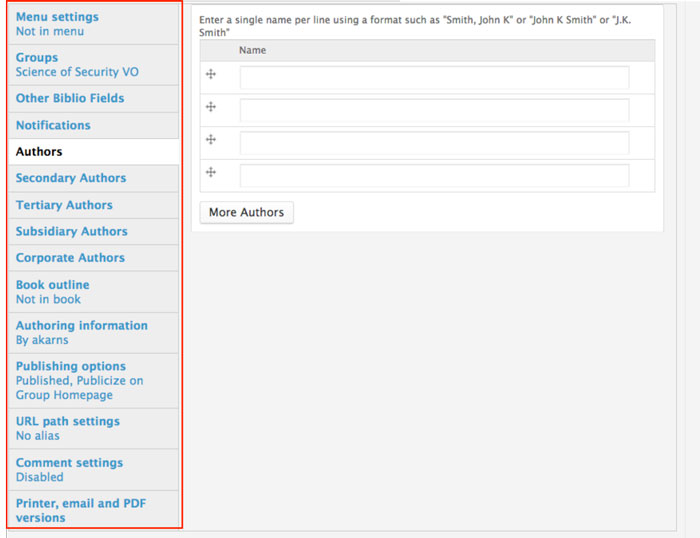
You can create single bibliographic references by following the instructions in the table below.
Trusted users can import a BibTeX file to create a batch of bibliographic references. You should use batch processing if your import file contains more than about 20 records, or if you are experiencing script timeouts during import. See instructions in the table below.
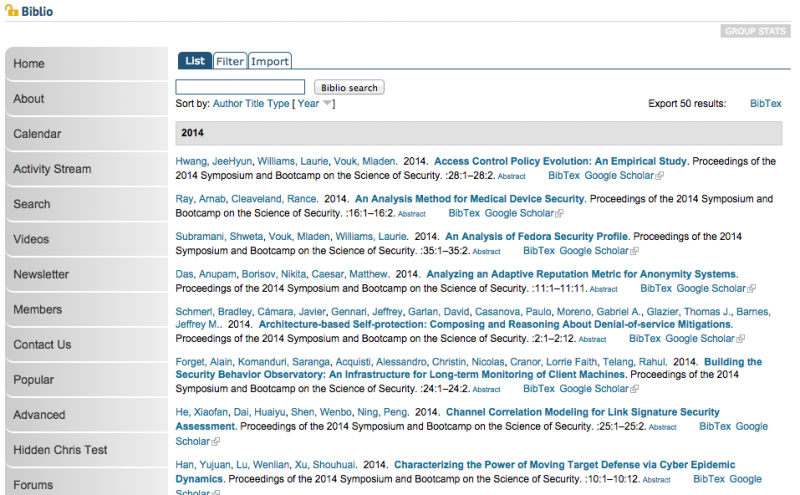
Your multiple bibliographic references will now show up on the main biblio page.
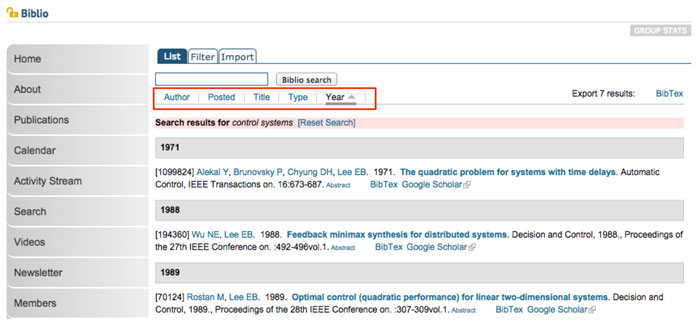
Search, Sort, and Filter Biblios
Bibliographic references can be searched by typing keywords into a search field. The search can be further sorted by author name, date posted, content type, or year. The filter feature allows you to show items from pre-populated menus categorized by author, type, term, year and keyword.
Conflict Detection
Sometimes more than one person simultaneously attempts to edit a node. Conflict Detection enables detection and assists resolution of this conflict to users with permissions to this feature.
Another person trying to edit a node that is already being edited will get a warning message identifying the original user (lock owner) and options either to break the lock or to subscribe to be notified when the other user’s session ends.

DOIs and Zenodo
The CPS-VO has integrated with an archive and DOI generation service provided by Zenodo. Zenodo refers to these entities within their API as depositions. This integration is still being actively improved, with several enhancements planned in the future. We also have added the ability to list your own DOI, if you have previously published content that has been also made available here on the CPS-VO.
All functions described in this section of the documentation can be accessed using the 'DOI' tab, which will only be visible if this feature is available for the content being displayed.
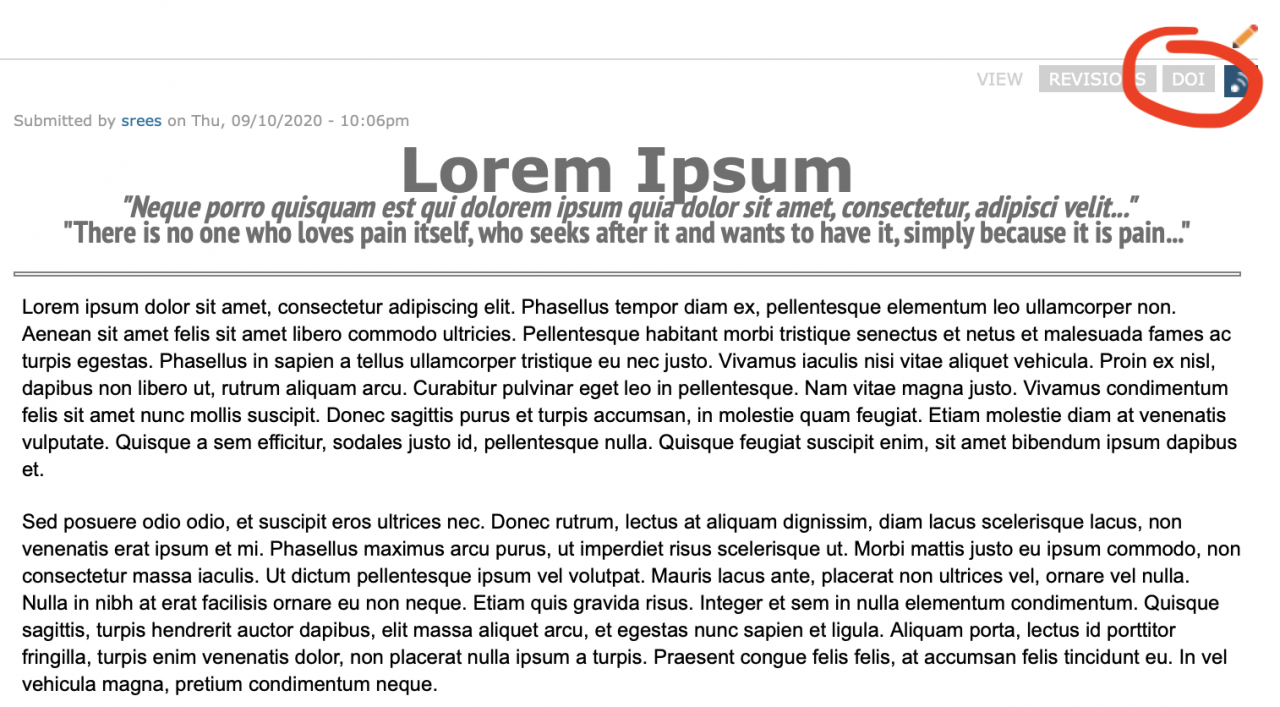
Currently, the types of content that we have the Zenodo service enabled for is limited, but we do plan to expand which content types support Zenodo. Please reach out to us with the contact form if you have a specific question or request for support regarding our Zenodo integration.
Viewing DOI information
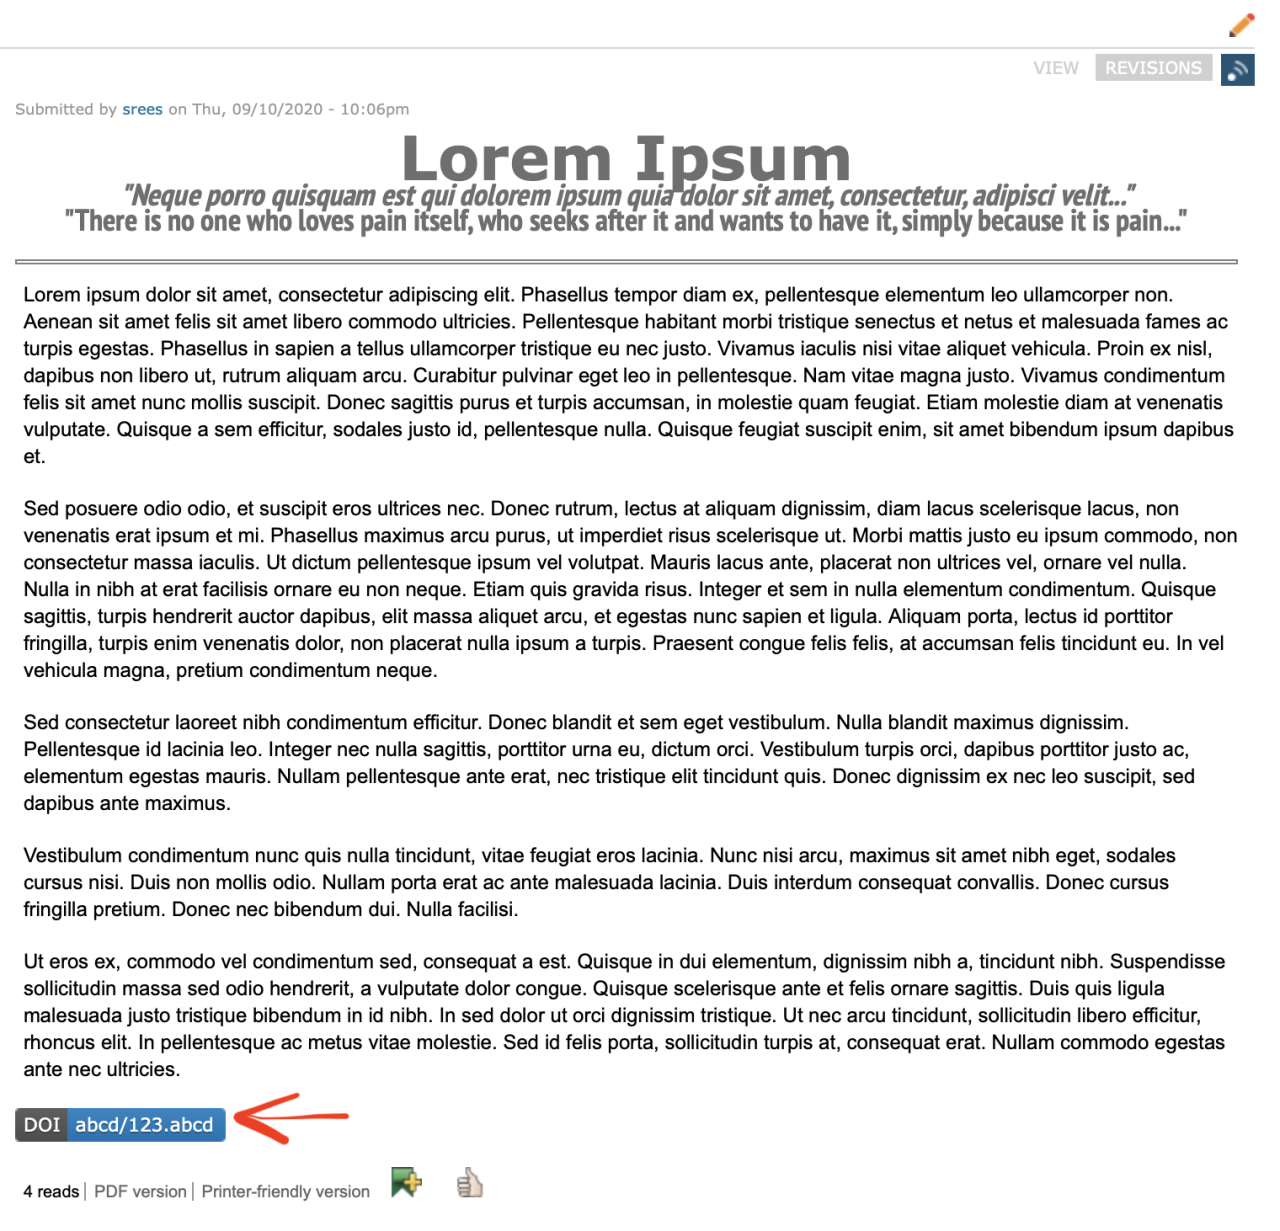
Content on the CPS-VO that has provided related DOI information will display a DOI tag at the bottom of the node as marked in the image below with the red arrow. People who wish to cite this content can utiliize this DOI information or can click on the tag to be taken to DOI.org to view more detailed information.
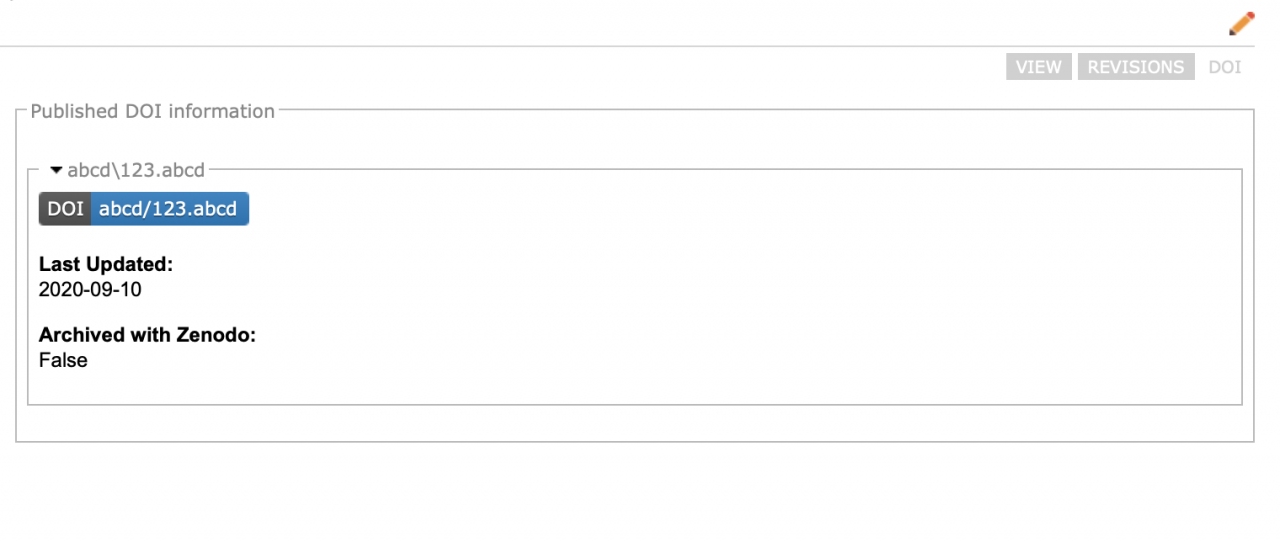
If your user account has permission to view extended details of the DOI information, you can access these details via the Zenodo tab at the top of the content. Pre-existing DOi information has very little extended information:
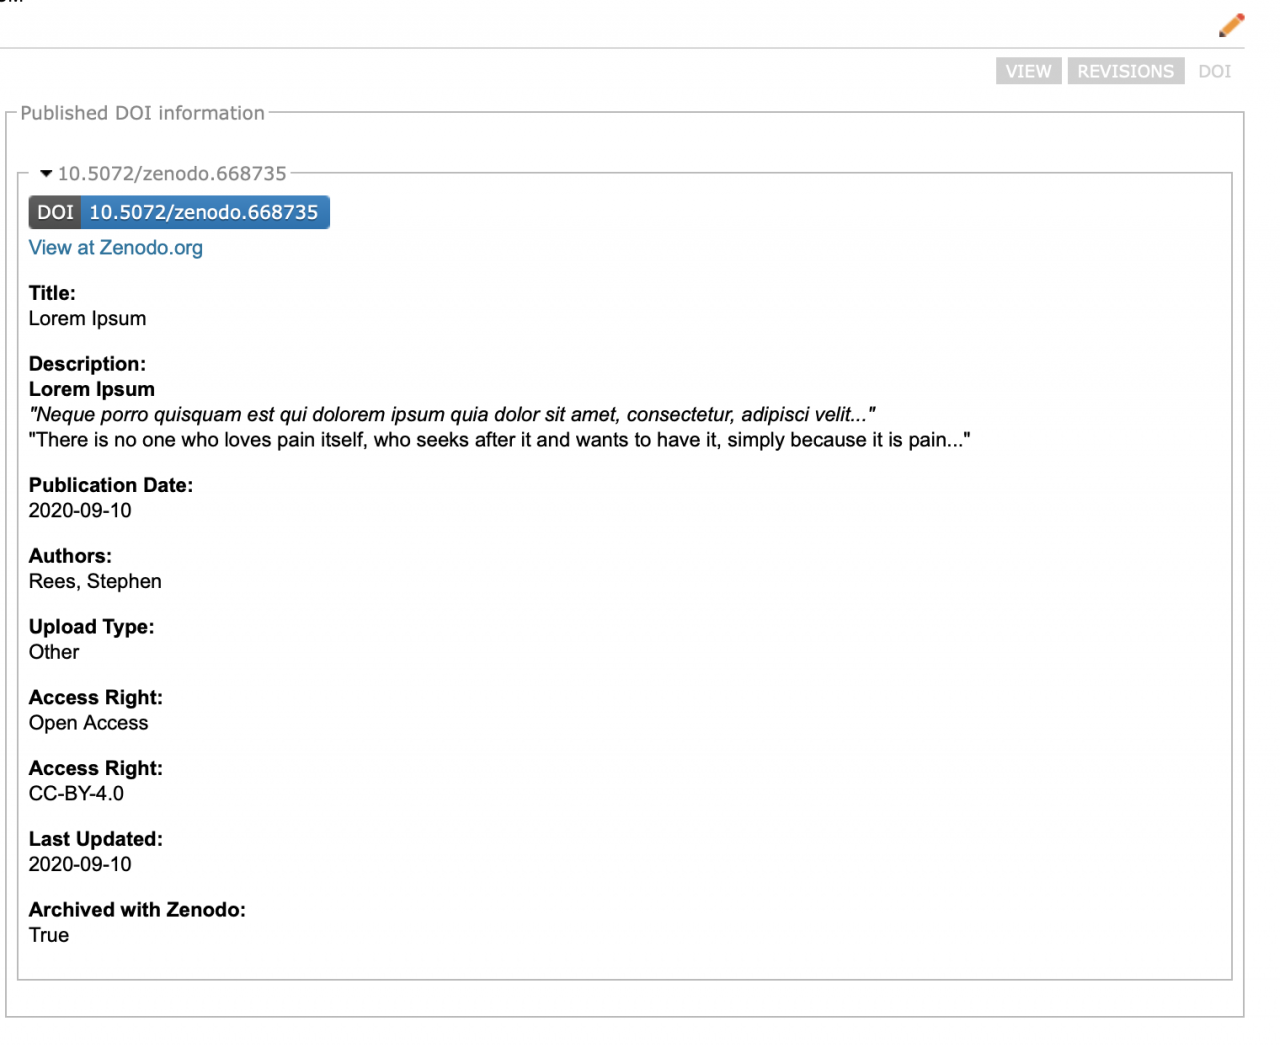
Zenodo archives will contain substantially more information, as well as a link to view the archive on the Zenodo website:
Requesting a DOI from another author
Content that does not yet have a DOI associated to it on the CPS-VO will have a link for requesting a DOI from the author if the following conditions are met:
- You have the necessary permissions to request a citable tag from the author
(currently Trusted User and above: learn more about roles here and check your Badges under 'My Account' to see which you have) - The content type has citations enabled for it
- The author has not disabled DOI/Zenodo for the particular piece of content
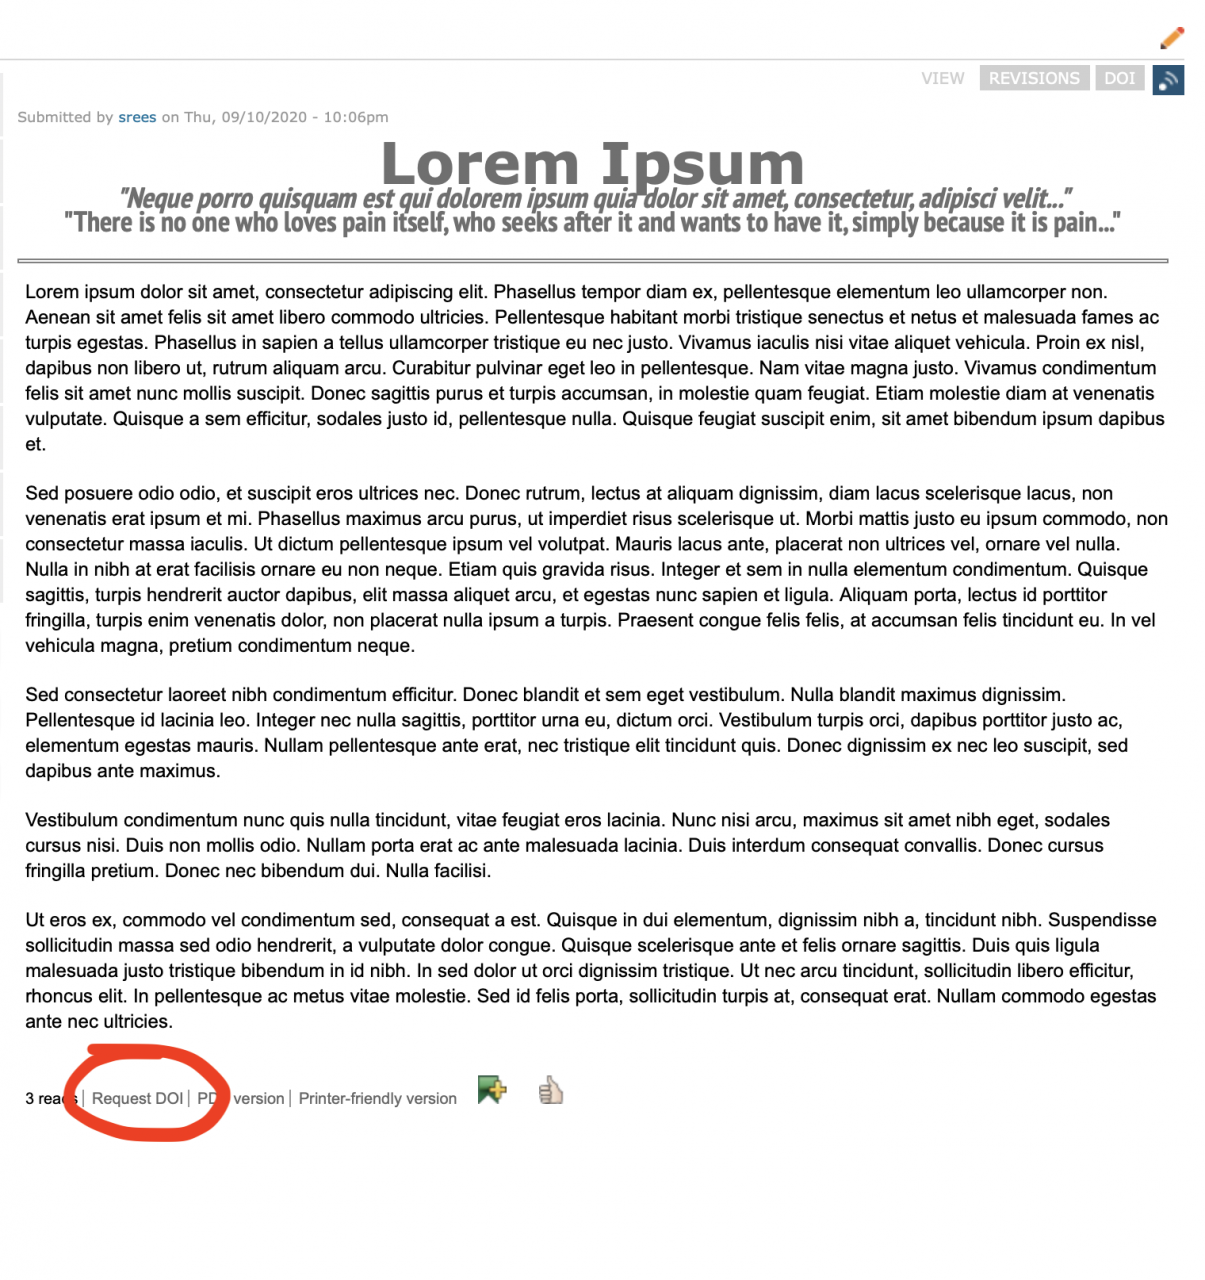
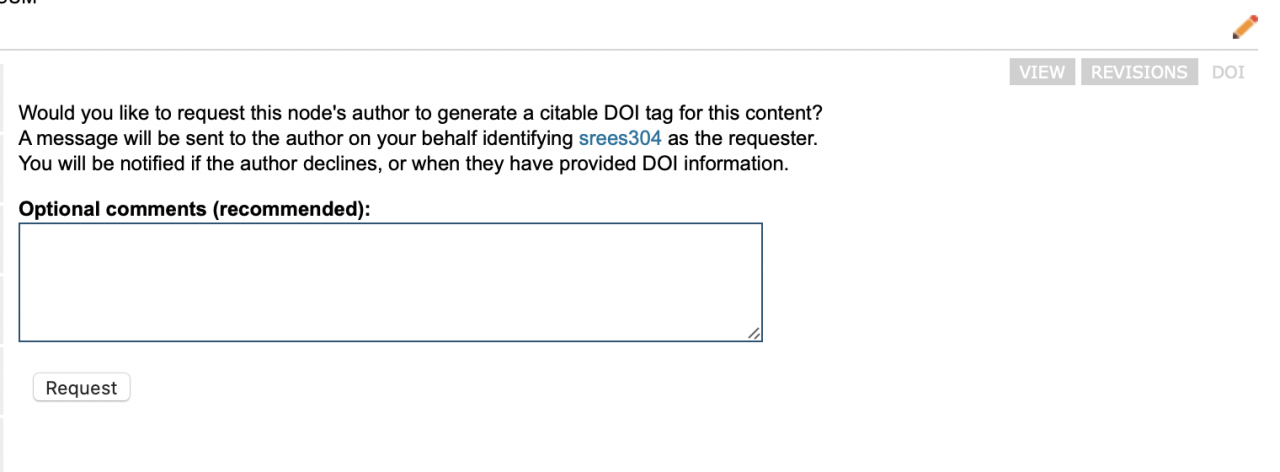
Following the link to 'Request DOI' will present you with the form below:
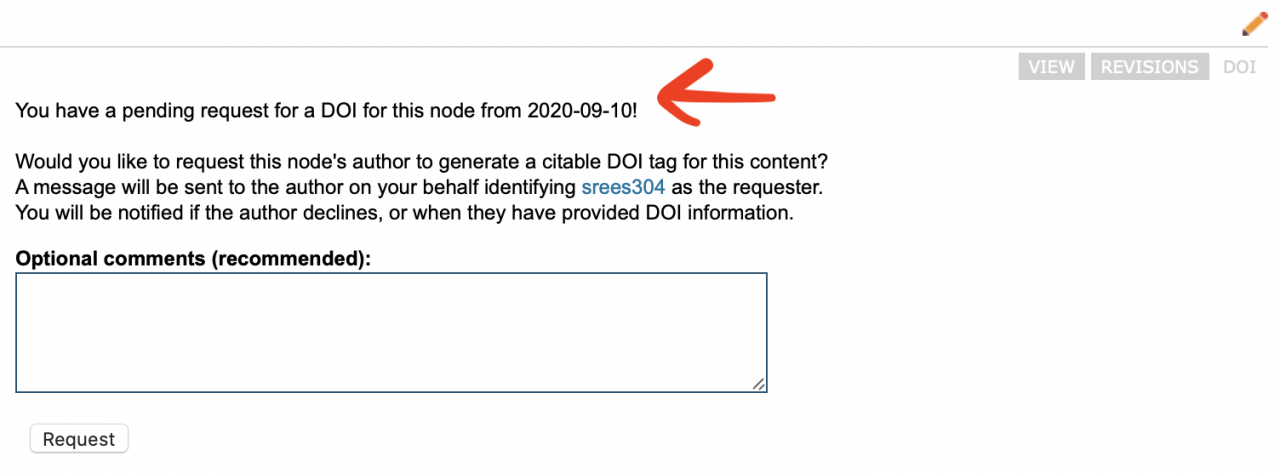
If you have previously requested a DOI for this content, there will be an additional message warning you about this. It is preferred that you do NOT repeatedly request a DOI as this will generate an email to the author each time; it remains available for extenuating circumstances.
You will be notified at the email address associated with your CPS-VO.org account when the author either denies your request or publishes a DOI for the node as requested.
Dealing with a DOI request from another user
If you have authored content on the CPS-VO, you may receive an email from our 'announcements' email address informing you that a user has requested a DOI be generated for content authored by you. This email will contain the user name of the requester with a link to their account, the name of the content involved with a link to that, any comments from the requester, and links to the Zenodo tab for adding a DOI as well as a link to directly deny the request. You will be required to log in to access the Zenodo or denial links. Logging in will also make more information available to you when viewing the requesters account page, if you are a Trusted User or better role.
Viewing the 'Zenodo' tab for your content will have an additional message at the top if you have pending requests:

As the message indicates, publishing an archive or submitting a pre-existing DOI will automatically fulfill all pending requests. When requests are fulfilled or denied, the requesters will receive an email informing them.
It is possible that you might receive a request for a DOI, and not have sufficient permissions to add or generate a DOI on the CPS-VO. If this occurs, please apply for elevated "trusted user" status via the "Contact Support" link under the "Home" tab in the global menu at the top of every CPS-VO page.
Adding an existing DOI record to your content
Often content on the CPS-VO will reflect work published elsewhere, and you may wish to tag your content with such DOI information. Users that have permission to manage their own DOI can manage the DOI information for enabled content types via the 'Zenodo' tab or the 'Generate DOI' link at the bottom of the content.
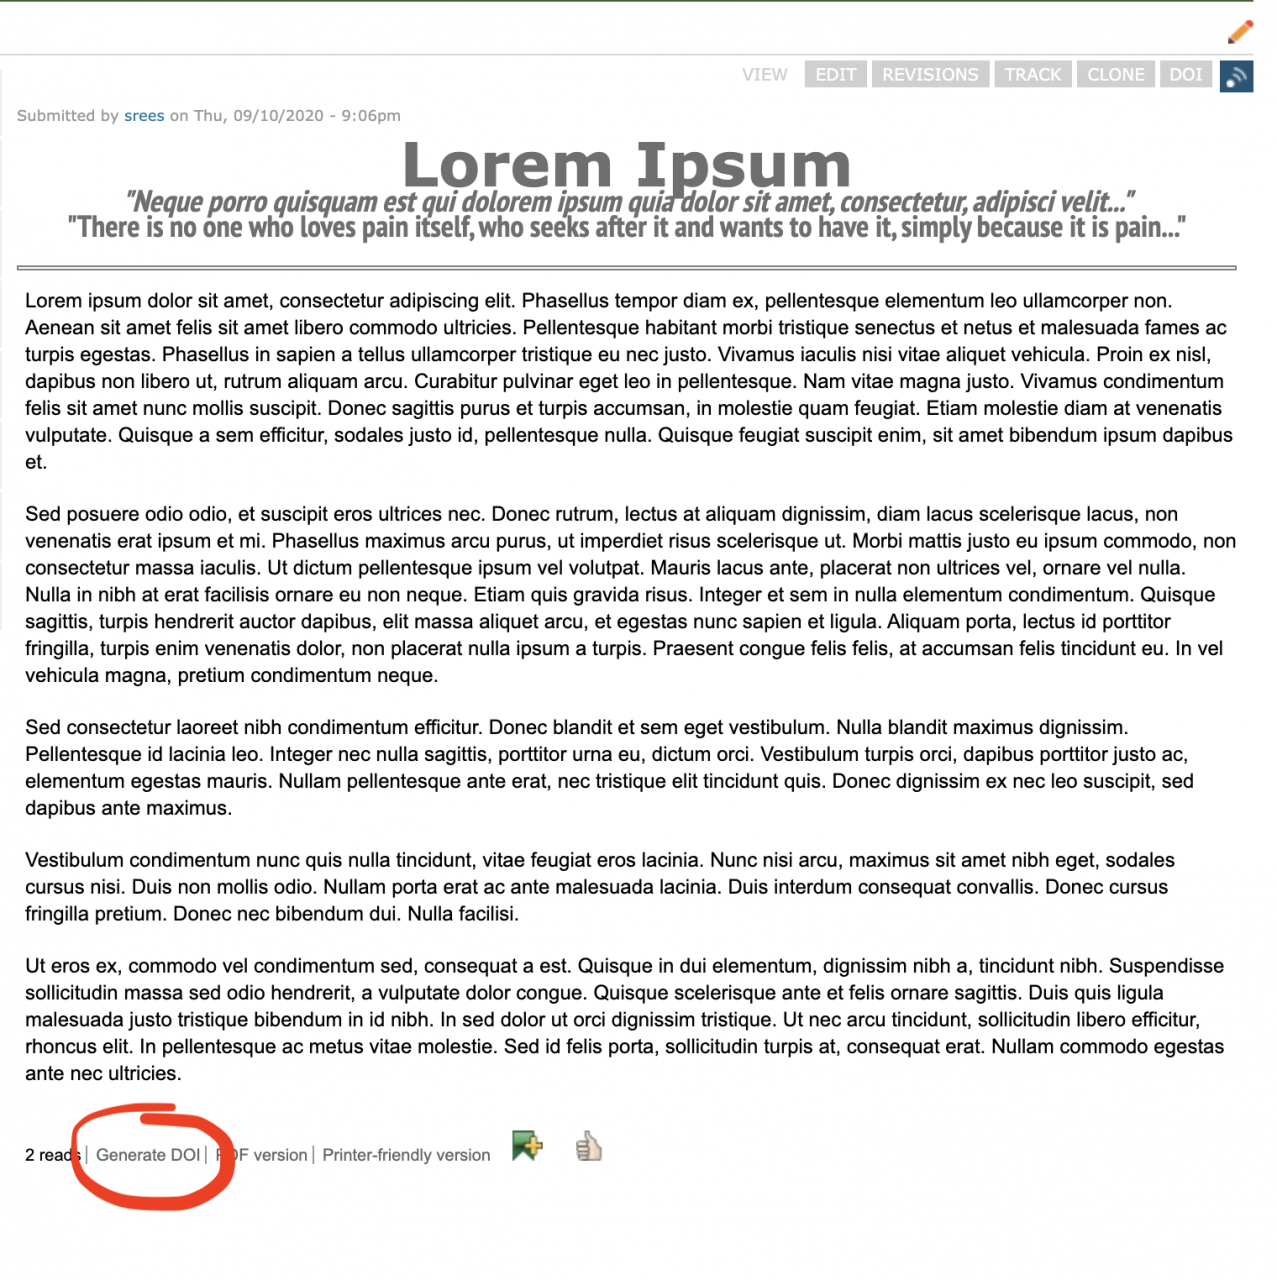
You will be presented with two expandable sections, the first of which 'Associated DOIs (no Zenodo archive)' you'll use for adding a pre-existing DOI. Simply enter the DOI in the form and submit, and it will be immediately visible on the node going forward for all users.
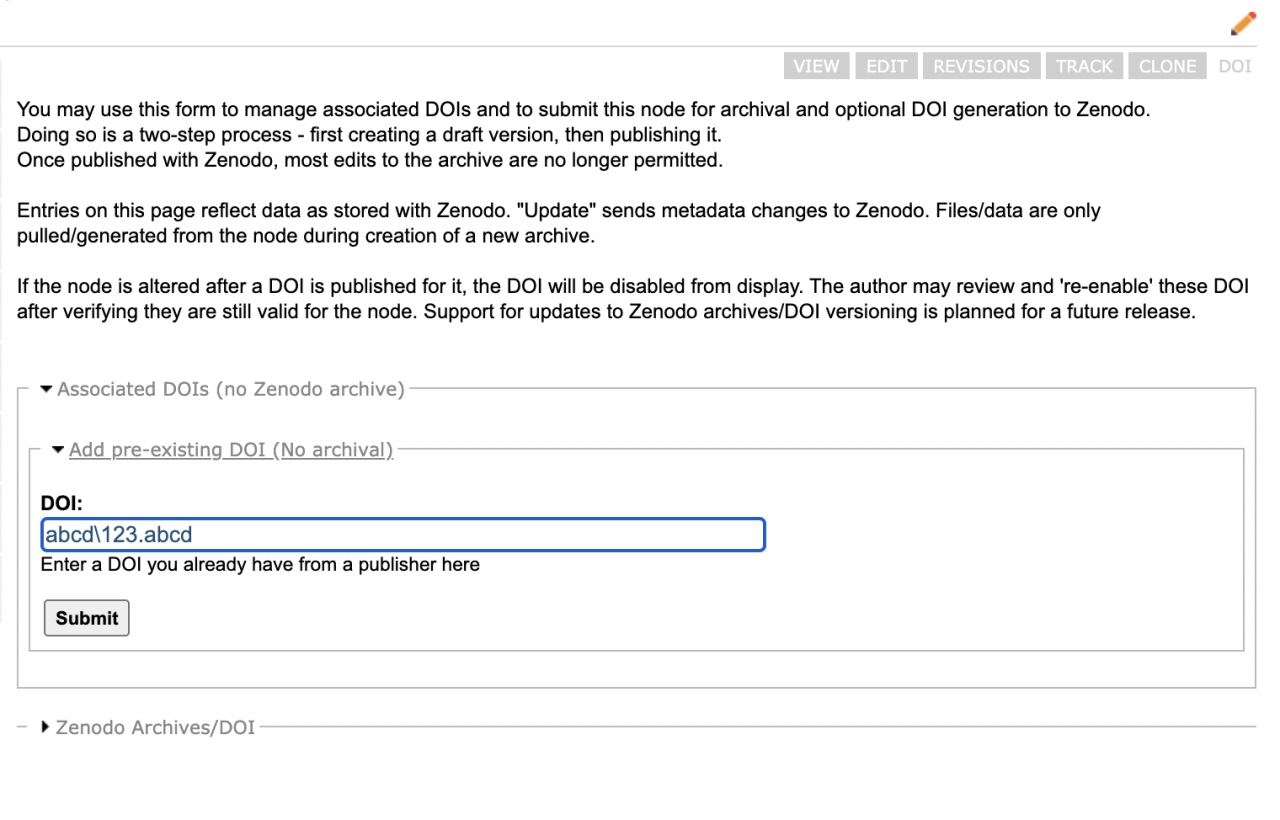
Please note that if you change the node after adding a DOI, the DOI will be disabled until you return to this form and confirm it is still valid for the content by clicking on 'Re-enable' button.
This type of DOI information CAN be deleted from the node.
Generating an archive DOI with Zenodo
If you wish to archive content from the CPS-VO itself and generate a DOI from that archive, our Zenodo service integration can provide that.
For file content types, the file itself will be transmitted to Zenodo and archived. For other enable content types, a PDF of the node will be generated and archived with Zenodo. Currently there is a file size limitation of 100MB. If your file content is larger, this feature will not be available.
Users that have permission to manage their own DOI can manage the DOI information for enabled content types via the 'Zenodo' tab or the 'Generate DOI' link at the bottom of the content.

You will be presented with two expandable sections, the second of which 'Zenodo Archives/DOI' you'll use for adding a new archive. All fields are required.
New archive's fields are pre-filled with content from the node itself. Draft archives are filled with content as previously submitted to Zenodo! All can be edited as desired until it is published.
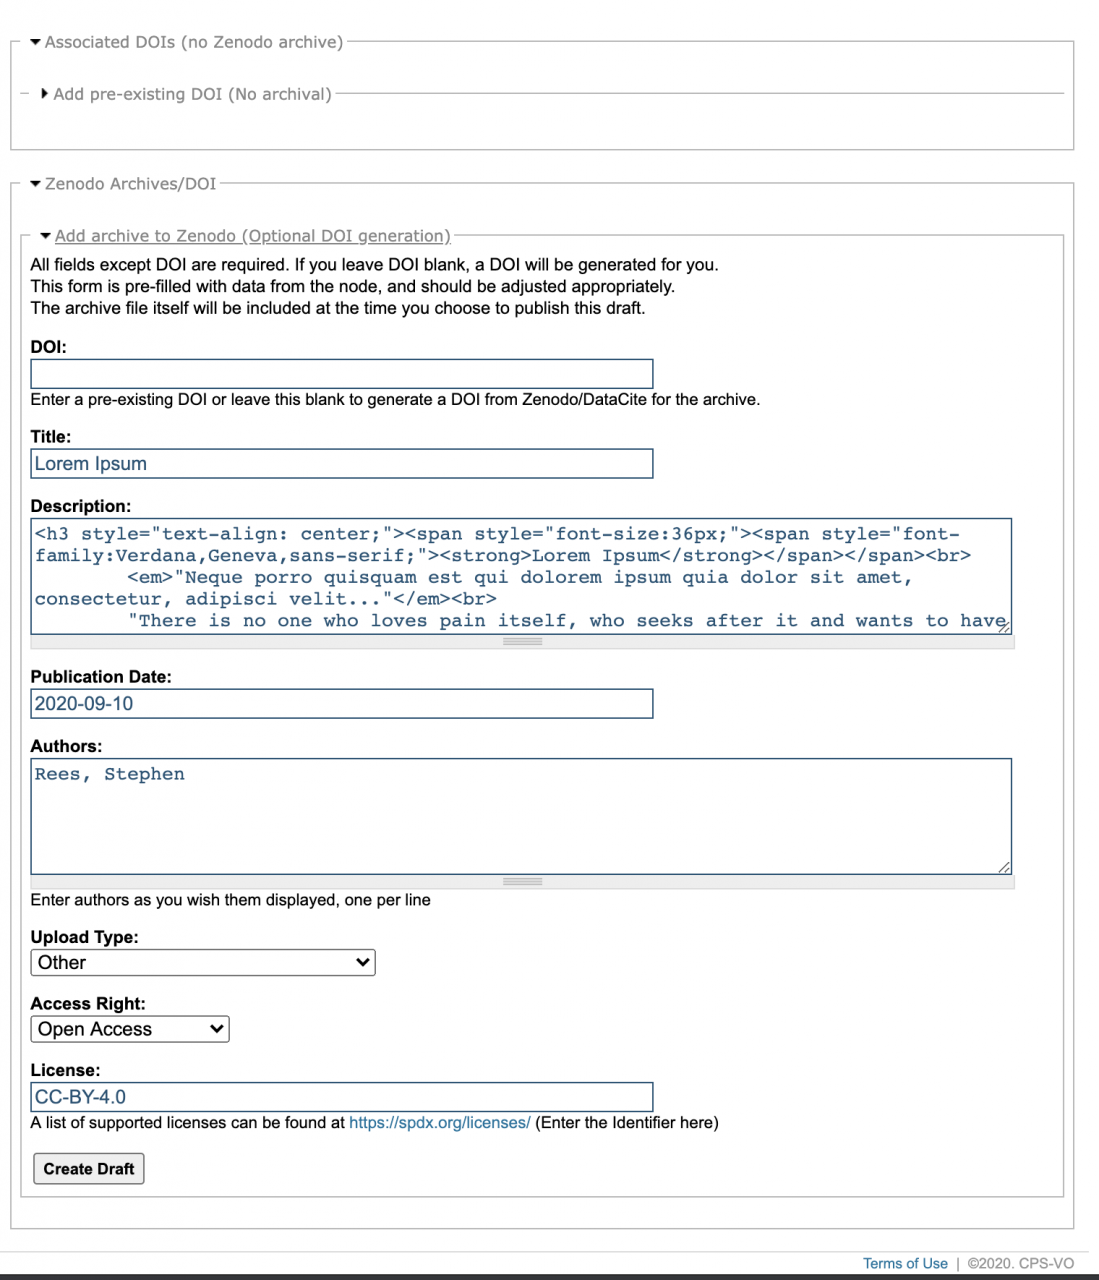
Publishing an archive with Zenodo is a two-step process - first is creation of the draft, and then after you are satisfied with it, publishing the draft. A draft archive that has been submitted to Zenodo will have a dark yellow heading with {Draft} in the title, and will look similar to this:
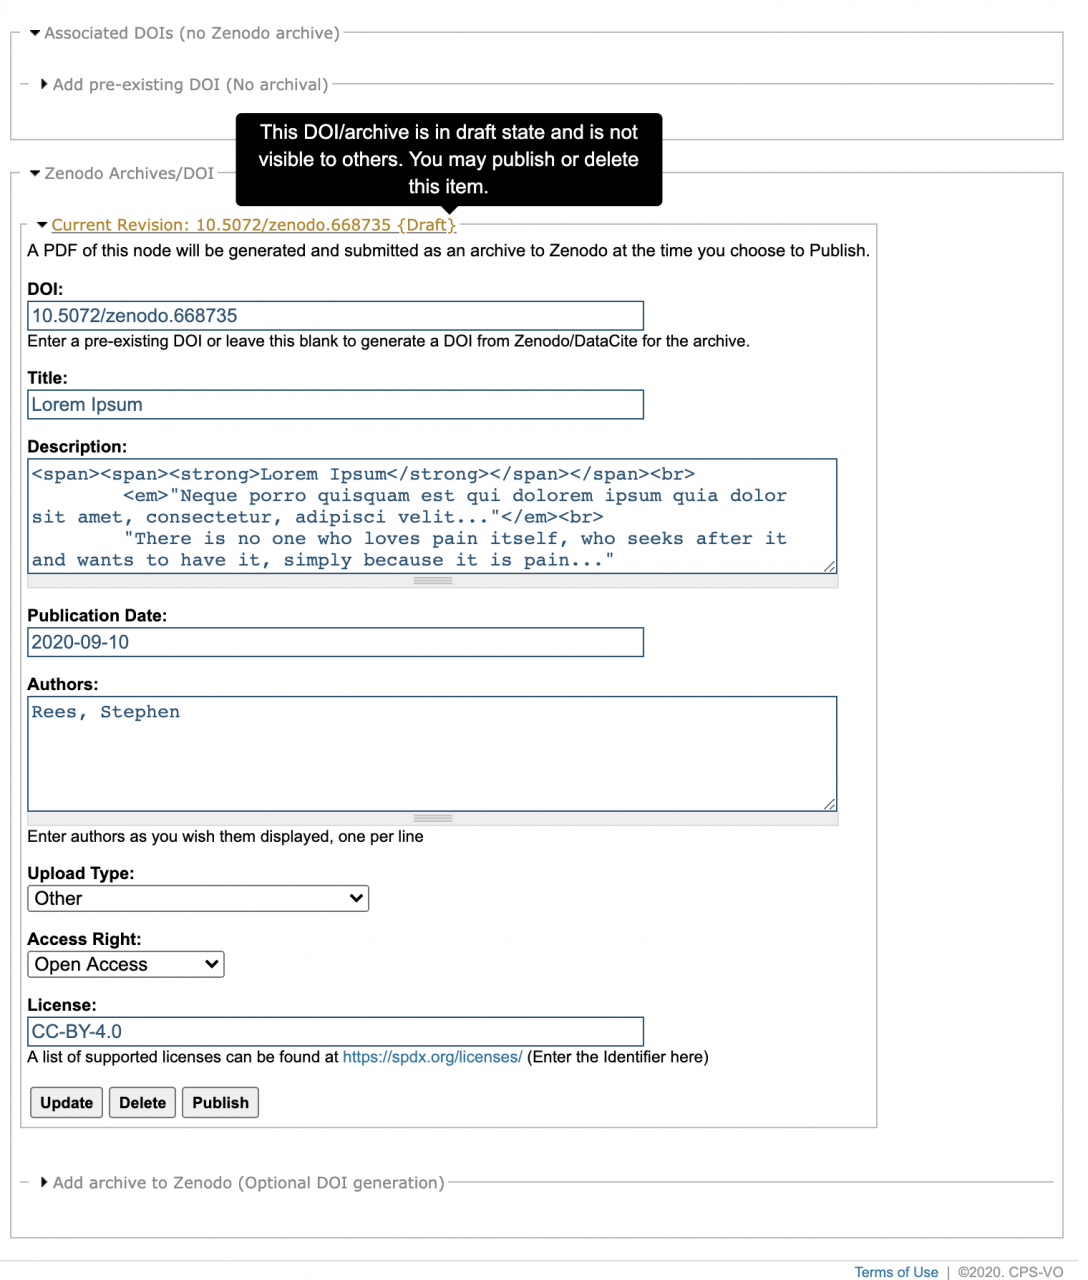
If you need to modify the data, please be sure to click 'Update'. The publish button does not submit form changes to Zenodo; it only publishes the last data that Zenodo received from us!
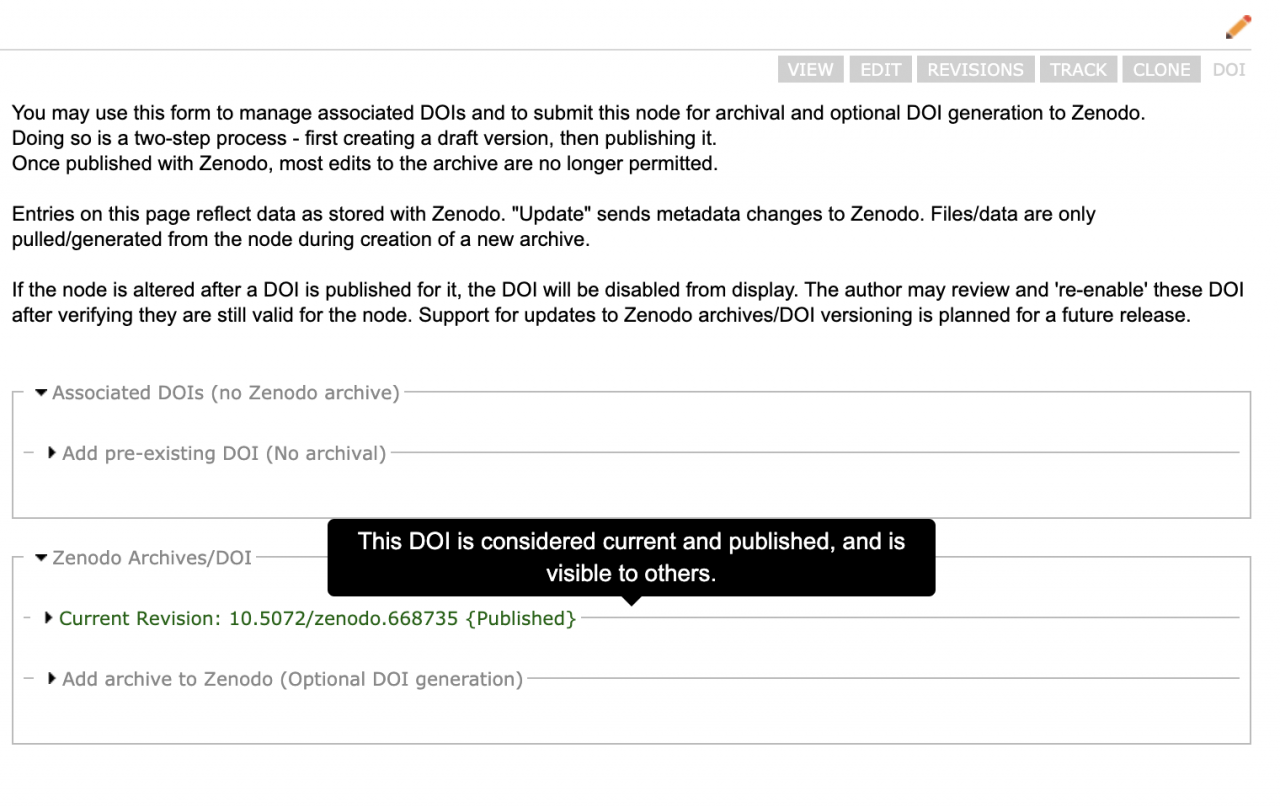
Published archives are permanent records with Zenodo and cannot be altered or deleted after being published! Once an archive is published, it will have a green header with {Published} and look similar to this:
Disabling DOIs/Zenodo for your content
In some cases, having DOIs or Zenodo options for your content does not make sense, or you simply may not wish to have it. For these situations, we have added the ability to explicitly disable the Zenodo feature for your content. When editing content for which the DOI/Zenodo feature is enabled, you will have an additional option you can check for completely disabling the Zenodo functionality for your node.
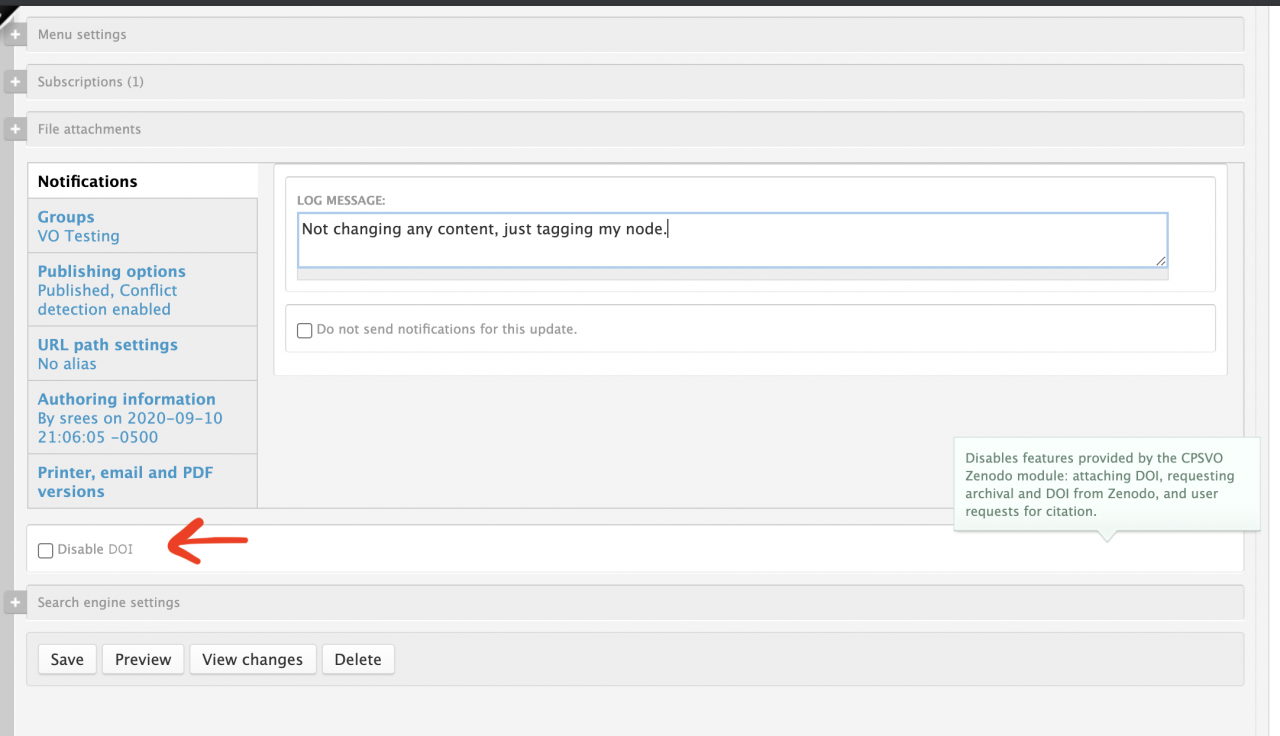
If the adminstrators of the CPS-VO disable Zenodo site-wide for a specific content type, any existing, valid, published DOI information will still be shown on the node until the node has been edited, thereby invalidating the DOIs.
Troubleshooting DOIs
The nature of DOIs requires that the content referenced cannot change. However, the CPS-VO has significant metadata for nodes that can be altered without substantively modifying the actual content the DOI refers to.
Our solution for this is to disable a DOI if the node has changed since the DOI was added/published. It will be hidden from view on the node page, but still be visible on the Zenodo tab to the author, with a red heading. The label showing 'Current Version' will be replaced with the revision information that matches what the DOI was published under:
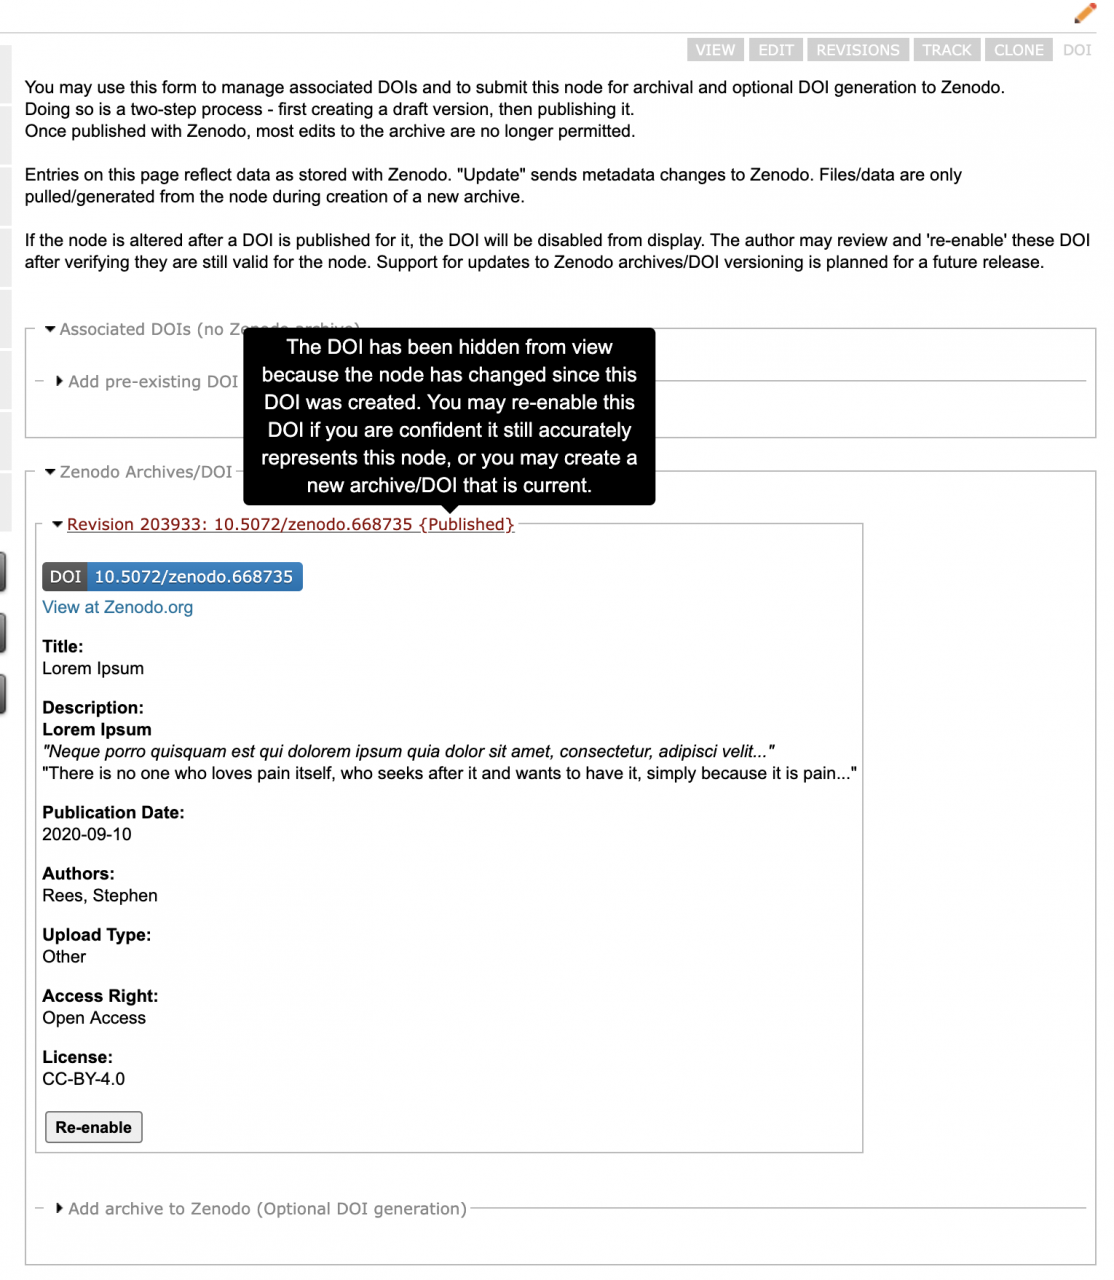
If you are confident that the content has not substantively changed and that the DOI is still an accurate representation of the content, you may re-enable the DOI and it will be flagged with the current version again.
Rarely, it is possible the CPS-VO will be out of sync with what is actually published on Zenodo. If you experience a situation where publishing an archive throws no errors but still doesn't seem to work, please use the 'Contact Us' page or the feedback tab with the specific node you are experiencing an issue with.
Form and Manage Groups
The CPS-VO Portal provides extensive support for Special Interest Groups.
Exemplars of types of groups are:
- R&D SIGs
- Federal Agency
- PI Projects
- Websites for workshops and conferences
- Planning meeting groups for workshops and conferences
- Program committee groups for workshops and conferences
- Working groups
Groups may be formed to meet different needs. Typical use cases include:
- Planning R&D Workshops, Meetings, and Conferences
- Birds of a Feather (e.g. technical or policy issues)
- Archival of Proceedings
- Managing Research Projects
- Publicizing Research Results
- Competitions / Challenge Problems
- Open, Educational Resources
The services provided to Groups include:
- Customized Branding with a Configurable Dashboard/Homepage
- Configurable Security Policy
- Calendaring Services
- iCal Support
- Online, Desktop Sharing Meetings
- Meeting Invites
- A Virtual Filesystem (incl. revision control)
- Electronic Discussion Forums
- Wikis
- Group-specific Vocabularies (or 'taxonomies; for labelling documents; incl. associated, domain-specific Search engines)
- Email Broadcasting to Group Membership
- Customized Forms (e.g. a tailored attendee registration page for upcoming conference)
- Inviting Other Potential Members
- Creating Subgroups (i.e. hierarchical families of Groups)
For information on user roles see http://cps-vo.org/tutorial/types-of-users
Configure a Group
After your group form has been approved by site administration, you can go about the process of configuring your group and setting up its pages. The following tutorial section will break down the process for configuring your group settings, branding your group, creating panel pages and adding widgets and custom content to your pages.
Group Settings & Branding
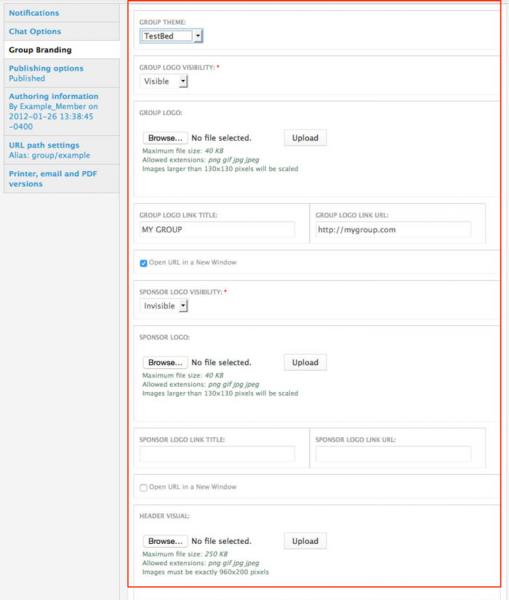
Set the branding and populate content on the home page.
 Video example
 |
|
 |
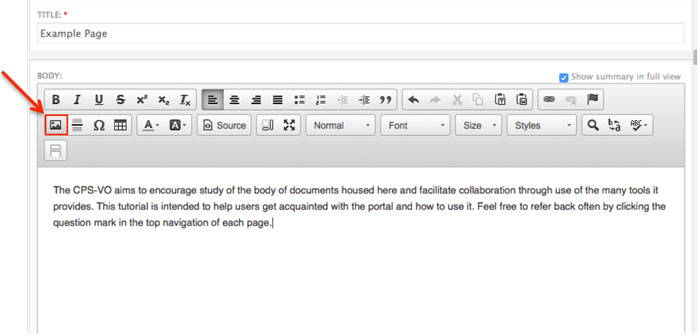
The rich text editor can be used to set text styles and insert graphics (much like Microsoft Word).
|
 |
|
 |
|
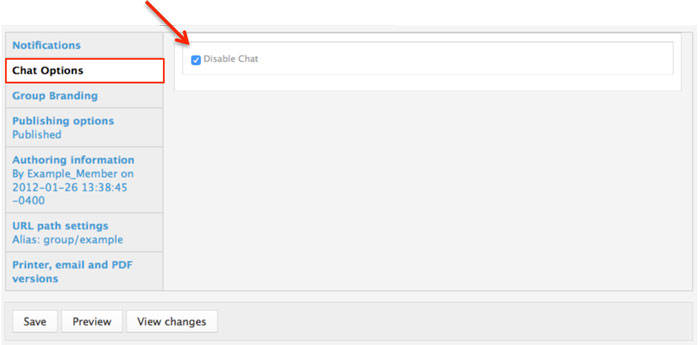
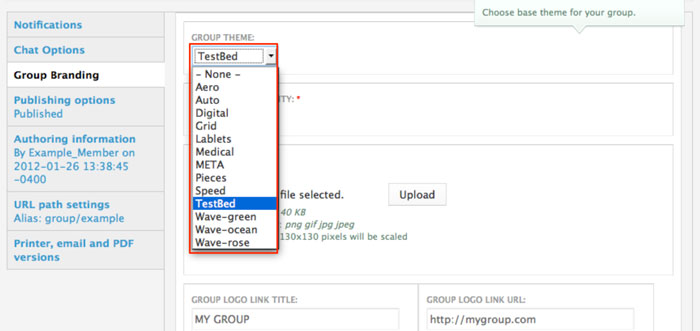
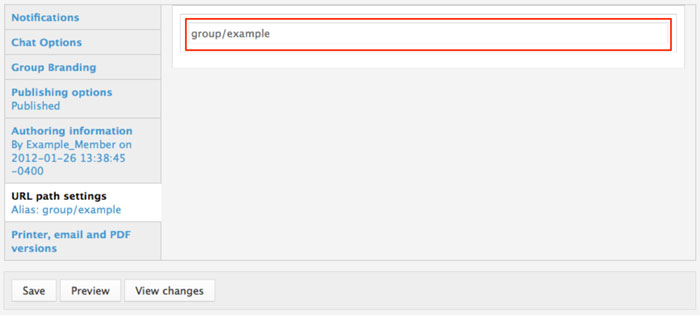
The bottom section of the “Edit Group” panel has a left side menu where you can choose your group chat settings, branding, and set an alias URL path.
 |
|
 |
|
 |
|
 |
|
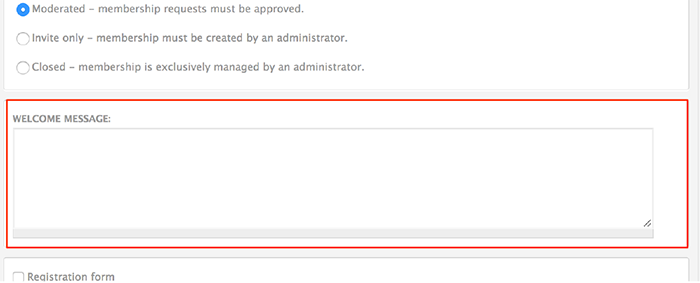
Set a custom welcome message
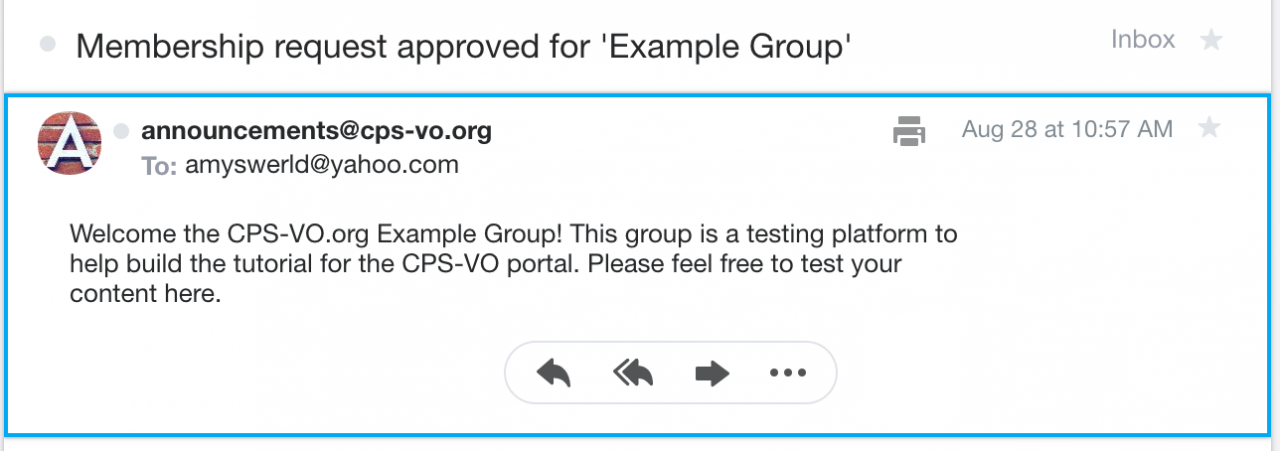
Group Managers may customize the welcome message that is sent to newly approved members. A custom welcome message can help new members know where to start in your group. Note: only moderated groups generate a welcome message.
| Example of the default welcome message: | Example of a custom message: |
 |
 |
P.S. Don't forget to click the save button to save all these settings to your group.
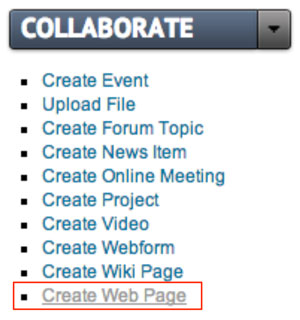
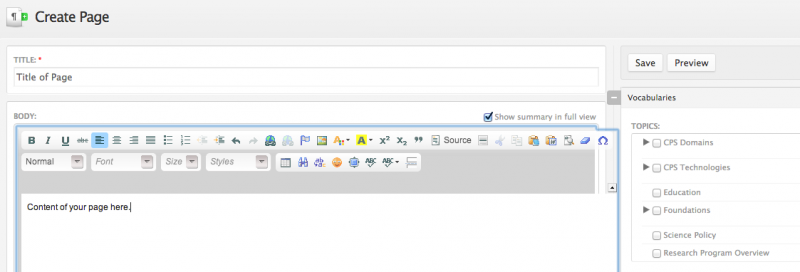
Create a Basic Web Page
As a manager or moderator of a group you can post web pages which will show up in the activity stream and can be embedded in panel pages of your group.
 Video example
You may later need to reference the node number of your web page for other uses in the portal. The node number of your page is at the top of the browser page in the URL window. If a custom URL was set, you can find the node number by clicking the edit button at the top of your page.

NOTE: Web Pages may only be created/edited by group managers and moderators.
Create Panel Pages
You may want to create panel pages for your group.
Use panel pages to organize your content in an attractive and informative manner. Each panel page becomes a tab when viewing your group. Different layouts can be chosen to best display the content for each panel page.

After you create a panel page you can then "Change the Layout of your Page" and add content.
Content can be added in 2 different ways: "Widgets" or "Custom Content".
Widgets enable you to quickly add automated content. Custom Content provides flexibility to manually add content (e.g. lists, links, descriptions, definitions, etc.)

Change the Layout of your Page
You may want to change the layout of your page.
Add Widgets to Panel Pages
After you have created your panel page and edited the layout, you will want to add content.
 Video example
Widgets can be added to automatically pull in certain kinds content from your group. Search, Calendar, Activity Stream, Member List, etc. are examples of the widgets available. A full list of widgets can be found in the "Widget Reference Table". Content can then be added to different regions of the page via widgets.
 |
Step 1: Content and widgets can be added to your panel page by clicking the "Edit content" link next to the name of your panel page. |
 |
Step 2: You will be taken to a page that shows the regions of your panel page. Click on the gear icon in the upper left corner of a region. |
 |
Step 3: Then select "Add content" from the dropdown menu to add widgets and custom content. |
 |
Step 4: This will take you to a page where you can add widgets and custom content (for more detail see pages adding custom content and "Widget Reference Table". |
 |
A spotlight slideshow is one example of a widget you might want on your panel page.
a. Click "Widgets, group dashboard" in the left side menu. Then select "Spotlight [group]" from the available widgets.
|
 |
b. Change the Spotlight title if desired, then click "Finish" to set your changes. Group administrators and moderators may now add news and event slides to the spotlight. See "Adding a Spotlight Slideshow". The news and event items will also appear in recent news and upcoming events sections if you have added those widgets to your panel page. Events and news widgets work best when added to the right side of your 2 column layout. See "Widget Reference Table" for a list of widgets and their functions. |
 |
Step 5: After adding widgets, click "Save" to take you back to your panel pages list. |
 |
After adding content to your group you can expect to see something like this Example Home Page |
Add Content to Widgets
Each widget requires certain content which is either automatically populated by activity in your group, or purposely added by the group manager. A "Widgets Reference Table" displays the widgets that are available to add to panel pages. Adding content to those widgets is covered in the section called "Kinds of Pages".
A spotlight slideshow is one example of a widget to which you might want add content.
About Publishing Options
- Publish: Uncheck this option if you don't wish for this content to appear on the VO yet. Useful for saving drafts of content that requires editing before going live/published.
- Publicize on Group Homepage: This option will place your post on your group's homepage in the corresponding section (Recent News, Upcoming Events, etc…)
- Archive: Will remove this post from displaying publicly (or to members of your group) and add it to a historical archive listing. You may also want to type in a date and time in the “Sunset” section to control when your event or news item is automatically archived.
- Display in Slideshow: Will place this post, along with its image (or video), in a slideshow. Must be used with either Publicize to Entire VO or Publicize on Group Homepage options.
- Pin to Top of Lists: This option will make this post appear at the top of content listings, regardless of any other settings. Useful for denoting important content or content that has a "call to action" associated with it.
Widget Reference Table
Widgets fall in different categories for different uses on pages.
- Widgets in the "Organic Groups" category would be used in creating your home or about page.
- Widgets in the "View Panes" category would be used on pages where you want to display recent comments.
- Widgets in the "Group Dashboard" category are typically embedded into one of the regions of a panel page.
- Widgets in the "Group Menu Items" category typically populate an entire page.
Click on links in the left column of the table below to see an example of the widget dashboard.
Click on links in the right column of the table below to see examples of those widgets being used on pages.
| Widget Categories |
Widgets within Category |
| Organic Groups | |
| View Panes | |
| Widgets, group dashboard | |
| Widgets, group menu items |
Add Custom Content
Custom content can be added to panel pages either by referencing an existing node (preferred method), or by creating content within a region on the page.
 |
Step 1: Click the "Edit content" link next to the name of your panel page. |
 |
Step 2: You will be taken to a page that shows the regions of your panel page. Click on the gear icon in the upper left corner of a region. |
 |
Step 3: Then select "Add content" from the dropdown menu. |
 |
Step 4: This will take you to a page where you can add widgets and custom content. |
 |
New custom content: Clicking the “New custom content” link will take you directly to an editor where you can type in the content you desire to shown in the widget. |
 |
Existing node (preferred method): To reference an existing node, you will need to type the number of the node in the first text field. The number of the node can be found in the URL of the page you want to add. If a custom URL has been set, you can find the node number by clicking the "edit" button on the page (For more information see "Creating a Web Page"). There are options to override the title of the node, leave existing node title, link the node title to the full node, allow comments and 'read more' links and tell whether to show the entire node or just a teaser (build mode). |
 |
Don’t forget to click the “Finish” button when you’re done typing.
|
Edit content that has already been created
Existing node: simply click the "edit node" link that shows when you hover over the content on the page.
Custom embedded content: navigate to "Panels" and edit the page where the content is placed. Click the gear icon and select "edit".
Edit Embedded Custom Content
You may need to edit content after adding existing nodes and custom content into a panel page.
 Video example
 |
To edit existing nodes embedded into the panel page (see ”add custom content”) hover your mouse at the top left of the content.
An “Edit node” link will appear only if you are group administrator, manager, moderator. Click on “Edit Node” to launch the text editor and edit the content.
|
 |
Click "Save" when you are finished editing and you will be taken back to the panel page where the node was embedded. |
 Video example
Kinds of Panel Pages
Different layouts can be chosen to best display the content for each custom page. Content can then be added to different regions of the page via widgets.
Creating a Home Page
Creating a basic custom home page versus creating a dashboard style home page.
Creating a Basic Home Page
After editing your group settings your home page will have a left menu with 3 tabs: Home, Forums, and Files.
 Video example
The content area of your home page will include the mission statement and an activity stream (a dynamic listing of content as it is added to the group). Many times groups do not want the activity stream on their home page. In order to remove it you will need to set up a custom home page.
Once you have created the new home page you can customize the content.
Creating a Dashboard-Style Home Page
After creating a basic home page for your group, you may want to change the layout to accommodate more features.
View a video example for creating a Dashboard Home Page
 Video example
For instructions on how to add widgets and custom content to your dashboard-style home page see page adding widgets to your panel page and adding "custom" content page. Adding slides to your slideshow widget is covered in the next tutoral section "Adding a Spotlight Slideshow". See the widget reference table for further description of available widgets.
View a video example for adding news, events and spotlight slideshow widgets to your Dashboard Home Page
 Video example
Adding A Spotlight Slideshow
You might want to add a slideshow to your home page.
 Video example
 |
You will first need to add the Spotlight widget. Click the "Edit content" link. |
 |
You will be taken to a page that shows the regions of your panel page. Click on the gear icon in the upper left corner of a region. |
 |
Then select "Add content" from the dropdown menu. |
 |
This will take you to a page where you can add widgets and custom content (for more detail see pages adding custom content and Widgets Table).
Click "Widgets, group dashboard" in the left side menu. Then select "Spotlight [group]" from the available widgets.
|
 |
Change the Spotlight title if desired, then click "Finish" to set your changes. |
 |
Step 5: After adding widgets, click "Save" to take you back to your panel pages list. |
Adding Content to the Spotlight Slideshow
Only group Managers, Moderators, and Members who have been granted the 'Trusted User' status have permissions to add content to the group spotlight slideshow.
 |
After creating an “Event” or “News item", scroll down to the area that is titled “Slideshow Image”. Click the “Choose File” button to retrieve an image from your computer. Click the “Upload” button to upload the image. |
 |
If your upload is successful, the image will display next to a button giving you the option to “Remove” it.
|
How to add content to your spotlight slideshow (usually found on the group home page).
 |
If you want the slideshow image and title to link to something other than the node URL (default), enter a custom "slideshow link" to make the spotlight link to a custom page with the setting below. Checkmark "Open URL in a New Window" if you want the browser to launch a new window upon click. If it's an external link, it needs to be a fully qualified URL, ie. http://www.somesite.com If it's internal, it should be sufficient to put a relative URL, ie. node/1234. |
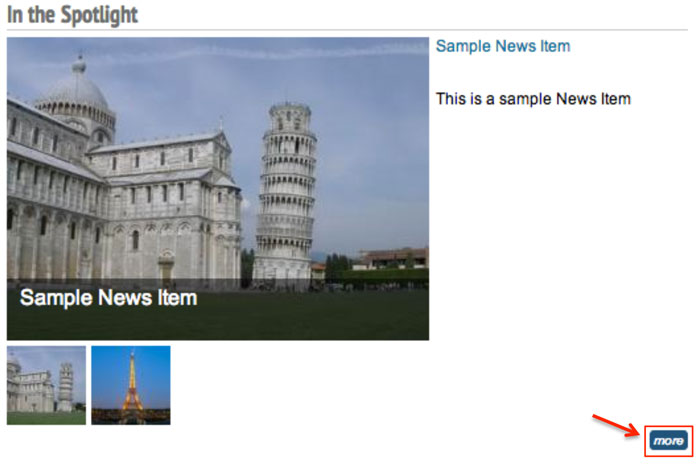 |
There is also a "more" button at the bottom right of the slideshow that links directly to the CPS-VO news item or event rather than the custom link. |
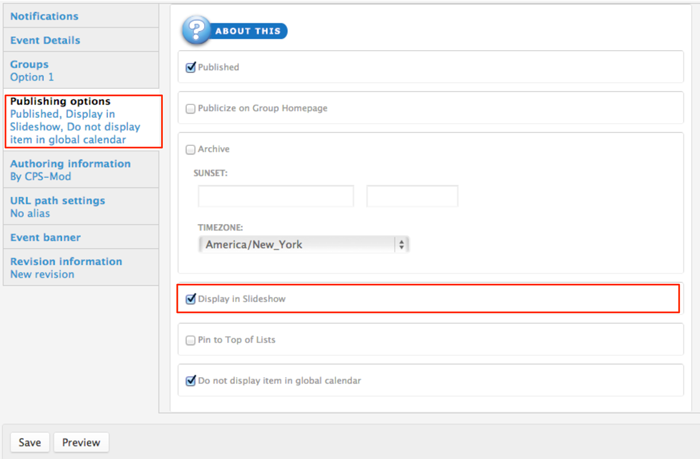 |
Next, click on the gray tab titled “Publishing options” and checkmark the box next to “Display in Slideshow”. Click "Save" to publish your event and show it in the spotlight. |
About Publishing Options
- Publish: Uncheck this option if you don't wish for this content to appear on the VO yet. Useful for saving drafts of content that requires editing before going live/published.
- Publicize on Group Homepage: This option will place your post on your group's homepage in the corresponding section (Recent News, Upcoming Events, etc…)
- Archive: Will remove this post from displaying publicly (or to members of your group) and add it to a historical archive listing. You may also want to type in a date and time in the “Sunset” section to control when your event or news item is automatically archived.
- Display in Slideshow: Will place this post, along with its image (or video), in a slideshow. Must be used with either Publicize to Entire VO or Publicize on Group Homepage options.
- Pin to Top of Lists: This option will make this post appear at the top of content listings, regardless of any other settings. Useful for denoting important content or content that has a "call to action" associated with it.
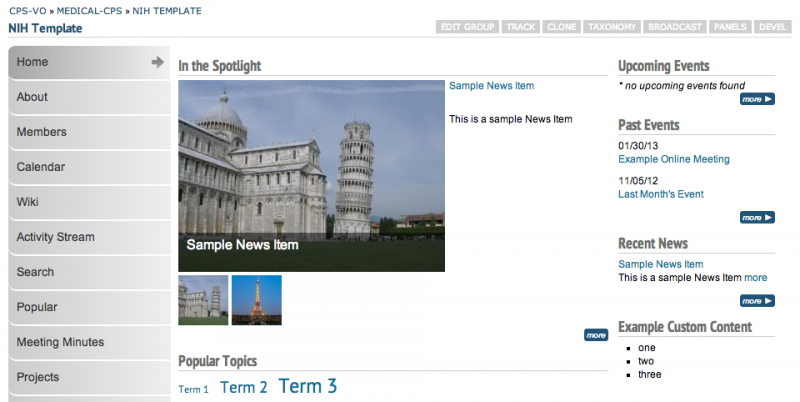
After adding content to your slide show you can expect to see something like the example below.
Creating a Projects Page
Creating a projects page is a convenient way to post your group research projects in one easily accessible location.
 Video example
First create a "Projects" Page by adding a new page in Panels. (see Creating Custom Pages for additional instructions).
 |
When your page is set up and named, click the "Edit content" link to the right of the title of your "Projects" panel page. |
 |
You will be taken to a page that shows the regions of your panel page. Click on the gear icon in the upper left corner of a region. The "Project" widget works best if placed in the Top or Bottom region of your panel page display settings due to its horizontal layout. |
 |
Select "Add content" from the dropdown menu. |
 |
This will take you to a page where you can add widgets and custom content. There are 3 widgets associated with Group Projects content.
Click the "Research Projects, All [group], Research Projects, Archived [group], or Research Projects, Current [group]" widget link - which is found under the left menu item called “Widgets, group menu-items”. This will insert the widget into the chosen panel-page region (top or bottom). |
 |
A new page will launch with a "Finish" button. Click the "Finish" button to insert the widget. Only one widget at a time may be added using this process. Click the "Save" button at the bottom of your panel regions page to set your changes.
|
 |
Initially the "Projects" page will read "no projects found". |
 |
Linked project titles will display on the "Projects" page in a table as group members add projects (Further instructions to members about contributing projects can be found in this tutorial at Creating a Group Project). |
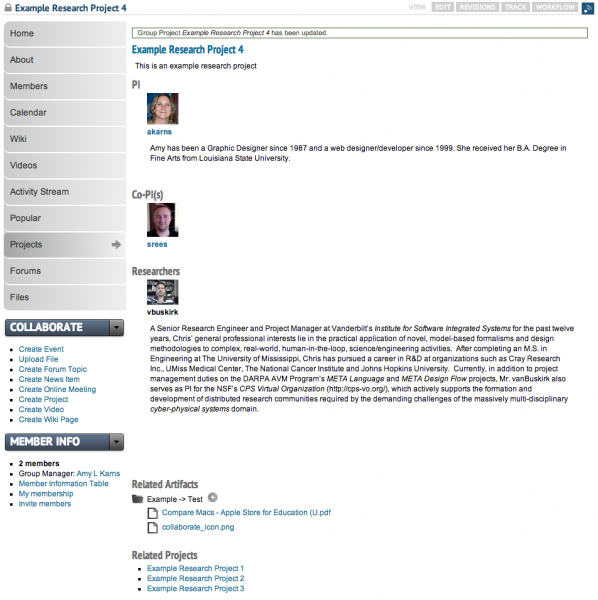
Clicking on the linked project title will lead to the individual project page (which will appear as below).
Creating an About Page
Creating an "About" page is a way to provide a brief overview of your group.
 |
When you initially created your group, you added your group “Description” and a “Mission statement”. This content can be included in your “About” page by using widgets. |
 |
First create an "About" Page by adding a new page in Panels. (see Creating Custom Pages for additional instructions).
When your page is set up and named, click the "Edit content" link to the right of the "About" panel page title. |
 |
You will be taken to a page that shows the regions of your panel page. Click on the gear icon in the upper left corner of the region in which you want your content to appear. |
 |
Select "Add content" from the dropdown menu to add widgets and custom content. |
 |
Click either the "OG description" or "OG Mission" link to add the desired content to your page and click “Finish”. |
 |
You may also add new custom content or content from an existing node to your "about" page by following the “Add Custom Content” instructions.
Click on the widget name to insert that widget. A new page will launch with a "Finish" button. Click the "Finish" button to insert the widget. Only one widget at a time may be added using this process.
After both widgets are added, click the "Save" button at the bottom of your panel regions page to set your changes.
|
 |
Your description and mission statement will now show on your "About" page. |
Creating a Members Page
A "Members" page is a convenient alphabetical listing of all members in a group with easy access to features such as adding to contacts, viewing contributions, linking to profile, etc.
 |
First create a "Members" Page by adding a new page in Panels. (see Creating Custom Pages for additional instructions). When your page is set up and named, click the "Edit content" link to the right of the title of your "Members" panel page. |
 |
You will be taken to a page that shows the regions of your panel page. Click on the gear icon in the upper left corner of the full-width region where you want your members list to display. The top or bottom region is best for this widget. |
 |
Select "Add content" from the dropdown menu. |
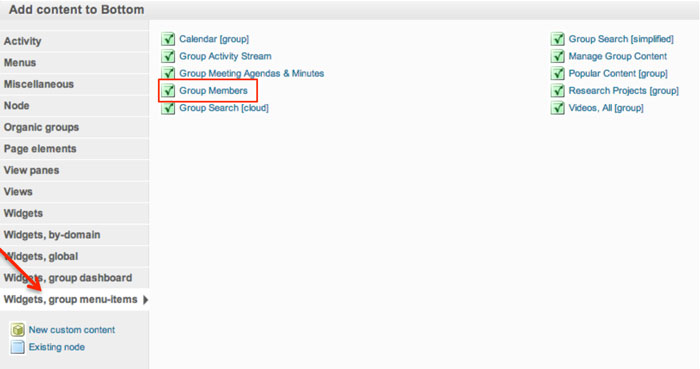 |
This will take you to a page where you can add widgets and custom content.
The “Group Members” widget can be found by selecting the left menu item “Widgets, group menu items”.
|
 |
Click on the widget name to insert that widget. A new page will launch with a "Finish" button. Click the "Finish" button to insert the widget. Only one widget at a time may be added using this process.
Click the "Save" button at the bottom of your panel regions page to set your changes.
|
 |
Example of a "Members" directory page.. |
Creating a Calendar Page
A "Calendar" page is a convenient place to post a group event calendar.
 |
First create a "Calendar" Page by adding a new page in Panels. (see Creating Custom Pages for additional instructions). When your page is set up and named, click the "Edit content" link to the right of the title of your "Calendar" panel page. |
 |
You will be taken to a page that shows the regions of your panel page. Click on the gear icon in the upper left corner of the region in which you want your search widget to display. |
 |
Select "Add content" from the dropdown menu. |
 |
This will take you to a page where you can add widgets and custom content.
The “Calendar [group]” widget can be found by selecting the left menu item “Widgets, group menu items”.
Add the widget by clicking on its title.
|
 |
Click on the widget name to insert that widget. A new page will launch with a "Finish" button. Click the "Finish" button to insert the widget. Only one widget at a time may be added using this process.
Click the "Save" button at the bottom of your panel regions page to set your changes.
|
 |
A calendar will then be added to your "Calendar" page. |


Creating an Activity Stream Page
The content area of a basic home page will include the mission statement and an "activity stream" (a dynamic listing of content as it is added to the group). Many times groups do not want the activity stream on their home page. In order to remove it you will need to set up a custom dashboard style home page.
Creating an"Activity Stream" page is encouraged if you remove the activity stream.
Follow the directions below to create an "Activity Stream" page.
 |
First create an "Activity Stream" Page by adding a new page in Panels. (see Creating Custom Pages) for additional instructions). |
 |
You will be taken to a page that shows the regions of your panel page. Click on the gear icon in the upper left corner of the region in which you want your content to appear. |
 |
Select "Add content" from the dropdown menu to add widgets and custom content. |
 |
The “Group Activity Steam” widget can be found by selecting the left menu item “Widgets, group menu items”.
|
 |
The "Recent Comments" widget is found in the “View Panes” category in the left menu. |
 |
Click on the widget name to insert that widget. A new page will launch with a "Finish" button. Click the "Finish" button to insert the widget. Only one widget at a time may be added using this process.
Click the "Save" button at the bottom of your panel regions page to set your changes.
|
 |
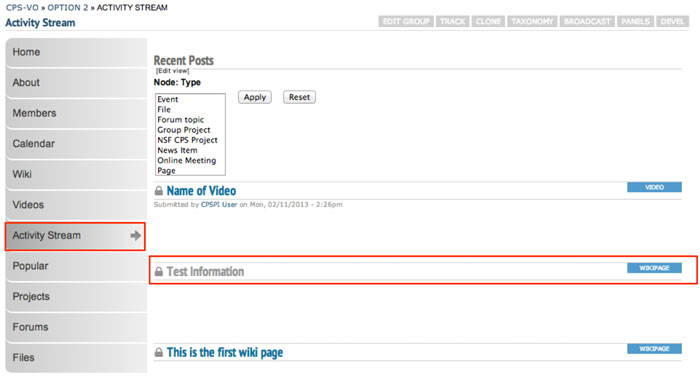
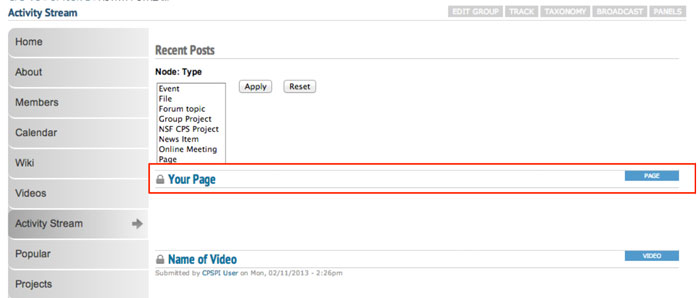
When activity and comments begin to populate in your group, you can expect it to look like the image on the left. Notice the option of filtering recent posts by type. |
Creating a Wiki
Managers can create Wikis for their group where they and their group members will be able to add and edit shared pages (see "Creating a Wiki Page")
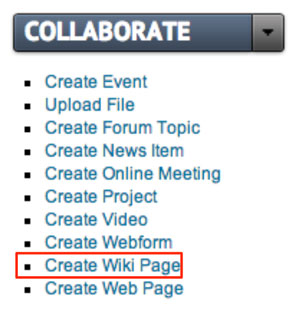 |
Make sure you have already created your first wiki page before you add the wiki widget to your group. If not, you can use the "Collaborate" toggle menu to get started. Click "Create Wiki Page" to launch the rich text editor. |
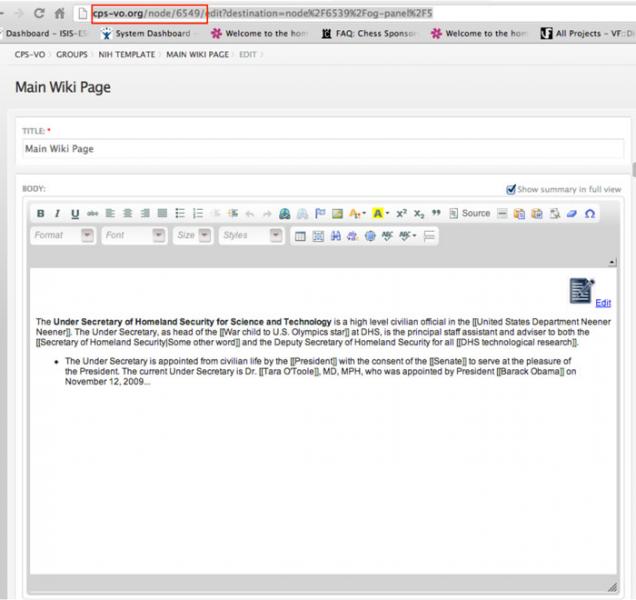 |
You can then find the node ID number in the top address bar. |
 |
After you create your first wiki page, create a panel page and name it "Wiki" (see “Creating Custom Pages”). Click “Edit content” link to the right of the title of your "Wiki" panel page. |
 |
You will be taken to a page that shows the regions of your panel page. Click on the gear icon in the upper left corner of the full-width region in which you want your wiki to display. The "Wiki" widget works best if placed in the Top or Bottom region of your panel page display settings due to its horizontal layout. |
 |
Select "Add content" from the dropdown menu. |
 |
This will take you to a page where you can add widgets and custom content. Click the "Existing node" link in the bottom left menu to begin. |
 |
This will launch a form. Type the node ID number of your first wiki page in the first text field. |
 |
Don’t forget to click the “Finish” button when you’re done typing. |
 |
Click the "Save" button at the bottom of your panel regions page to set your changes. |
 |
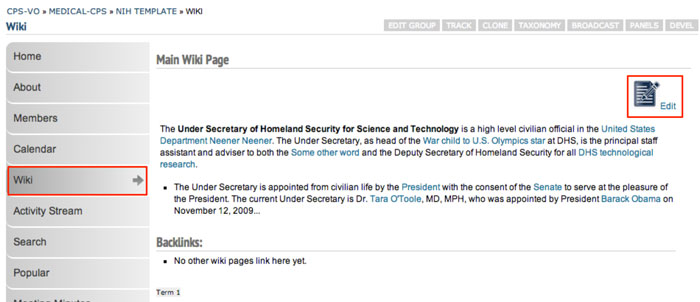
Your first wiki page will now be displayed on your "Wiki" panel page. Group members can now add and edit shared pages (see "Creating a WIki Page"). |
Creating a Popular Content Page
A popular content page is helpful for perusing the most viewed and used group content.
 |
First create a "Popular Content" Page by adding a new page in Panels. (see Creating Custom Pages for additional instructions). When your page is set up and named, click the "Edit content" link to the right of the title of your "Popular Content" panel page. |
 |
You will be taken to a page that shows the regions of your panel page. Click on the gear icon in the upper left corner of the region in which you want your search widget to display.
|
 |
Select "Add content" from the dropdown menu. |
 |
This will take you to a page where you can add widgets and custom content.
Click to add the “Popular Content (group)” widget (which can be found by selecting the left menu item “Widgets, group menu items”).
|
 |
A new page will launch with a "Finish" button. Click the "Finish" button to insert the widget. Only one widget at a time may be added.
Click the "Save" button at the bottom of your panel regions page to set your changes.
|
 |
As content is developed in your group, a table will display on the page like the example below. |
Creating a Videos Page
A "Videos" page is a convenient way to provide a place for group members to share embedded videos from services such as TED, Vimeo, or YouTube.
 |
First create a "Videos" Page by adding a new page in Panels. (see Creating Custom Pages for additional instructions). When your page is set up and named, click the "Edit content" link to the right of the title of your "Videos" panel page. |
 |
You will be taken to a page that shows the regions of your panel page. Click on the gear icon in the upper left corner of the region in which you want your search widget to display. |
 |
Select "Add content" from the dropdown menu. |
 |
This will take you to a page where you can add widgets and custom content.
Click on the “Videos, All [group]” widget (which can be found by selecting the left menu item “Widgets, group menu items”).
|
 |
The "Video, Featured [group] widget" is found in the “Widgets, group dashboard” category in the left menu. A video must be set to "public" in the group settings and in the publishing options as "published" and "publicized to group home page" in order to show up in the featured videos category. (see bottom of page for more about featuring a video). |
 |
Click on the widget name to insert that widget. A new page will launch with a "Finish" button. Click the "Finish" button to insert the widget. Only one widget at a time may be added using this process.
Click the "Save" button at the bottom of your panel regions page to set your changes.
|
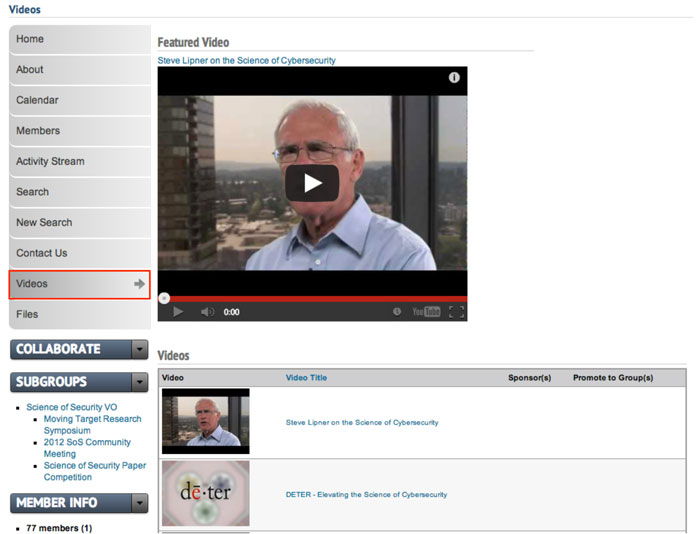 |
You and group members can now begin adding videos to your "Video(s)" page (see "Creating A Video"). You can expect the video page to look similar to the example below. |
More About Featured Videos
Creating a Moderation Board Page
A Moderators Board page is helpful for editing, deleting and moving group content.
 |
First create a "Modboard"* Page by adding a new page by that name in Panels. (see Creating Custom Pages for additional instructions). When your page is set up and named, click the "Edit content" link to the right of the title of your "Modboard" panel page. *Some groups choose to name this page differently, but the standard CPS-VO terminology is "Modboard". |
 |
You will be taken to a page that shows the regions of your panel page. Click on the gear icon in the upper left corner of the region in which you want your search widget to display. |
 |
Select "Add content" from the dropdown menu. |
 |
This will take you to a page where you can add widgets and custom content.
Click to add the “Manage Group Content” widget (which can be found by selecting the left menu item “Widgets, group menu items”).
|
 |
A new page will launch with a "Finish" button. Click the "Finish" button to insert the widget. Only one widget at a time may be added.
Click the "Save" button at the bottom of your panel regions page to set your changes.
|
 |
As content is developed in your group, a table will display on the page like the example below. A set of dropdown menus give you bulk-editing capabilities. |
Creating an Agenda and Meeting Minutes Page
An "Agenda and Meeting Minutes Page" page is a convenient way to store and search meeting documentation.
 |
An "Agenda and Meeting Minutes" page collects and displays anything tagged with 'Meeting Minutes' or 'Agenda' from the 'Document Type' taxonomy (located to the right of the text editor when creating group content). |
 |
First create a "Meeting Minutes" Page by adding a new page in Panels. (see Creating Custom Pages for additional instructions). When your page is set up and named, click the "Edit content" link to the right of the title of your "Meeting Minutes" panel page. |
 |
You will be taken to a page that shows the regions of your panel page. Click on the gear icon in the upper left corner of the region in which you want your search widget to display. |
 |
Select "Add content" from the dropdown menu. |
 |
This will take you to a page where you can add widgets and custom content.
Click on the “Videos, All [group]” widget (which can be found by selecting the left menu item “Widgets, group menu items”). The "Group Meeting Agendas & Minutes widget" is found in the “Widgets, group dashboard” category in the left menu. Click on the widget name to insert that widget. A new page will launch with a "Finish" button. Click the "Finish" button to insert the widget. Only one widget at a time may be added using this process.
Click the "Save" button at the bottom of your panel regions page to set your changes.
|
Initially your Meeting Minutes page will be empty. However, the search features will automatically populate as content is added and tagged with 'Meeting Minutes' or 'Agenda' taxonomies from the 'Document Type' taxonomy (located to the right of the text editor when creating group content).
Manage a Group
The CPS-VO Portal provides extensive support for Special Interest Groups. Group Managers and Group Moderators are responsible for maintaining and grooming the content in their group. To edit group content select the [Edit] menu tab in the upper righthand corner of the page. To remove content select the [Edit] menu tab in the upper righthand corner of the page and then the [Delete] button located next to 'Save' and 'Preview'.
The links below explain how to perform advanced group management functions.
Administer Members
Handling memberships in a group involves overseeing who is a member of the group, and who are the administrators, managers and moderators. There must be at least one administrator for every group. Members of a group may leave the group at any time. As the administrator you may only leave the group if at least one other administrator is designated.
 |
View Member Information Table Click on the "Membership Information Table" link in the "Member Info" toggle menu beneath your group menu in the left sidebar. |
 |
This will take you to a "member list" where administrators and managers can moderate group membership requests and edit user group privileges.
Clicking the orange "CSV" button at the bottom left of the table will export the list in spreadsheet format. |
 |
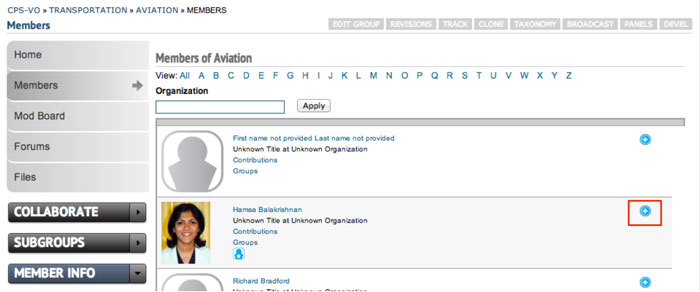
View Group Members To view a page with the photos and names of the members of your group, click the "Faces" tab. |
 |
Add Members Managers can add members to a group and configure their function in the group. Click on the “Add Members” tab. Type one or more usernames into the “List of Users” text area. Separate multiple usernames by commas or new lines. Click the “Add users” button to complete the process.
If you need to find a user, enter their name in the upper right hand search field (see Seeking Out Colleagues). Click the individual's name to go to their profile page where you will find their username listed beneath their real name.
|
 |
Configure member roles from the "Configure roles" tab. Members can be given "manager" or "moderator" roles from this page by checkbox selection. Click the "Save" button to submit changes. |
 |
Invite Members Group members can invite users to join the group by using the "Invite members" tab. This will send an email message asking the invitee to click a link to join your group. Type one or more comma delimited email addresses and/or VO usernames into the "Invitees" text input area, provide an optional message in the textbox entitled "Additional message". Finally, click the "Invite" button to send the message(s). Note, a maximum of 20 invites can be sent out at a time. |
Send Out Messages
Only group managers can broadcast a message to members of a group. A broadcast emails all group members with a copy of the message. Remember your message will be read by all of your group members. The "From" field of the message upon delivery will say it is from "cps-vo on behalf of" and your name from your profile.
To broadcast a message, follow these steps:
Set Up Group Vocabularies/Terms & File Folders
Content should be labeled to make it searchable. See http://cps-vo.org/node/878 for an explanation of Tags, Terms and Labels.
As a group administrator you can edit and create taxonomies for your group with the following steps.
 Video example
* NOTE: Details for further customizing your group are given in Configuring Groups.
Create a Webform
Webforms may only be created/edited by group managers and moderators.
As a manager or moderator of a group you can post web which will show up in the activity stream and can then be embedded in panel pages of your group.
Create Webform and add components
 Video example
Types of Components:
- Date: Inserts a drop-down menu for user to select a month/day/year. Optional calendar selector is also available.
- Email: A field where user can enter their email address
- Fieldset: A boxed field that contains a description and a title
- File: A place where user can upload a file.

*NOTE: Create a custom directory by typing a path similar to the one below. This identifies attachments with the webform. - Grid: a series of questions and options with radio button selectors
- Hidden: This gives you the option to insert variables or notes which users cannot see.
- Markup: This allows webform creator to enter text in multiple colors and font styles.
- Textfield: You can collect lengthier responses from your users by creating "textarea" fields
- Number: Creates either a dropdown menu or a text area with predetermined low and high integers.
- Page break: Allows you to split your webform into 2 pages.
- Select Options: Makes a list of options with radio buttons.
- Textarea: You can collect lengthier responses from your users by creating "textarea" fields
- Textfield: A one line field for user to enter text.
- Time: A dropdown hr/minut/am/pm selector

Configuring Notification Emails
 Video example
- The first is the email address (or multiple addresses) of the webform administrators.
- The second will be the submitter's email address as they typed it in the "email" field on the webform.
*NOTE: You must include at least one email component field in the webform to enable this function.
Configuring Form Settings
 Video example
The "Form Settings" tab will take you to a page where you can choose a landing page, set submission limits, and choose access policies.
Submission Settings
Landing page option with confirmation message
The webform user will be taken to a landing page after submitting the form. You may choose (three options shown in image below) where the user is redirected.
- Confirmation Page - Sends user to generic CPS-VO.org confirmation page.
- Custom URL - Redirects the user to a custom page (most usually the group home page)
- No Redirect - Reloads current page.

Submissions Limit
Submission Access
 |
Select which user roles are able to view and submit the form. Note: Only authenticated users (CPS-VO members) are able to edit their submissions. |
Configuring Form Validation and Access Policies
- Specific value(s)
- Verifies that the specified component contains a defined value (select, textfield, textarea, email, hidden, select)
This feature would be used (for example) when a code is required to submit the form. The webform can then be viewable by anonymous users, but can only be submitted by users who have the code.
Export the Webform
 |
Clicking the export button will prompt a download of the PHP code generated to create the form. |
Access Webform Results
 |
|
View/Edit Individual Submissions
It's easiest to access individual results from the "table" view. Click on the submission number on the far left of the column. That will take you to their individual submission where you can edit the submissions if needed.
 |
|
 |
This will take you to a window where you can view and edit the individual submission. |
Edit the Webform

Webform Check List
![]() Does your webform have a description?
Does your webform have a description?
![]() Is your webform published?
Is your webform published?
![]() Is your webform public or is it private to your group?
Is your webform public or is it private to your group?
![]() Have you created all the components you need?
Have you created all the components you need?
![]()
Are the necessary components set as mandatory?
![]()
Have you configured notification emails to go to the user and also to the form administrator?
![]() Have you configured the confirmation landing page?
Have you configured the confirmation landing page?
![]() Have you configured the submission access rules?
Have you configured the submission access rules?
![]() Does your webform need an access code? Has one been configured?
Does your webform need an access code? Has one been configured?
![]()
Have the necessary users been granted permissions to view the webform results?
Manage Group Forums
Only group managers have permissions to administer group forums. Managing group forums involves adding new forums, editing or deleting existing forums, controlling the listing order of forums, and adjusting forum privacy settings.
Using the Modboard
see Creating the Modboard Page for additional instructions on how to create the modboard panel page.
 As content is developed in your group, a table will display on the page like the example to the left.
| Node: Type | Node: Title | Node: Body | Public | Published | Promoted to front page | Sticky | Items per page |
 |
 |
 |
|
|
|
|
 |
 |
Type a search word or phrase in text box. |
Type a search word or phrase in text box. |
Apply Applies the search |
Reset Resets the parameters to 0 |
Bulk Operations
|
||
- Click the "Apply" button to set your search parameters.
- Select the nodes you would like to edit by the checkboxes next to the title of the node.
- Choose a Bulk Operation from the Bulk Operations dropdown menu.
- Type a log message
- Check the "disable notifications" box if you want to keep your changes from being broadcast.
- Select the "Execute" button
- Follow the prompts for the operation you chose
- You will be taken back to the modboard page with a confirmation message at the top describing the action (see example below).

Group Manager/Moderator Actions by Role
Group Manager
| Group policies and settings |
| Configure group menu pages |
| Administer group members |
Manage group forums
|
| Create or edit group vocabularies |
| Send a broadcast message |
Group Moderator
| Groom and moderate content |
| Publicize content on the group home page |
| Create and manage webforms |
| Create a basic web page |
Appendix: The VO Architecture
The Computing Infrastructure
The server powering the CPS-VO deployment is currently a Dell PowerEdge r515:
- 2 x 2.1ghz 4170HE AMD Opteron w/6 cores per, for 12 cores
- 64GB of memory
- 6.38TB of usable storage, configured as a RAID5 array
- 6 x gigabit network interfaces
- protected by a Vanderbilt ITS firewall service (2 x Checkpoint 4600 configured as a HA pair)
- backed up to an LTO tape using the ISIS/Vanderbilt backup service

This server hosts 4 Virtual Machines:
- The Development Machine
where various new features and bug fixes are initially integrated together in an environment that is similar to the actual CPS-VO installation
(2 vCPU, 8GB memory, 96GB storage)
- The Staging Machine
used for final testing before deploying new code; this is an exact replica of the actual CPS-VO
(6 vCPU, 16GB memory, 532GB storage)
- The Production Machine
where http://cps-vo.org actually lives; this is the live site
(6 vCPU, 16GB memory, 532GB storage)
- The Big Blue Button Server
hosts the VO's open-source web conferencing system (e.g. desktop sharing, video & voice over ip)
(2 vCPU, 4GB memory, 80GB storage)
The Virtual Organization Software Stack:
The software architecture of the VO comprises a large suite of open-source technologies.
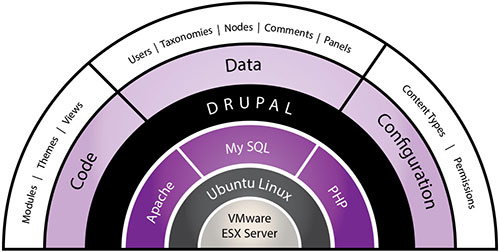
In the following sections, we progressively walk through an overview of each of the layers, proceeding from the lowest systems level software, to the upper application-specific codes.
Virtualization and the VO
The CPS-VO collaboration framework is hosted within a VMWare virtual machine. Presently, we are running VMware ESXi version 5.

VMware, however, is not a strict requirement. There are several open-source, or otherwise free, alternative hypervisors on the market.
By using virtualization techniques the process of creating a clone of the VO is simply a matter of shutting down the virtual machine and copying a few files.
The LAMP Stack
LAMP - Linux, Apache, MySQL & PHP
The operating system driving the VO collaboration framework is Ubuntu, the world's most popular free, open-source, enterprise-level linux server derivative. In addition to the base operating system, the primary systems-level software packages are:
- Apache - the world's most adopted open-source web server
- MySQL - the world's most popular open-source database
- PHP - the pervasive server-side web programming language
The Drupal CMS
The VO collaboration platform is built on top of the open-source Drupal content management platform, which powers millions of websites and applications. It's built, used, and supported by an active and diverse community of people around the world (including a dedicated Drupal Security Team, which is 40 strong). Presently, we use version 6 of the Drupal CMS.
Code

The architecture, installation, configuration and maintenance of Drupal-based content management systems is well documented at http://drupal.org, but we summarize the essential ideas here. The Drupal architecture is defined by a series of abstraction layers, along with an extensive and well documented API for extending and modifying default behaviors.
"Effective Web design is driven by the need to balance flexibility and simplicity. If a system is too simple, it can only be used for a single purpose - but if it is too flexible, it may be too difficult for new users to learn. Drupal strives to reconcile these conflicting goals by providing its users with the tools they need to make their own content management solution, while still providing some pre-built components to help them get started. Thus, it can be described both as a content management system (CMS) and a content management framework (CMF) - one system which strives to have the strengths of both, without their deficiencies. Most CMS's are like a toy boat or truck - specific assumptions have been made about their use, assumptions that would be hard for you to override. Frameworks, on the other hand, provide you with raw materials only - you need to know a programming language and have a clear design vision to put them together. Drupal is like a Lego kit. Skilled developers have already made the building blocks - in the form of contributed modules - that you need to create a site that suits your needs, whether that is a news site, an online store, a social network, blog, wiki, or something else altogether."1
Modules
Themes
Views
Configuration

Content Types
|
Type |
Description |
|---|---|
| Bibliographic Reference | Allows members to add bibliographic references to groups in which they have membership. Biblios can be added manually or imported from BibTex. |
|
Event |
Events are special because they have a start date/time and an optional end date/time as a first-class concept. |
|
File |
Files allow uploads of documents and other pre-existing content. |
|
Forum topic |
A forum topic is the initial post to a new discussion thread within a forum. |
|
Group |
The basic unit of organization for adding new virtual communities to the VO. |
|
Group Project |
Used for documenting research projects relevant to some Special Interest Group. |
|
NSF CPS Project |
Used to build the catalog of NSF CPS research projects. |
|
News Item |
News items are more ephemeral forms of information than Pages. They are ideal for creating and displaying content that informs or engages website visitors. Press releases, site announcements, and informal blog-like entries may all be created with a news item entry. News entries may be automatically featured on the site's or on a group's home page. |
|
Online Meeting |
A virtual teleconference/desktop sharing session. |
|
Page |
A simple web page for creating and displaying information that rarely changes, such as an "About us" section of a website. By default, a page entry does not allow visitor comments and is not featured on the site's initial home page. |
|
Panel |
A panel layout broken up into rows and columns. Used for building Dashboards with various content embedded within the rows and columns at specified locations. |
|
Story |
Deprecated |
|
Tearline |
A content type that differs from web pages in that there are separate sections, each with differing access permissions |
|
User Profile |
Used to track basic data and meta-data for individual users (e.g. place of employment). |
|
Video |
Used for embedding videos hosted at sites such as youtube or vimeo. |
|
Webform |
Create a new form or questionnaire accessible to users. Submission results and statistics are recorded and accessible to privileged users. |
|
Wiki page |
A version of web pages that supports hyperlinking by symbolic names, rather than explicit URLs. |
Permissions
- anonymous users
- authenticated users
- trusted users
- group moderators
- group managers
- site moderators
- site administrators
Data
Finally, the last component of an instance of a VO is it's data. This includes, for example all of the web pages belonging to a site, as well as the list of validated users that may log onto the site. As with configuration settings, the data within an instance of a Drupal website is stored in a series of database tables.

Users
Taxonomies

Nodes
- Pages in books
- Discussion topics in forums
- Entries in blogs
- News article stories
Comments
Panels
1. Quoted from http://drupal.org/getting-started/before/overview
2. List of module pre-requisites for the VO collaboration framework
3. List of some of the Views defined by the VO collaboration framework
Support Staff and Roles
Support Staff and Roles
The VO collaboration and content management system is a large and complex software system consisting of many layers that require configuration and maintenance.
System Administration
Later, in the final chapter, we will discuss the process for an initial installation of a VO, which requires expertise in operating system administration, networking, and database management.

Site Development
Once the basic software is deployed, it is time to install, configure and customize the various modules and themes, which were reviewed in the previous chapter.

Using drupal.org's module search engine, a site developer can quickly find the official homepage of all of Drupal modules that have been published to the open-source community.

Each module comes with specific instructions for its installation and configuration procedures in a bundled README.txt file.
The above figure shows an example README for the node_clone module, which allows one to quickly make copies of existing content.
Once installed, however, it is frequently the case that, while the module is useful, its behavior needs to be extended in some way in order to better meet the needs of the CPS-VO community. In the case of the node_clone module, for example, while it can copy most simple content types, the concept of Groups has been greatly extended from the notion of groups that come with a vanilla, out of the box Drupal installation. Using Drupal's hook system, however, a software developer can define a new module that intercepts certain events generated by the website in order to override or complement the behavior of existing module(s). This is particularly useful for tying together multiple modules, which were developed in isolation and are not aware of one another, so that they behave in a more coherent fashion. The following figure show the info file for a custom CPS-VO module.

This info file declares that the cpsvo_groupclone module is dependent upon three other modules (viz. clone, og_vocab, & og_panels). In addition to the info file, the cpsvo_groupclone module contains a module file that contains PHP code, which defines the module's behavior.

In this example, we intercept Drupal's node_save event for the Group content type, and in addition to cloning the group node itself, we also look up all of that group's taxonomies and its panels from the database and iteratively clone each of those items as well, associating copies of each to the newly cloned group. This gives us the ability to have push-button initialization for a new group, based on previously defined template groups, without the tedious overhead of manually initializing the new group's taxonomies and its services (e.g. discussion forums, group homepage, membership listing, ...).
Site Management
While code developers typically work from the backend, using software development tools such as version control and PHP code editors, there is another class of support staff whose expertise falls along the lines of web design. These site administrators work primarily with Drupal's web-based administrative front-end to maintain basic configuration settings, and with CSS stylesheets and graphics files for maintaing the sites visual look and feel.

Below is an example screenshot of the web-based configuration page for the node_clone module.
Additionally, each module defines a set of permissions for its various features, which the site admin must map to the various roles assigned to each class of users. In the following screenshot, you can see that we restrict the ability to clone a group so that only site administrators have access to this feature.
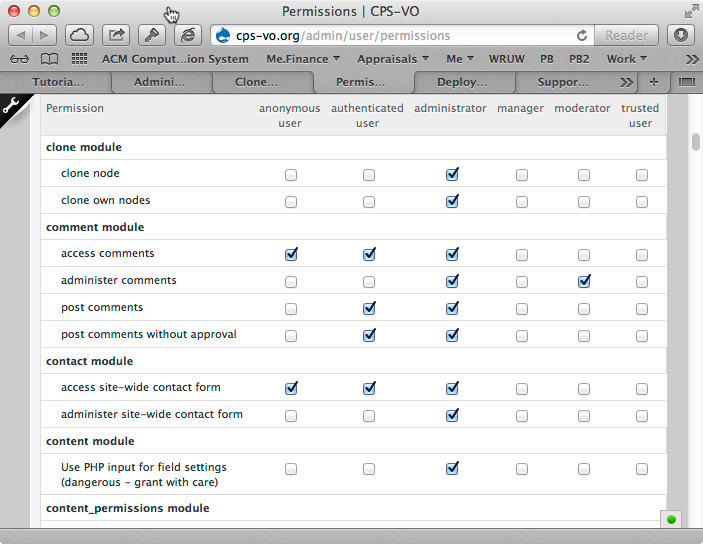
Site Moderation
The next level of support staff required to maintain an evolving virtual organization is that of the individual group moderators and managers.

Group managers do not have the ability to perform site-wide configuration duties, but they do have full control of their own local group. This includes the ability to edit, delete, or roll back (i.e. to a prevous version) any content that resides within their group. The chapter titled Form & Manage Groups lays out the details for this role.
This covers the four layers of the archetypical support roles. Next, we delve into more details of the systems administration tasks at the lowest layer.

Deploying a VO
Joining the CPS-VO by founding a new group was covered previously in the chapter titled Form & Manage Groups. Here we discuss creating a new Virtual Organization from ground zero.
Setting Up a Development Environment
In the upcoming sections, we discuss options for instantiating a new Virtual Organization, which is based upon the CPS-VO project's open-source codebase. A detailed description of the process for replicating the CPS-VO on a local workstation or laptop to be used for software development is given here.
Multi-Site Installs
Drupal's multi-site features allow one to easily associate a new domain name to the existing CPS-VO infrastructure. Multi-site installations leverage all existing computing hardware, networking infrastructure and system administration staff resources. Additionally, since multi-sites share the same codebase, all future software development and code maintenance for the core CPS-VO modules are shared with sister sites with little additional overhead1. Given that multi-sites share all resources all the way up to, but stopping short of, their Drupal configuration, the installation process for this mode of operation is far easier.
Deploying an Independent VO
Alternatively, one may instantiate a new virtual organization at a physically separate site, assuming the requisite computational infrastructure and administrative personell are available. In this case, however, a snapshot of the VO codebase is forked off, and there is no automated support for managing future software upgrades. The process for creating a new Virtual Organization is a subset of that of setting up a development environment outlined above, where the difference is that Drupal's configuration and site content will not be replicated from http://cps-vo.org.
1. It is still possible to develop new, customized features on a sister site that is isolated from the core CPS-VO activities.
Appendix: FAQ
Answers to the most frequently asked questions about the CPS-VO
- What is the CPS-VO Portal?
- What is the CPS Community?
- What is the CPS Community Forum?
- What are repositories? What services are offered by repositories?
- How will CPS-VO activities and accomplishments be reported?
- How do I interact within the CPS-VO?
- Who can join the CPS-VO? How do I join?
- I forgot my username/password, what do I do?
- Who can form groups? How are groups formed?
- How do I join a group? Can I belong to more than one group?
- How do I leave a group?
- How do I post content to a group? Who can see the content posted in a group?
- How do I find the content I have posted?
- Where do I post community announcements, CfP’s, events?
- How do I adjust my subscription notification settings?
- How do I report a bug/inappropriate content? Submit feedback?
What is the CPS-VO Portal?
The CPS-VO Portal content is created and managed by the CPS Community. The Portal technical infrastructure is integrated and expanded by the CPS-VO Portal Team of the Institute for Software Integrated Systems (ISIS) at Vanderbilt University.
The CPS-VO Portal provides services and content for :
- facilitating interaction and information exchange among CPS researchers across a broad range of institutions, programs and disciplines
- sharing knowledge generated by CPS research with the broader engineering and scientific communities, sharing and integrating experimental tools, platforms and simulators among researchers and stakeholders,
- fostering collaboration and information exchange between CPS researchers and industry
- helping international collaboration. The Portal is built on DRUPAL, a widely used free and open source content management system (CMS) that is used as a back-end for at least 1% of all websites worldwide
What is the CPS Community?
The Cyber Physical Systems (CPS) community is a broad community of interest for CPS researchers and developers. The CPS-VO includes institutions from academy and industry, and people who work on a wide range of related disciplines with different approaches, methods, tools and experimental platforms. These entities are all interconnected and evolve driven by a shared goal, to advance our knowledge in the science and engineering of CPS.
What is the CPS Community Forum?
An annual CPS-VO community-building event at CPSWeek, where Federal Agencies, Academic and Industry organizations discuss status of the CPS research and applications. Community Forum archives can be found here: 2009, 2010, 2011
What are repositories? What services are offered by repositories?
At this point, the CPS-VO Portal supports a File Repository for managing information created by the CPS Community. Content in the File Repository is characterized by site-wide and group-wide taxonomies that enables taxonomic search, taxonomy-driven access control, and taxonomy-driven visibility control. Future releases of the CPS-VO Portal will extend the repository suite to education material, challenge problems and solutions, tools and models.
How will CPS-VO activities and accomplishments be reported?
CPS-VO activities will be reported at the CPS Community Forum each year. A copy of the annual report will be made available in the CPS File Repository.
How do I interact within the CPS-VO?
See full tutorial instructions at http://cps-vo.org/tutorial/collaborate-with-colleagues
There are several ways to interact within the CPS-VO:
- Seek out Colleagues
- Contribute to Forum Discussions
- Create a Global Forum Announcement
- Create a Calendar Event
- Create Event Invitations
- Participate in Online Meetings
- Upload a File
- Activity Messaging
- Use the Chat Feature
- Create a News Item
- Create a Group Project
- Post a Video
- Create and Edit Wiki Pages
Who can join the CPS-VO? How do I join?
See full tutorial instructions at http://cps-vo.org/tutorial/get-an-account
Anyone with a valid email address can become a member of the CPS-VO.
At the top of the portal home page click on the "Click here to register" link and follow the instructions.
I forgot my username/password, what do I do?
At the top of the portal home page (when you are logged out) click on the "Forgot username or password?" link and follow the instructions to receive an email with a one-time login link.
Who can form groups? How are groups formed?
Any VO community member may apply to form a group. A request to form a group may be sent by completing and submitting the request form located at http://cps-vo.org/tutorial/form-manage-group/SIG-request
How do I join a group? Can I belong to more than one group?
See full tutorial instructions at http://cps-vo.org/tutorial/groups/join-a-group
VO community members may belong to multiple groups.
Step 1: Go to the publicly listed groups by selecting "Groups" from the "Browse" tab in the global menu at the top of the CPS-VO home page.
A "Join" link is displayed to the right of groups that are open for membership. Other groups require you to "Request Membership". Still other groups are "Invitation Only" or "Closed" indicating that membership is controlled by the group manager (either by inviting you to their group or adding you).
Step 2: To join an available group, click on the link listed in the "Join Link" column to the right hand side of their description.
How do I leave a group?
See full tutorial instructions at http://cps-vo.org/tutorial/groups/leave-a-group
Step 1: Click on the "My Groups" menu link at the top of the CPS-VO home page to show your group list.
Step 2: Navigate to the group you want to leave and click on "Edit membership".
Step 3: The resulting group page will have a link called "Leave this group". Click on this to end your membership of the group.
How do I post content to a group? Who can see the content posted in a group?
Navigate to the group in which you want to post content. There are multiple types of content listed in the "Collaborate" toggle menu (located beneath the left sidebar menu in your group).
Use the "Groups" selector (located in the area beneath the rich text editor) to choose which groups you want your file to publish to and whether you want it to be publicly available in the CPS-VO Repository.
How do I find the content I have posted?
Most groups have an "activity stream" page where you can access the most recent content. You can also go to your account page and select the "contributions" tab to see all the content you have posted.
Where do I post community announcements, CfP’s, events?
See full tutorial instructions at http://cps-vo.org/tutorial/collaborate-with-colleagues/forum-announcement
Select "Announce on Forums" in the "Collaborate" menu at the top of the CPS-VO home page. You will be taken to a form where you can add the Title and Content of your announcement, select Vocabularies to tag it, and select which forums the announcement will post to.
How do I adjust my subscription notification settings?
See full tutorial instructions at http://cps-vo.org/tutorial/exploring-my-account/subscriptions
You can get to your subscriptions page by going to your account and clicking the "My Subscriptions" menu item in the "My Tools" toggle menu. This is the page where you can manage your subscriptions and your notifications settings.
How do I report a bug/inappropriate content? Submit feedback?
Submit a bug or inappropriate content by clicking the feedback button to the far right of the site or by hovering over the house icon at the top left of the CPS-VO home page and selecting "Contact Support" in the dropdown menu.
Appendix: Glossary
Activity Stream - a dynamic listing of content as it is added to the group
Archive - Clicking the archive checkbox hides this content from global and group home pages. However, the content will still be accessible in other areas of the site. Unchecking the archive checkbox allows this content to display on global and group home pages.
Authenticated User - entry level users with the most basic level of membership. Authenticated users can contribute content to the global repository, calendar, and forums.
Author - the creator a of a node
Bibliographic Reference - a content type that allows members to add bibliographic references to groups in which they have membership. Biblios can be added manually or imported from BibTex.
Bookmarks - content saved to your library for easy retrieval at a later date
Breadcrumbs - The set of links, usually just below the header, that show the path you followed to locate the current page. For example, it might show CPS-VO > SCIENCE OF SECURITY > CALENDAR, meaning that you started at the home page, selected 'Science of Security' from the 'My Groups' menu, then selected 'Calendar' from the group menu items. The term breadcrumbs is borrowed from Hansel and Gretel, who left crumbs of bread along their path so they could find their way back out of the forest.
Broadcast - sends an email message to all members of the group
Collaborate Menu - toggle menu in the left sidebar of a group. Contains links to create and post content within a group.
Contacts - users you have added to your contacts list
Content - the text, images, and other information on the web site
Content Type - Every node belongs to a single "node type" or "content type", which defines various default settings for nodes of that type. Content types on the CPS-VO include: Events, News Items, Videos, Files, Groups, Projects, Online Meetings, Tearlines, Webforms, Web Pages, and Wiki Pages.
Contributor - the person(s) who authored the document
Event - a content type that has a start date/time and an optional end date/time as a first-class concept. Events postings are automatically listed in the global and/or group calendar.
Field - elements of data that can be attached to a piece of content. Fields commonly contain text, images, or terms.
File - a content type that allow uploads of documents and other pre-existing content
Filter - a tool to narrow search results based upon the specified criteria
Forum Topic - a posted topic of discussion within a certain forum
Global - content not belonging to a group
Group - the basic unit of organization for adding new virtual communities to the CPS-VO.
Group Manager - responsble for the group menu structure, group taxonomy structure, group forum structure, administering group members, and sending group broadcast messages
Group Member - can contribute to the group repository by uploading files, posting videos, and creating events & news items. They can also contribute to the forums, conduct online meetings, and create projects and wiki pages.
Group Moderator - has full control over your group's content. They perform an editorial function and are responsible for grooming the content of your group and ensuring that publicly viewable content is appropriate, correct, and complete to your group's own standards.
Group Project - a content type used for documenting research projects relevant to some Special Interest Group. Contains fields for elements such as: abstract, PI, Co-PI, researchers, artifacts, related projects and vocabularies.
Invitation - invitation of guests to an event sent via notifications
Log Message - a message entered for each revision to help track changes to a post.
Member Info Menu - toggle menu in the left sidebar of a group that contains information about the group and group members.
Messages - information sent via email or portal messaging about content or groups to which a user has subscribed.
Modboard - a bulk editor which allows you to make changes on multiple pieces of content at the same time.
News Item - a content type for more ephemeral forms of information than Pages. They are ideal for creating and displaying content that informs or engages website visitors. Press releases, site announcements, and informal blog-like entries may all be created with a news item entry.
Node - a piece of content in Drupal, typically corresponding to a single page on the site, that has a title, an optional body, and perhaps additional fields. Every node also belongs to a particular content type. Examples of nodes are files, news events, online meetings, and wiki pages.
Notification - messages sent via email or portal messaging to inform users of additions to subscribed content.
NSF CPS Project - a content type used to build the catalog of NSF CPS research projects
Online Meeting - a content type used for a virtual teleconference/desktop sharing session.
Page - a content type for creating and displaying information that rarely changes, such as an "About us" section of a website
Panel - a web page in which content can be added to defined areas in custom layouts with different column configurations.
Private - Content that is not marked as public is private to the group in which it was posted.
Publicize - placing a post on a group homepage or the VO homepage
Publish - Uncheck this option if you don't wish for this content to appear on the VO yet. Useful for saving drafts of content that requires editing before going live/published.
Public - content that may be viewed by unauthenticated users
Region - defined areas of a page where content can be placed.
Revision - one version from a list of tracked differences between multiple versions of a post
Roles - Examples of roles are unauthenticated users, authenticated users, trusted users, group moderators, and group managers.
Search - allows users to jump right to the specific piece of information which interests them
Site Administrator - has global access to all VO content. This means that a Site Administrator has the privileges of a group manager and moderator in all groups. They can add/ remove members, broadcast messages, and create/remove group admins. Additionally, they can configure group services, add/ban group members, and also have full control over group content.
Spotlight - featured content (eitiher news or event) that is placed into a slideshow feature on the portal home page or a group home page.
Sticky - Setting content as "Sticky" will cause that content to be pinned to the top of lists
Subgroups Menu - lists the parent and subgroups related to the current group
Subscription - allows a user to automatically be notified of new or updated content
Sunrise - Setting a sunrise date will de-archive this content at the set date and time (midnight is the default if a time is not set). The content will then display on global and group home pages.
Sunset - Setting a sunset date will automatically archive this content at the set date and time (midnight is the default if a time is not set). The content will no longer display on global and group home pages after the sunset date/time, but will still be accessible in other areas of the site.
Tagcloud - a visual representation for text data, typically used to depict keyword metadata (tags)
Taxonomy - Taxonomies of terms are used for organizing content. Taxonomies are a set or 'Vocabularies' of 'Terms'. Because of their impact on finding and accessing items on the site, creating and modifying taxonomies can only be done by Site and Group Administrators.
Tearline - a content type that differs from web pages in that there are separate sections, each with differing access permissions
Teaser - a teaser is a snippet of text designed to tell the user the content of a post without reading the entire post
Term - an organizational keyword, known in other systems as categories or metadata. A term is a label that can be applies to a node. They are also known as tags.
Trusted User - a member who has been vetted and approved by site managers and site administrators. This trusted member will then be able to post information to the CPS-VO home page. CPS-VO members can apply for elevated "trusted user" status via the "Contact Support" link under the "Home" tab in the global menu at the top of every CPS-VO page.
Unauthenticated User - users who are not logged in, or have not yet joined the CPS-VO. They can browse the site, but are not able to contribute content to the portal. Also known as 'Anonymous Browsers'.
User Profile - visual display of personal data associated with a specific user
Vertical Tabs - tabs to the left of a page that stack on top of each other.
Video - a content type used for embedding videos hosted at sites such as YouTube, Vimeo, or TED.
Vocabulary - a collection of terms
Webform - A content type used to create a form or questionnaire that allows a user to enter data. Submission results and statistics are recorded and accessible to privileged users.
Widget - an application, or a component of an interface, that enables a user to perform a function or access a service
Wiki Page - a version of web pages that supports hyperlinking by symbolic names, rather than explicit URLs
Contact Support
Maintainers of the Portal can be contacted to report a problem, make a suggestion, or to ask the portal manager to request setting up a group. If you would like to make a group request then please select "Group request" as the "Category" in your email.
To contact portal administration perform the steps below:
Step 1: Select the "Contact Support" link under the "Home" tab in the global menu at the top of the CPS-VO home page.

Step 2: The "Contact Us" form is brought up with your username and email from your account information already filled in. Select a category to identify the purpose of your message.
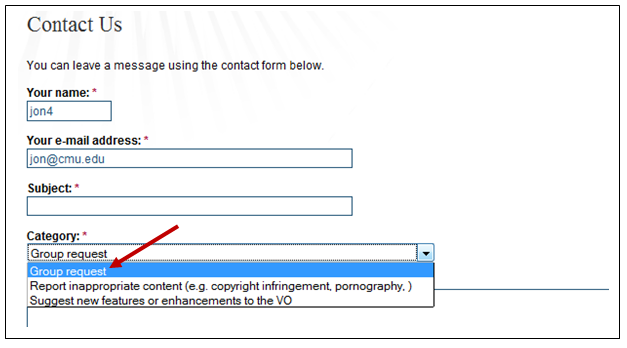
Step 3: Fill in the Subject and Message fields, and submit with the "Send e-mail" button (you may choose to send a copy of the email to yourself with the provided checkbox).


