Collaborate with Colleagues
Listening and allowing others to be heard makes for a productive outcome. Facilitating this is essential to advance our goals. Support for working with and building groups is a way to accomplish such success. Users are provided with services that set up and enable infrastructure for groups working together.
Seek out Colleagues
CPS-VO members can be searched by first name, last name, topics, keywords and author.
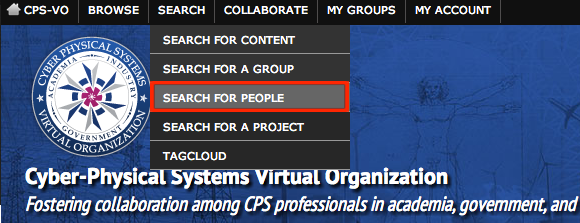 |
Select "Search for People" feature in the "Search" menu at the top of the CPS-VO home page. |
 |
CPS-VO members can be searched by first name, last name, topics, keywords and author by typing into the search window. The search can be constrained to match "all of the words", "exact phrase", "at least one of the words" or "without the words" (omitting the words typed in the box). You may also choose from a list of "guided search" terms displayed below the "keyword search" field. |
Contribute to Forum Discussions
Each group has a forum where active discussions can be started, commented on and viewed. A privilege of group membership is that forum discussions can be initiated. Group administrators may make discussions inactive.
Forums provide a place where discussions can be tracked. These discussions come in the form of initiated topics. Forums can be made public or private within a group. A forum must first exist before a topic can be initiated because the topic must be placed inside a forum. Only the initiator of a forum topic and group administrators have permissions to edit the topic content. After discussions are opened in a forum they may be commented on by group members.
 Video example
To participate in a forum discussion, use the following steps:
 |
Step 1: Go to one of the groups you are a member of and navigate to the forum. Step 2: Click on the link of the forum name you would like to participate in. In the example it would be "General Discussion". |
 |
Step 3: Click on a topic you would like to read and/or discuss. |
 |
Step 4: Reply to a topic by clicking on the "Post Reply" button. |
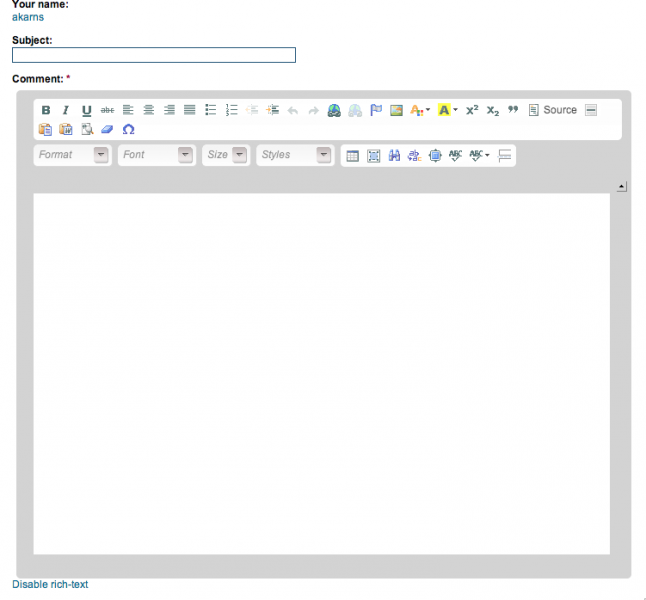 |
Step 5: Type your reply in the text editor and click the "Save" button at the bottom of the page beneath the rich text editor. |
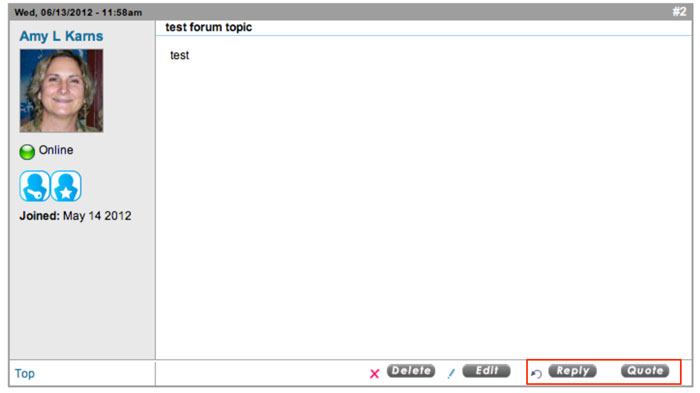 |
Step 6: Reply to an individual post by clicking the "Reply" or "Quote" button beneath an individual comment. |
 |
As other items in the Portal, subscriptions can be made to forums discussions. A subscription to an active forum topic means that you will get an email notification whenever comments are made to the topic. |
There are two ways in which to start a new forum topic:
 |
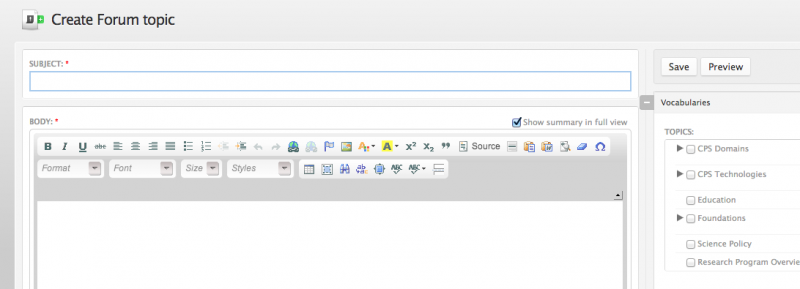
1. Start a new topic by clicking on the "New Topic" button: |
 |
|
 |
2. You can also start a new topic from the "Collaborate" menu in the left sidebar of your group home page: |
 |
|
Create a Global Forum Announcement
There may be announcements you want to broadcast to the global forums on the CPS-VO.
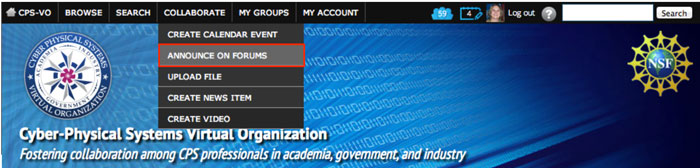 |
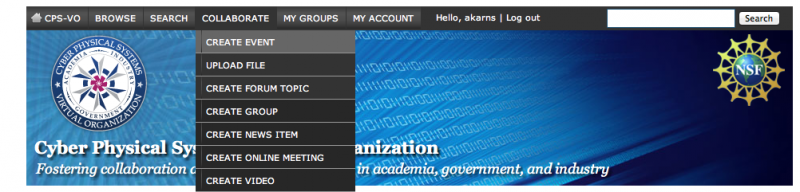
Begin by selecting "Announce on Forums" in the "Collaborate" menu at the top of the CPS-VO home page. |
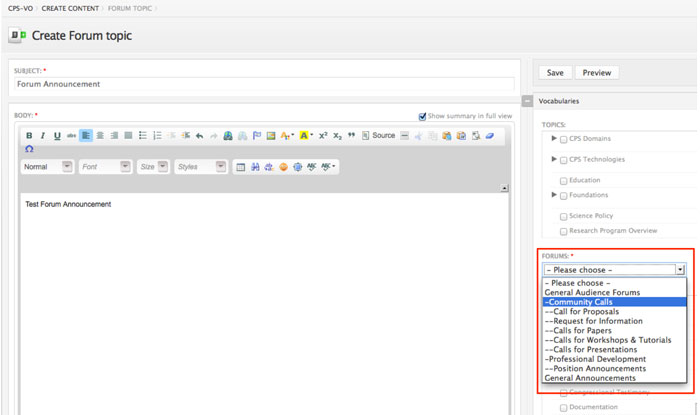 |
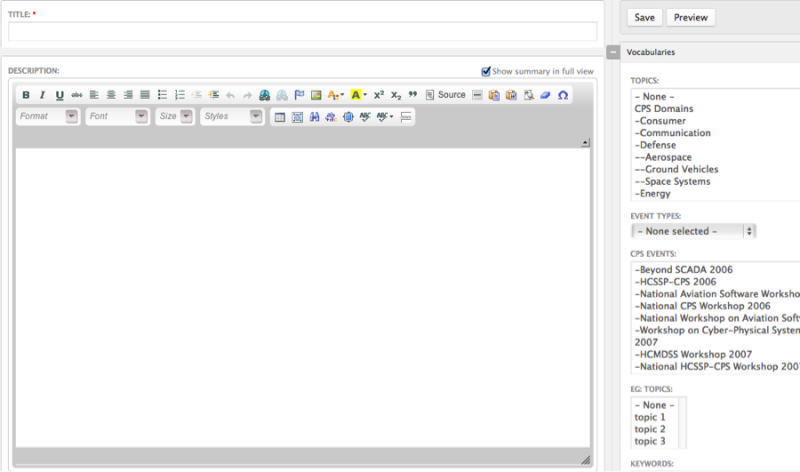
You will be taken to a form where you can add the Title and Content of your announcement, select Vocabularies to tag it, and select which forums the announcement will post to. |
 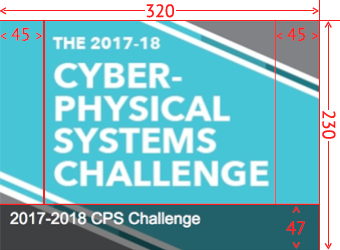 |
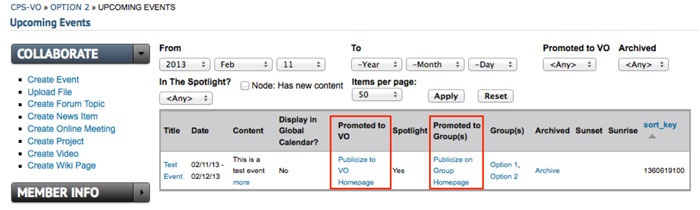
Optionally, add a slideshow image if you want your event to be added to a group spotlight slideshow. Click the "Browse" button to navigate to the image on your computer then click the "Upload" button to submit the image. It should show as a thumbnail if successfully uploaded.
The dimensions of the image should be 320x230 pixels. Leave 47 pixels at the bottom for the slide title. Also leave 45 pixels on each side (making a 230 pixel square "sweet spot"). This will allow for the image to be cropped nicely in the set of icons beneath the spotlight. |
 |
Use the area with the gray menu below the image browser to set:
|
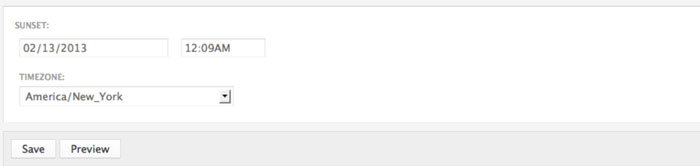 |
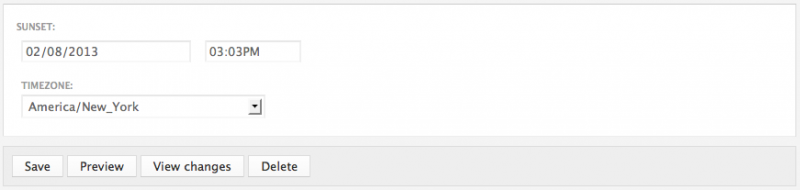
Optionally, set a date and time that your post will be archived and disappear from the CPS-VO homepage using the "Sunset" feature.
Click the "Save" button to submit your announcement. |
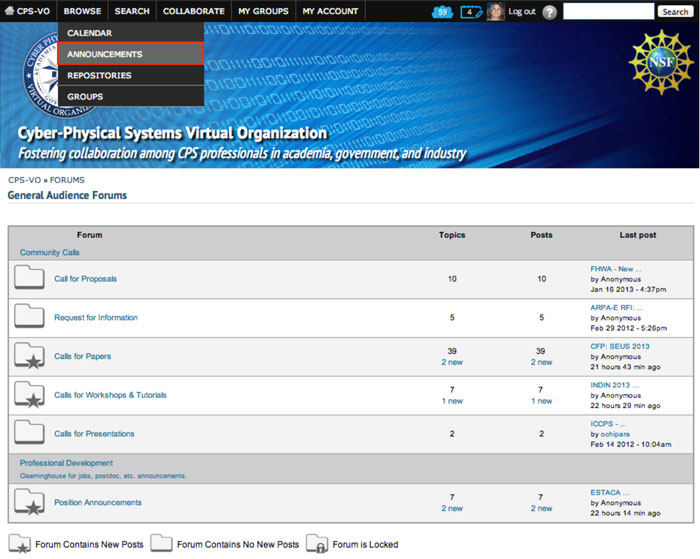 |
Your announcement will then post in the forums you selected, as well as appearing on the CPS-VO homepage (if you are a trusted user). Announcements can be found via the "Announcements" link under the "Browse" tab in the global menu at the top of the CPS-VO home page. |
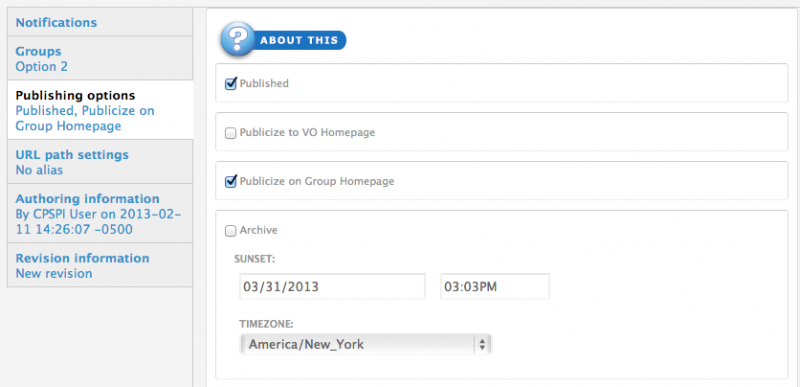
About Publishing Options
- Publish: Uncheck this option if you don't wish for this content to appear on the VO yet. Useful for saving drafts of content that requires editing before going live/published.
- Publicize to Entire VO: Selecting this option will place this post on the VO homepage. Exercise caution when using this option.
- Publicize on Group Homepage: This option will place your post on your group's homepage in the corresponding section (Recent News, Upcoming Events, etc…)
- Archive: Clicking the archive checkbox hides this content from global and group home pages. However, the content will still be accessible in other areas of the site. Unchecking the archive checkbox allows this content to display on global and group home pages.
- Sunrise: Setting a sunrise date will de-archive this content at the set date and time (midnight is the default if a time is not set). The content will then display on global and group home pages.
- Sunset: Setting a sunset date will automatically archive this content at the set date and time (midnight is the default if a time is not set). The content will no longer display on global and group home pages after the sunset date/time, but will still be accessible in other areas of the site.
- Display in Slideshow: Will place this post, along with its image (or video), in a slideshow. Must be used with either Publicize to Entire VO or Publicize on Group Homepage options.
- Pin to Top of Lists: This option will make this post appear at the top of content listings, regardless of any other settings. Useful for denoting important content or content that has a "call to action" associated with it.
Create a Calendar Event
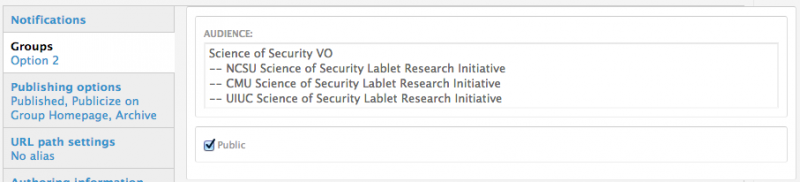
CPS-VO events are postings in the calendar. Events have important details such as a Title, a start date, a location. It may also have a description and a URL. Events also have "Audiences". Audiences are CPS-VO groups and you may be a member to any number of them. If no audience is marked for an event or it is marked public then it will only show in the global calendar for all CPS-VO users. If you have selected groups in the audience section, the event will show on the selected group calendars and activity stream pages.
To post events in the calendar follow the instructions outlined in steps 1 and 2 below.
STEP 1:
 |
Go to the "Create Event" form by clicking on the link in the "Collaborate" dropdown menu at the top of the CPS-VO home page. |
 |
You can also "Create Event" from within a group by using the "Collaborate" toggle menu in the left sidebar area of a group page. |
STEP 2: Before submitting the event details it is suggested that you fill out as much information as possible about your posting. Required items are marked with a *red star. (Details below):
 |
|
 |
|
 |
|
 |
|
Use the advanced options to select specific months and days to repeat on.
 |
Use the 'Except' box to input dates that should be omitted from the results. Use the ‘Additional’ box to insert extra dates which fall outside of the repetition pattern. Click the “Add more” buttons beneath exceptions and additions for multiple entries. |

|
Add a slideshow image if you want your event to be added to a group spotlight slideshow. Click the "Browse" button to navigate to the image on your computer then click the "Upload" button to submit the image. It should show as a thumbnail if successfully uploaded.
The dimensions of the image should be 320x230 pixels. Leave 47 pixels at the bottom for the slide title. Also leave 45 pixels on each side (making a 230 pixel square "sweet spot"). This will allow for the image to be cropped nicely in the set of icons beneath the spotlight. |
 |
A set of options near the bottom of the page allow you to set notifications, event details, groups, publishing options, authoring information and URL path settings:
|
 |
|
 |
|
|
|
Promote and publish news items to the group home page in the "events" section and/or spotlight slideshow.

About Publishing Options
- Publish: Uncheck this option if you don't wish for this content to appear on the VO yet. Useful for saving drafts of content that requires editing before going live/published.
- Publicize to Entire VO: Selecting this option will place this post on the VO homepage. Exercise caution when using this option.
- Publicize on Group Homepage: This option will place your post on your group's homepage in the corresponding section (Recent News, Upcoming Events, etc…)
- Archive: Clicking the archive checkbox hides this content from global and group home pages. However, the content will still be accessible in other areas of the site. Unchecking the archive checkbox allows this content to display on global and group home pages.
- Sunrise: Setting a sunrise date will de-archive this content at the set date and time (midnight is the default if a time is not set). The content will then display on global and group home pages.
- Sunset: Setting a sunset date will automatically archive this content at the set date and time (midnight is the default if a time is not set). The content will no longer display on global and group home pages after the sunset date/time, but will still be accessible in other areas of the site.
- Display in Slideshow: Will place this post, along with its image (or video), in a slideshow. Must be used with eitherPublicize to Entire VO or Publicize on Group Homepage options.
- Pin to Top of Lists: This option will make this post appear at the top of content listings, regardless of any other settings. Useful for denoting important content or content that has a "call to action" associated with it.
Create Event and Meeting Invitations
After you have created your event or online meeting you will want to invite others to attend.
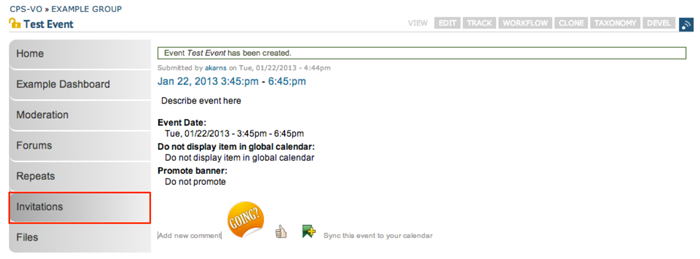 |
Click on the "Invitations" tab from the left menu. |
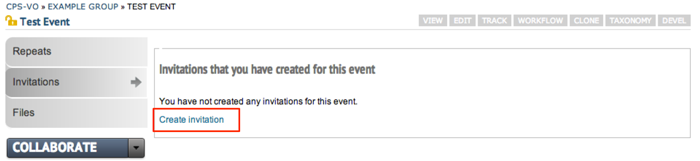 |
From that page, click the “Create Invitation” link in the content area to the right. |
 |
Write your invitation in the rich text editor and click the “Save Invitation” button at the bottom of the page. |
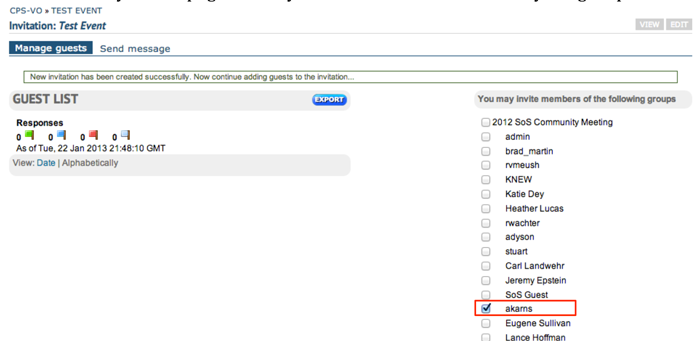 |
This will take you to a page where you can invite members from your groups. |
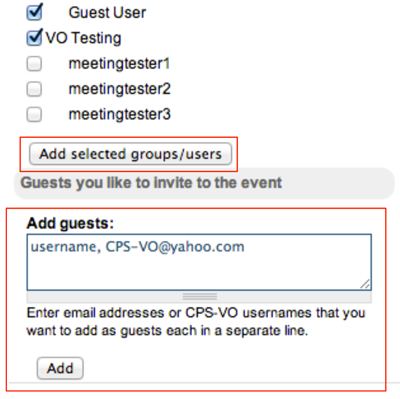 |
Click the “Add selected groups/users” button. User names will indent beneath group names. If you click a group name, all users within that group will be invited. You can also add guests by typing their CPS-VO usernames or email addresses in the “Add guests” text box. |
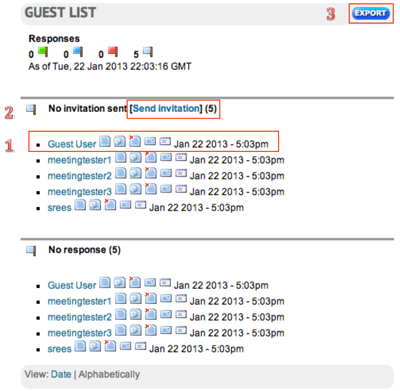 |
Your invitees will show in a guest list to the left of the member list.
1. Use the icons next to their name to view the invitation, invitation status, remove attendee, send a message, or send the invitation.
2. You may send the invitation to all users by using the link at the top of the list.
3. Export a CSV file of your guest list by using the blue “Export” button to the right of the “Guest List” header text.
|
 |
As the invitees respond, categories (no response, attending, not attending) will appear with their names according to their responses.
If you click on the tab "Send Message" (as shown below) it will allow you to attach a message to your invitation and send it to a select audience from a dropdown menu (which includes selectors for Entire guest list, Guests who do attend, Guests who do not attend, Guests who might attend, and Guests who have not replied yet). |
Upload a File
A File can belong to the general CPS-VO portal / community or it may be associated with one or more groups. Submission of a file can be made through the Primary Menu (see Step 1 figure) or when within the context of a Group, the primary menu disappears, and group-specific file upload mechanism appear (details are provided in the following section). If a file is submitted through the primary menu then the audience by default will be for all site users unless the Audience is specifically marked. If a file is submitted through the group browser then the default audience is that group. In this case additional groups can also be marked to see the file so that the file is cross-posted in multiple groups concurrently. Additionally, files may be marked Private so that only members of the group have access, or it can be checked as Public and thus visible to all site users.
Upload a File -Video example
Submit a file from the global menu either as public for all CPS-VO users or to select groups
 |
Step 1: Go to the form for creating a file by clicking on "Upload File" under the "Collaborate" tab at the top of the CPS-VO home page. |
 |
Step 2: Select the file you wish to upload by clicking the "Choose File" button and navigating to the file on your computer and selecting it. Fill out any relevant information describing your submission. Make sure to select vocabularies in the area to the right of the rich text editor (Topics, CPS Events, Document Type or source) that will help others find your file when searching for content. You may also type your own keywords. Note: The default file extensions allowable include: doc, docx, exe, gif, gz, jpg, jpeg, json, msi, odp, ods, odt, pdf, png, pot, pps, ppt, pptx, py, tar, tgz, tif, tiff, txt, xls, xlsx, zip. |
 |
Use the "Groups" selector (located in the area beneath the rich text editor) to choose which groups you want your file to publish to and whether you want it to be publicly available in the CPS-VO Repository. Click the "Save" button to submit your file. |
Upload a file within a group
Upload a file within a Group - Video example
 |
Select "Upload file" from the "Collaborate" toggle menu in the left sidebar of a group then follow the same instructions as uploading a file using the global menu. Don't forget to tag the file with the appropriate taxonomy terms, if you want it to show up under the groups Files menu item (i.e.the group's virtual filesystem) . Files uploaded from within the context of a group are automatically tagged as belonging to that group, thus you do not have to edit the Groups setting for these files unless you want to simultaneously post them to other groups as well. |
Upload multiple files within a group using the bulk uploader
Bulk Uploader - Video example
 |
Step 1: Go to your group file browser. Step 2: Select a destination folder where you would like to upload your files and begin the upload process by selecting "Upload files". |
 |
Step 3: Drag and drop files from your desktop or select files from your file browser by clicking on "Add files". Click on "Start upload" to complete the upload process. As in the previous section, these files will automatically be tagged as belonging to your group. You will then be directed back to the file browser after your files are uploaded where you can individually edit the files and add other vocabularies. |
Link to a term within a folder
 |
Step 1: Determine the node ID of the group (which can be found by hovering over the “edit group button”). |
 |
Step 2: Select the gray “taxonomy button” to navigate into the list of group vocabularies. |
 |
Step 3: Select “list terms” to the right of its vocabulary parent to go to a list of its terms. |
 |
Step 4: Scroll to the target term by navigating to that term in the taxonomy listing and hover over the linked name to determine its node ID. |
 |
Step 5: Provide a link to the term following this syntax: node/{groupid}/browser?target_term={termid} |
Activity Messaging
The Notification service allows you to subscribe to notifications of updates to items (such as Events, Files, etc.). For example, you will receive an email each time the author updates a document to which you have subscribed or when details about an event change.
Below are the steps demonstrating how manage subscriptions.
 |
Step 1: To receive notifications about updates and new comments on the item, select the "Subscribe to: This post". If you want to subscribe to posts by the authors of the item, use the "Subscribe to: Post by USERNAME" link. |
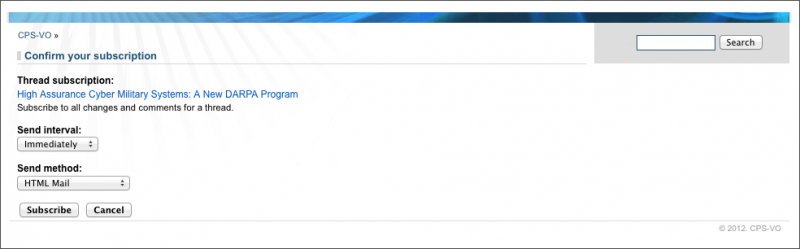 |
Step 2: The "Subscribe to" link takes you to the subscription confirmation page, where you can choose how often to check whether the item or its comments have been updated. If any change is noticed, an email will be sent to the email address linked to your account. |
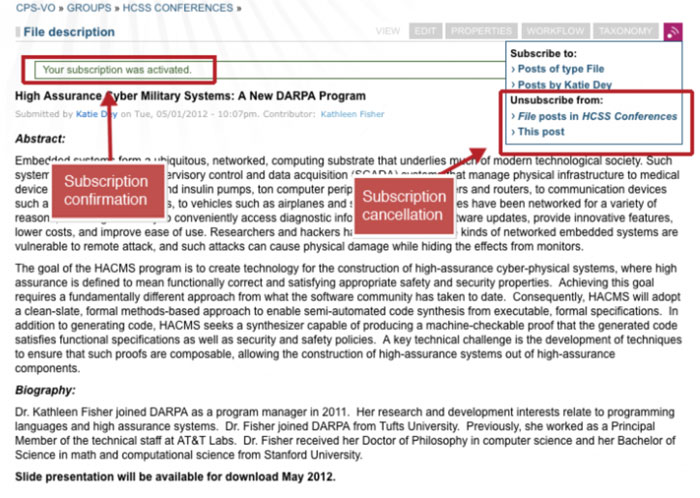 |
Step 3: After subscribing you will see a confirmation in a green outline box. The "Subscribe to: This Post" link then changes to "Unsubscribe from: This Post" for canceling the subscription. (Note: You can also manage all your subscriptions via your "My Account" page by selecting the "My Subscriptions" link in the left sidebar toggle menu as described here.) Read more about managing your subscriptions from your Account |
An exemplar email is shown below. Click on the hyperlink provided in the email to navigate to the content that has been updated.

Logging and Viewing Revisions
A revision is saved each time content is edited. Add a log message to help identify changes made to the content.
 |
From the "notifications" tab (located in the vertical tabs beneath the editing area), you can enter a log message before you save the content. This log message will be included in the notification that is sent out and also in the revisions report. |
 |
View the list of revisions by clicking the gray "revisions" tab at the top of the node. |
 |
The list of revisions displays log messages, post date and node author. Select two revisions with the radio buttons and click the "Show diff" button to reveal differences between the two revisions. |
 |
Older content is shown in the left column and newer content is shown in the right column. Click the "list revisions" tab at the top left of the content to go back to the revisions table. |
 |
Revert to a past revision by selecting the "Revert" link to the right of the revision entry. |
 |
A warning message will appear. Click the "revert" button. |
 |
A copy of the revision that you chose to revert will be copied and placed at the top of the list as the current revision. |
Create a News Item
As a member of a group you can post news items which will show up in the activity stream and can be set by the group manager to show up in the Spotlight Slideshow and the Recent News section of the group's home page.
 |
Go to the "Create News Item" link in the "Collaborate" toggle menu which is located in the lower left sidebar on your group page. |
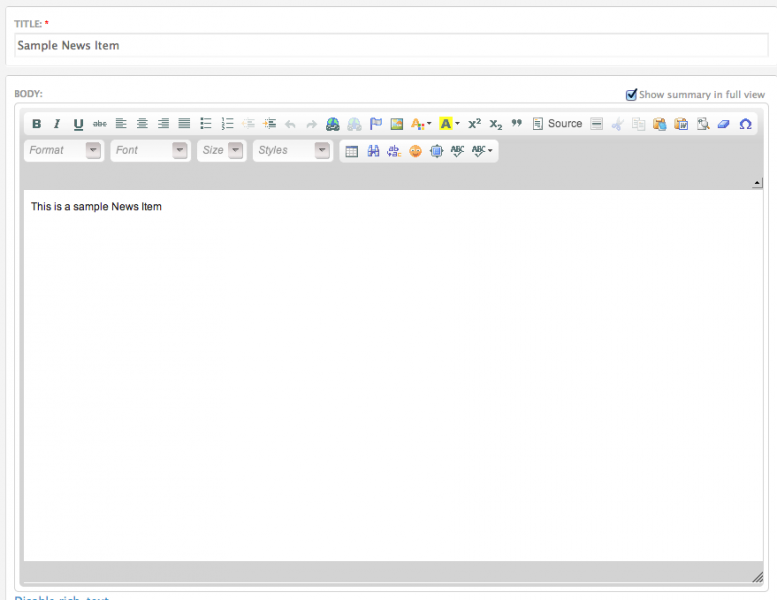 |
You will be taken to a rich text editor where you can add a title and the information about your news item. |
 |
You can upload a photo to go with your news item. This will enable it to later be added to the spotlight slideshow if so desired by the group manager.
The dimensions of the image should be 320x230 pixels. Leave 47 pixels at the bottom for the slide title. Also leave 45 pixels on each side (making a 230 pixel square "sweet spot"). This will allow for the image to be cropped nicely in the set of icons beneath the spotlight.
|
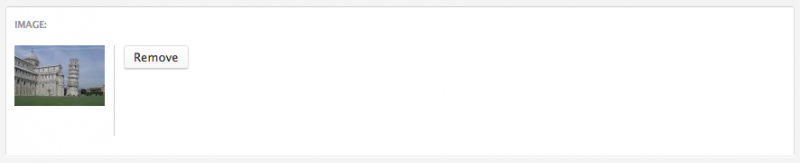 |
When the photo is successfully uploaded it will display as shown below. Click the "Remove" button to remove the photo. |
 |
Click the "Save" button at the bottom of the form to submit your news item.
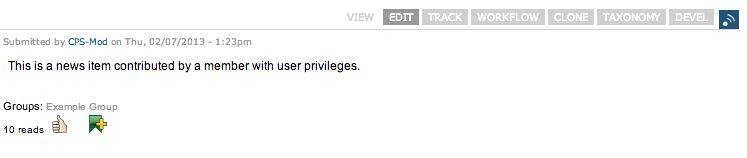
The news item will show in the activity stream section of your group by default. |
For Moderators and Managers:
To edit publishing options on a news item:
 |
Click the "edit" button at the top of the news item page. |
 |
Go to the "Publishing options" section beneath the rich text editor. Select "Publicize to group home page" to display in the "Recent news" section and/or "Display in slideshow" to display in the spotlight slideshow. |
 |
Your item will show up in the "Recent News" Section and/or "Spotlight Slideshow" on your group’s home page. |
About Publishing Options
- Publish: Uncheck this option if you don't wish for this content to appear on the VO yet. Useful for saving drafts of content that requires editing before going live/published.
- Publicize to Entire VO: Selecting this option will place this post on the VO homepage. Exercise caution when using this option.
- Publicize on Group Homepage: This option will place your post on your group's homepage in the corresponding section (Recent News, Upcoming Events, etc…)
- Archive: Clicking the archive checkbox hides this content from global and group home pages. However, the content will still be accessible in other areas of the site. Unchecking the archive checkbox allows this content to display on global and group home pages.
- Sunrise: Setting a sunrise date will de-archive this content at the set date and time (midnight is the default if a time is not set). The content will then display on global and group home pages.
- Sunset: Setting a sunset date will automatically archive this content at the set date and time (midnight is the default if a time is not set). The content will no longer display on global and group home pages after the sunset date/time, but will still be accessible in other areas of the site.
- Display in Slideshow: Will place this post, along with its image (or video), in a slideshow. Must be used with either Publicize to Entire VO or Publicize on Group Homepage options.
- Pin to Top of Lists: This option will make this post appear at the top of content listings, regardless of any other settings. Useful for denoting important content or content that has a "call to action" associated with it.
Create a Group Project
Your group may have a "Projects" page where you can share your project within that area of interest.
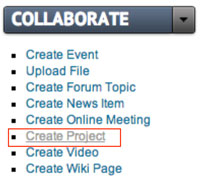 |
Adding a group project can be initiated by going to the “Create Project” link in the “Collaborate” toggle menu in the left sidebar of your group page. |
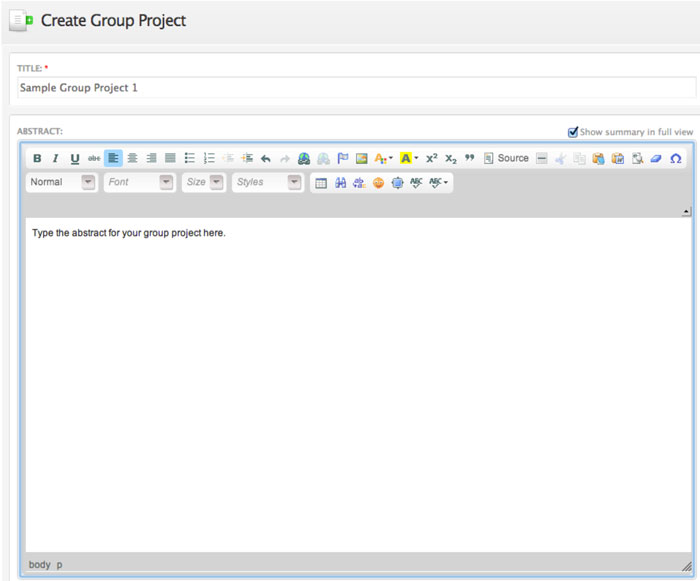 |
Clicking the “Create Project” link will take you to a form where you can enter important information about your Group Project.
Enter your Project Title and Abstract in the Rich Text Editor.
|
 |
Enter PI, Co-PIs and Researchers by typing their username in the text field. An auto-fill feature will help you find the correct user. |
 |
Related Artifacts can also be added. Choose a “vocabulary” and “term” from the dropdown list. All content types with that taxonomy will then be listed on your project. You can add as many vocabularies as you choose by clicking on the “add more values” button. |
 |
Add Related Projects by typing the name of the project that is related to yours. An auto-fill feature will cause a dropdown menu to appear with suggestions of the projects you might be referring to. Click the "Add more items" button to add more projects. |
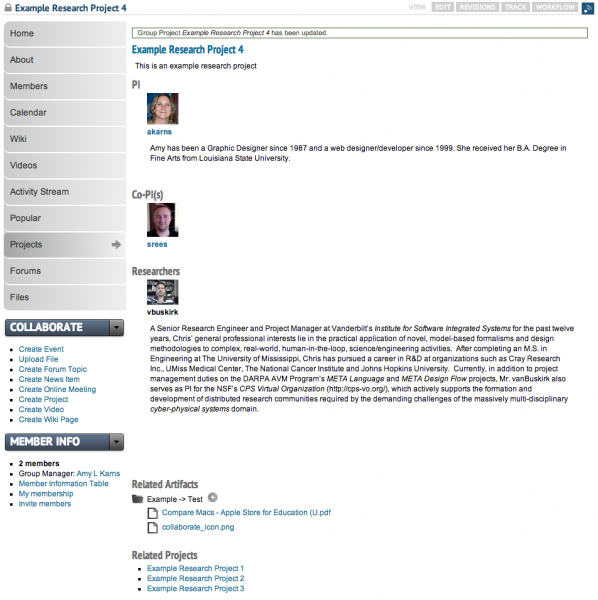 |
You will be taken to your project page after clicking the "Save" button at the bottom of the form. |
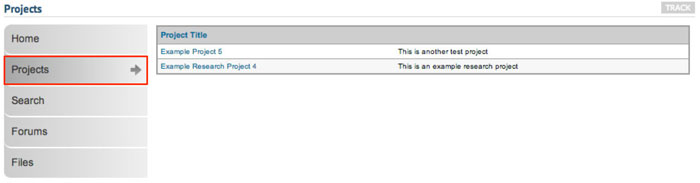 |
Clicking on the Projects tab in your group left sidebar menu will take viewers to a page that lists all your group's submitted projects in a table. |
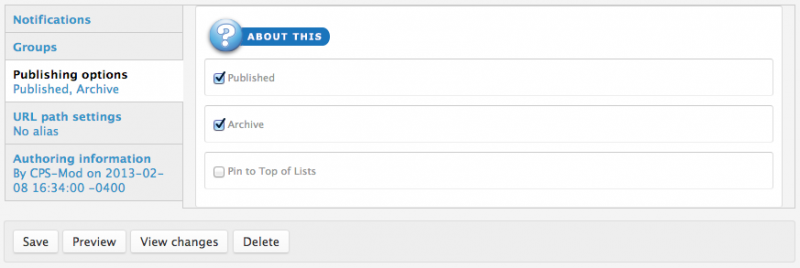 |
Archive a project using the "Publishing Options" tab in the area beneath the text editor in edit mode. Select the "Archive" check box as shown below. |
Post a Video
Videos can be shared from TED, Vimeo, or YouTube.
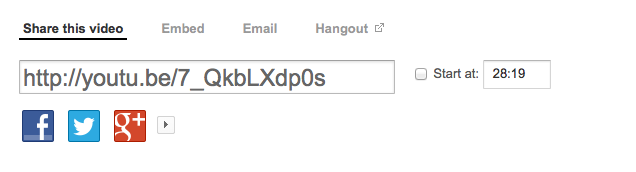 |
style="vertical-align: top;"Go to the video server of your choice and copy the video's "URL" (share this video link) or the "Embed" code. The example below is YouTube. (The following services are supported: TED, Vimeo, YouTube) |
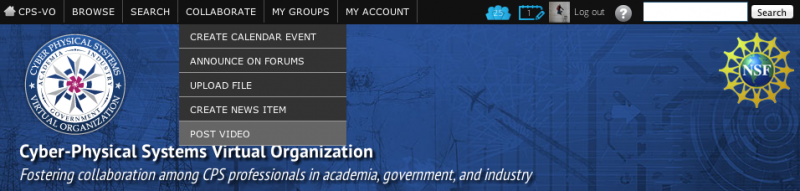 |
1. Select "Post Video" in the "Collaborate" tab in the global menu at the top of the CPS-VO home page. |
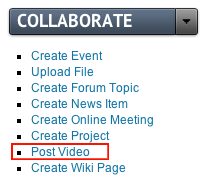 |
2. Click on the “Post Video” link in the “Collaborate” toggle menu which is located in the left sidebar of your group page. |
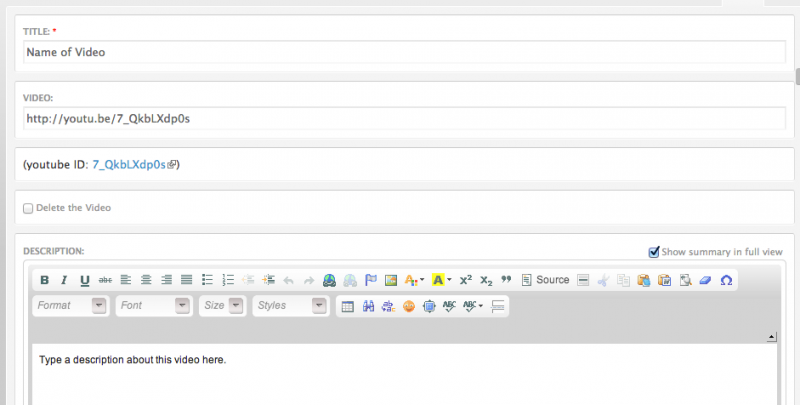 |
Fill out the “Title” and “Description” and paste the URL or embed code into the “Video” text field. Select "Vocabularies" in the area to the right of the rich text editor to make your video show up in the search engine.
|
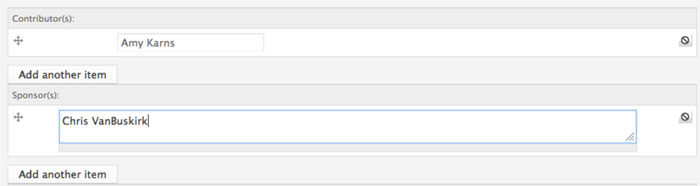 |
Enter "Contributor" and "Sponsor" names in the text fields beneath the rich text editor. You can add more names by clicking the “Add another item” button. |
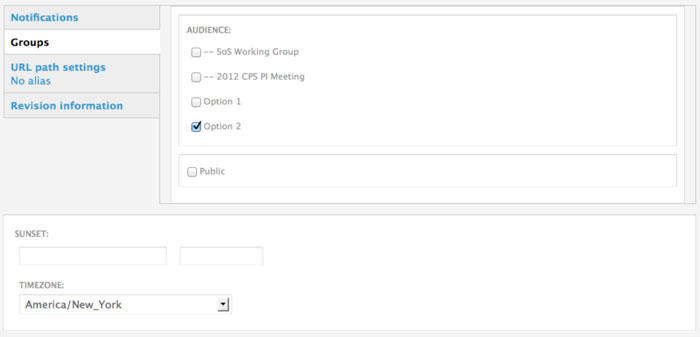 |
Use the next area down to set:
Notifications: whether group members get an email notification of changes to your video page
Groups: Check the boxes next to the groups you want to share the video with in the “Audience” section.
URL Path settings: If you would like a shorter URL to your video page,
you can type the path in the "URL Path Settings" field. (e.g. instead of node/125 it might read /your_video_name)
Revision information: If you log back in and make changes to the event you can log the changes in the “Revision Information” field.
|
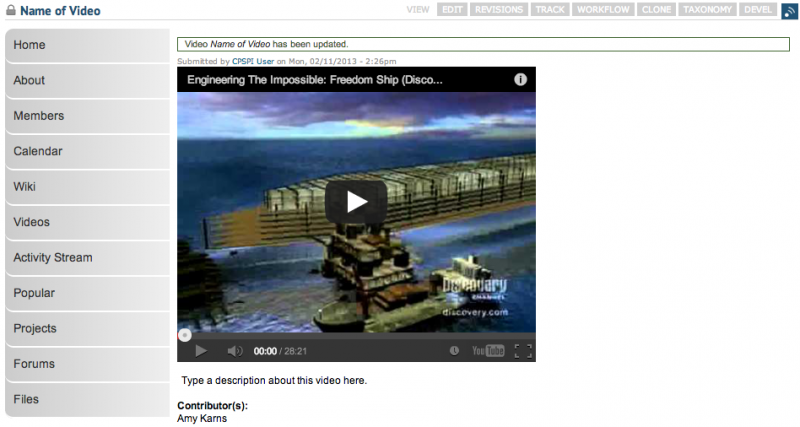 |
After you click the “Save” button, you will be taken directly to your video. |
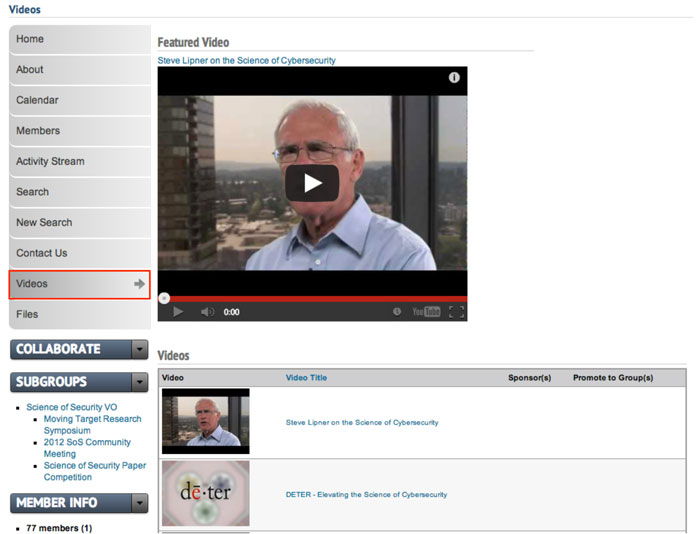 |
If your group administrator has set up a "Video(s)" page, your video will be posted on the “Video(s)” page of each selected group. |
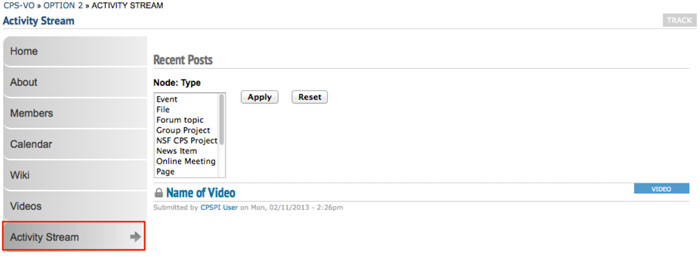 |
A link to your video will also appear in each selected group's “Activity Stream”. |
 |
You can also add a "Sunset" date and time to automatically archive the video. When it is archived, it will no longer show in the featured portion of the video page |
Setting a video as a Featured Video
 |
Make sure the video is set to"public" in the group settings. |
 |
Publishing options should be checked as "published" and "publicized to group home page". Be certain the video is not archived by the sunset date (described above). |
Create Wiki Pages
If the group manager has set up a wiki feature, group members can create wiki pages. (Managers see the tutorial page: "Creating a Wiki" for instructions on adding the wiki feature to your group.)
Create Wiki Pages - Video example
There are 2 different ways for users to create a wiki page.
1. Create a wiki page from the "Collaborate" menu
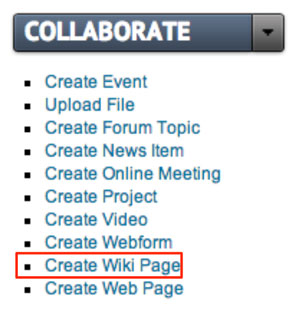 |
Use the "Create Wiki Page" link in the "Collaborate" toggle menu beneath the left sidebar menu in your group. |
 |
This will launch a rich text editor where you can type the title of your wiki page and add content and checkmark vocabularies (in the column to the right of the text window). |
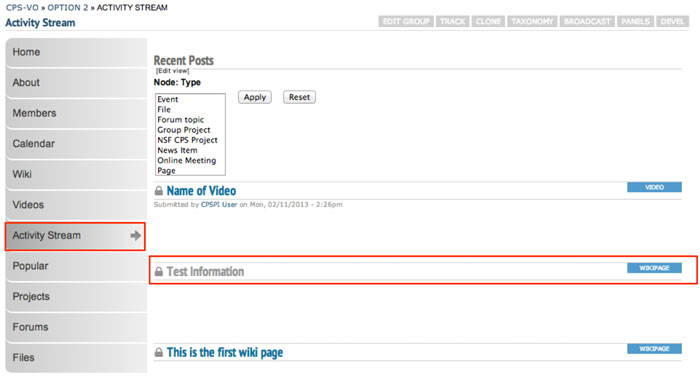 |
When you click the save button (toward the bottom of the editing page), your wiki page will show up on the "Activity Stream" page of your group by default. |
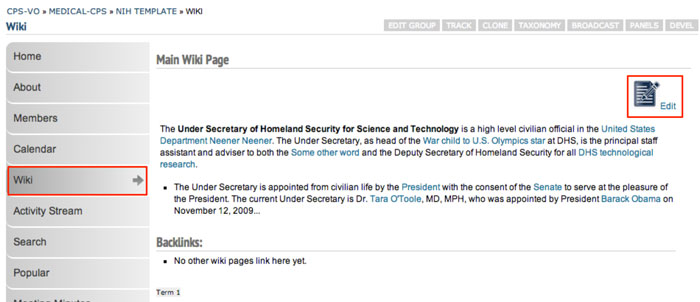 |
If the manager has set up a wiki feature, it will show up in that group's left sidebar menu. To begin editing a wiki, click the blue "Edit" icon in the first wiki page. |
 |
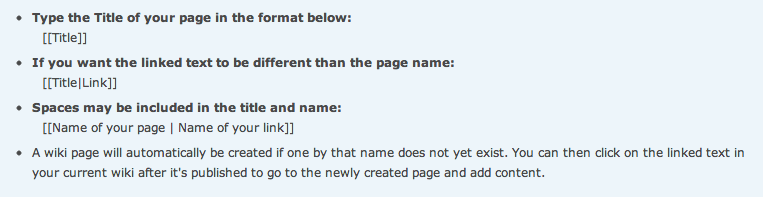
Create a link following the "Freelinking" instructions provided above.
When you click the link that you created, you will be taken to a blank rich text editor that is pre-populated with the title of your link (like the rich text editor displayed in section 1). Simply begin adding content and save the page when you are satisfied. Do not change the title or your link to the other page will break.
Pages subsequent to the first page do not need the blue "Edit" icon and may be edited by clicking the gray "Edit" tab at the top of the content area.
A list backlinks will display underneath each wiki page as related pages are created.
|
Create a Bibliographic Reference
As a member of the CPS-VO, you can create a bibliographic reference that can be added to the groups of which you are a member. If you are a "Trusted User", you have permissions to import a batch of bibliographic references using a BibTeX file.
You can create single bibliographic references by following the instructions in the table below.
|
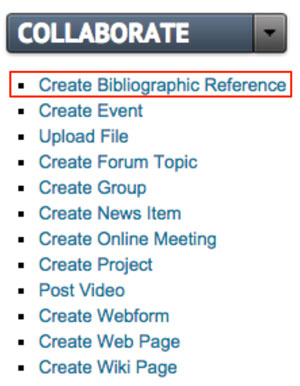
Select the "Create Bibliographic Reference" link in the "Collaborate" toggle menu which is located in the lower left sidebar on your group page. |
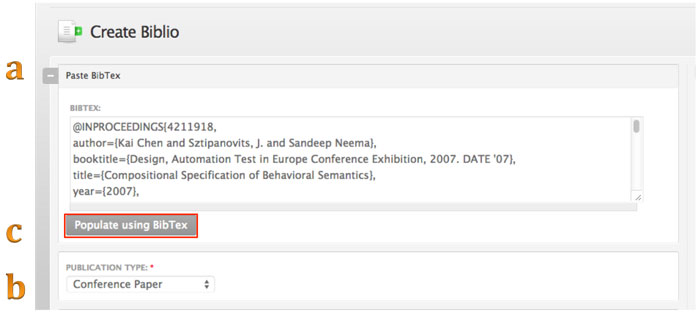 |
1. Paste the BibTeX code copied from a digital library
|
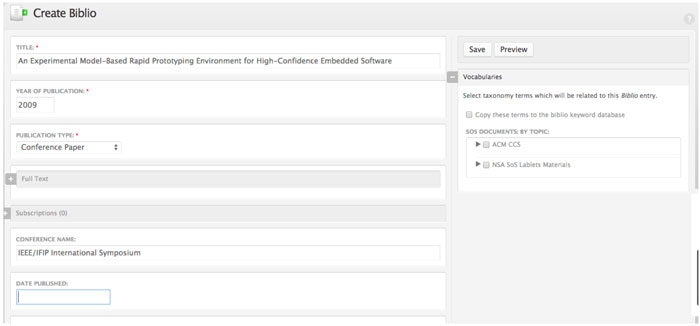 |
2. Enter the publication details manually
|
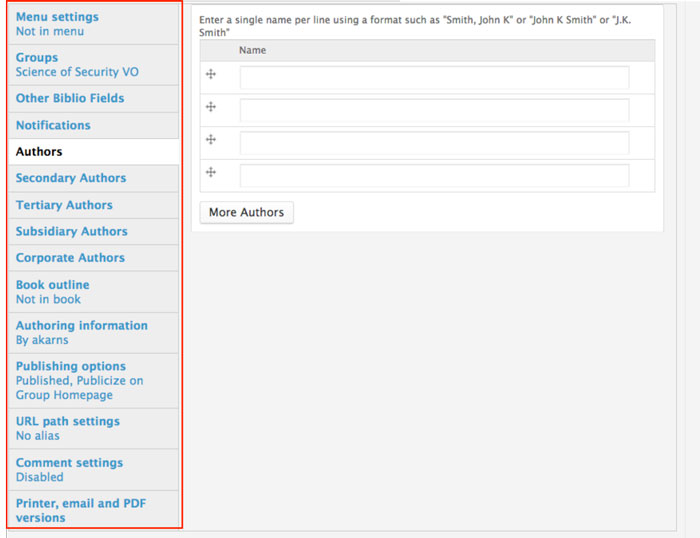 |
|
Trusted users can import a BibTeX file to create a batch of bibliographic references. You should use batch processing if your import file contains more than about 20 records, or if you are experiencing script timeouts during import. See instructions in the table below.
 |
|
 |
|
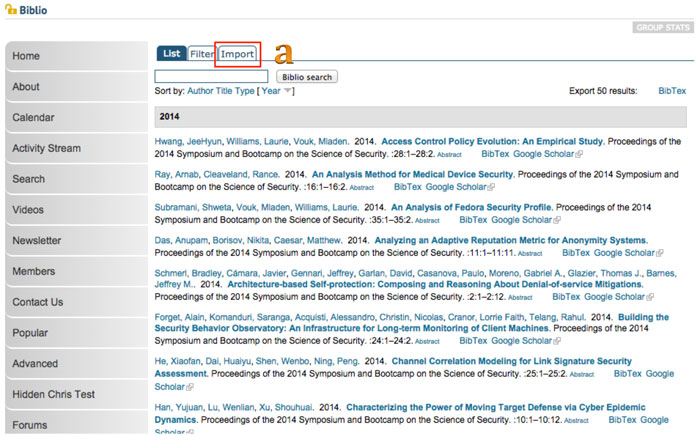
Your multiple bibliographic references will now show up on the main biblio page.
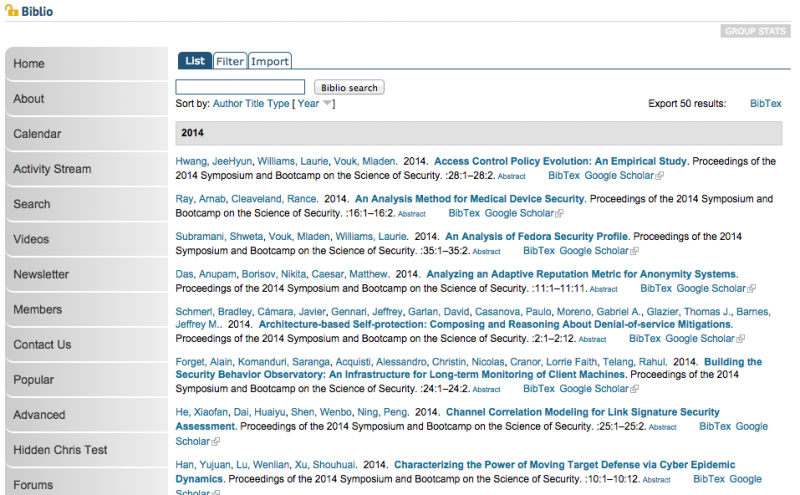
Search, Sort, and Filter Biblios
Bibliographic references can be searched by typing keywords into a search field. The search can be further sorted by author name, date posted, content type, or year. The filter feature allows you to show items from pre-populated menus categorized by author, type, term, year and keyword.
 |
Search, Sort, Filter and Export bibliographic references from a group's biblio listings page. |
 |
Search: Enter content into the text field and click the "Biblio Search" button. |
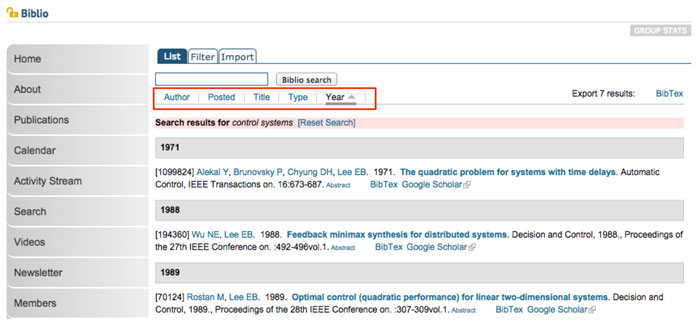 |
Sort: Sort bibliographic references by author, post date, title, type or year. |
 |
Filter: Click on the Filter tab to narrow results by author, type, term, year or keyword. |
 |
Export: Clicking on the “BibTex” link at the top right will allow you to export the bibliographic references listed. |
Conflict Detection
Sometimes more than one person simultaneously attempts to edit a node. Conflict Detection enables detection and assists resolution of this conflict to users with permissions to this feature.
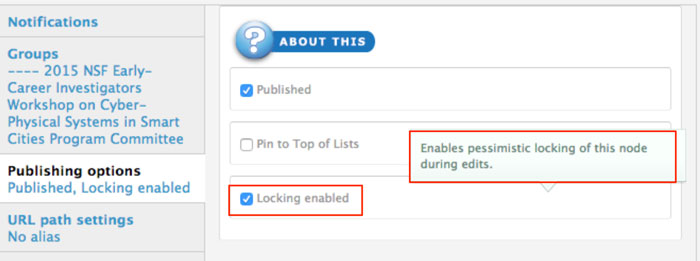 |
Turn on Conflict Detection from the Publishing Options menu (in the area beneath the rich text editor that has settings for your page). Checking the “Conflict Detection Enabled” box will turn on the feature. |
|
|
A yellow pencil icon will appear at the top right of the node when Conflict Detection is enabled. A red pencil icon will replace the yellow pencil if a node is in conflict (being edited by another user). |
 |
When Conflict Detection is enabled, the first person editing a node with locking enabled will see this message at the top of the rich text editor:
You have a lock on editing this node until Mar 6 2015 - 3:45pm (Extend). This lock will automatically end if you navigate away from this page. The end time can be extended via the “Extend” link in the text. |
 |
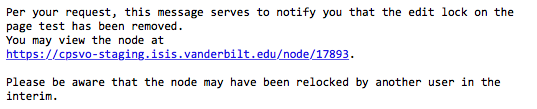
Navigating away from the locked page will generate a notification message |
Another person trying to edit a node that is already being edited will get a warning message identifying the original user (lock owner) and options either to break the lock or to subscribe to be notified when the other user’s session ends.

 |
1. BREAK:
They will have the option to break the lock or receive a notification message when the lock is released. |
 |
If the original user attempts to save after another user has broken their lock AND saved, they will receive a notification message letting them know
NOTE: For best results, reload by clicking the edit tab above the Title field rather than refreshing your browser. |
 |
2. NOTIFY: The interrupting user will get a pop up message indicating they will receive an email when the other user’s session ends. Click OK to activate the notification process. |
 |
An example of the notification email is shown left. |
DOIs and Zenodo
The CPS-VO has integrated with an archive and DOI generation service provided by Zenodo. Zenodo refers to these entities within their API as depositions. This integration is still being actively improved, with several enhancements planned in the future. We also have added the ability to list your own DOI, if you have previously published content that has been also made available here on the CPS-VO.
All functions described in this section of the documentation can be accessed using the 'DOI' tab, which will only be visible if this feature is available for the content being displayed.
Currently, the types of content that we have the Zenodo service enabled for is limited, but we do plan to expand which content types support Zenodo. Please reach out to us with the contact form if you have a specific question or request for support regarding our Zenodo integration.
Viewing DOI information
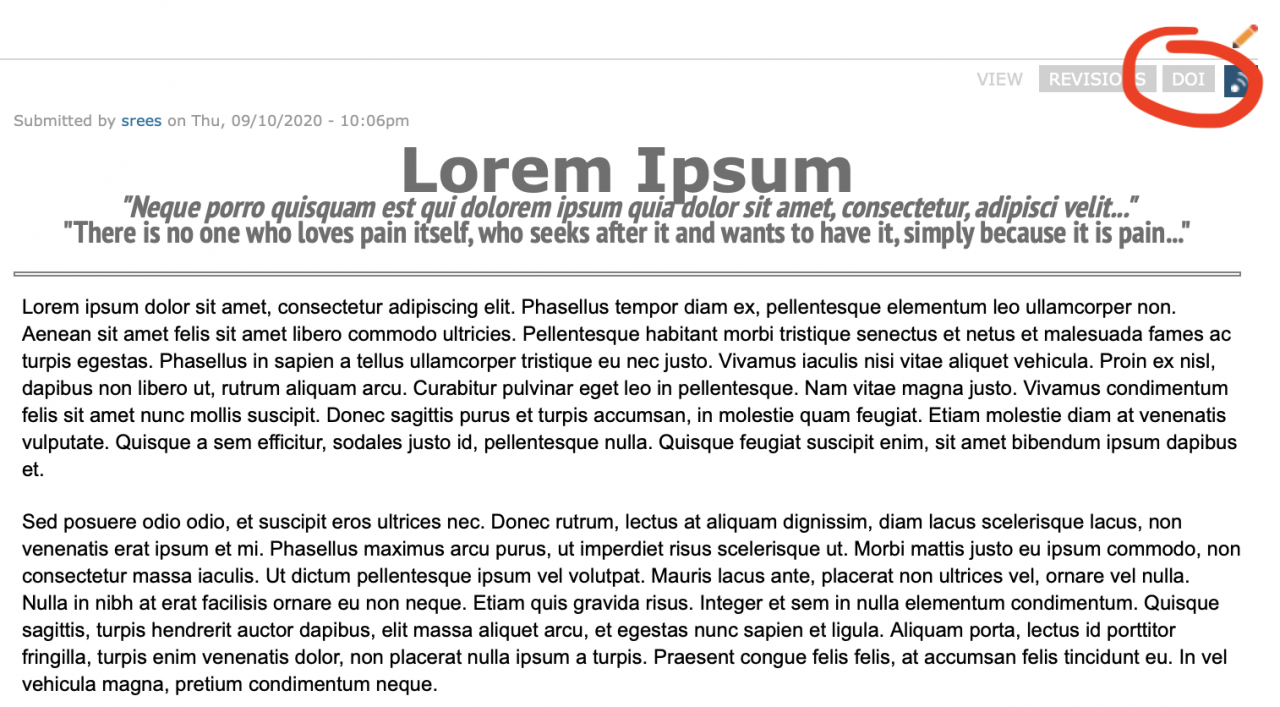
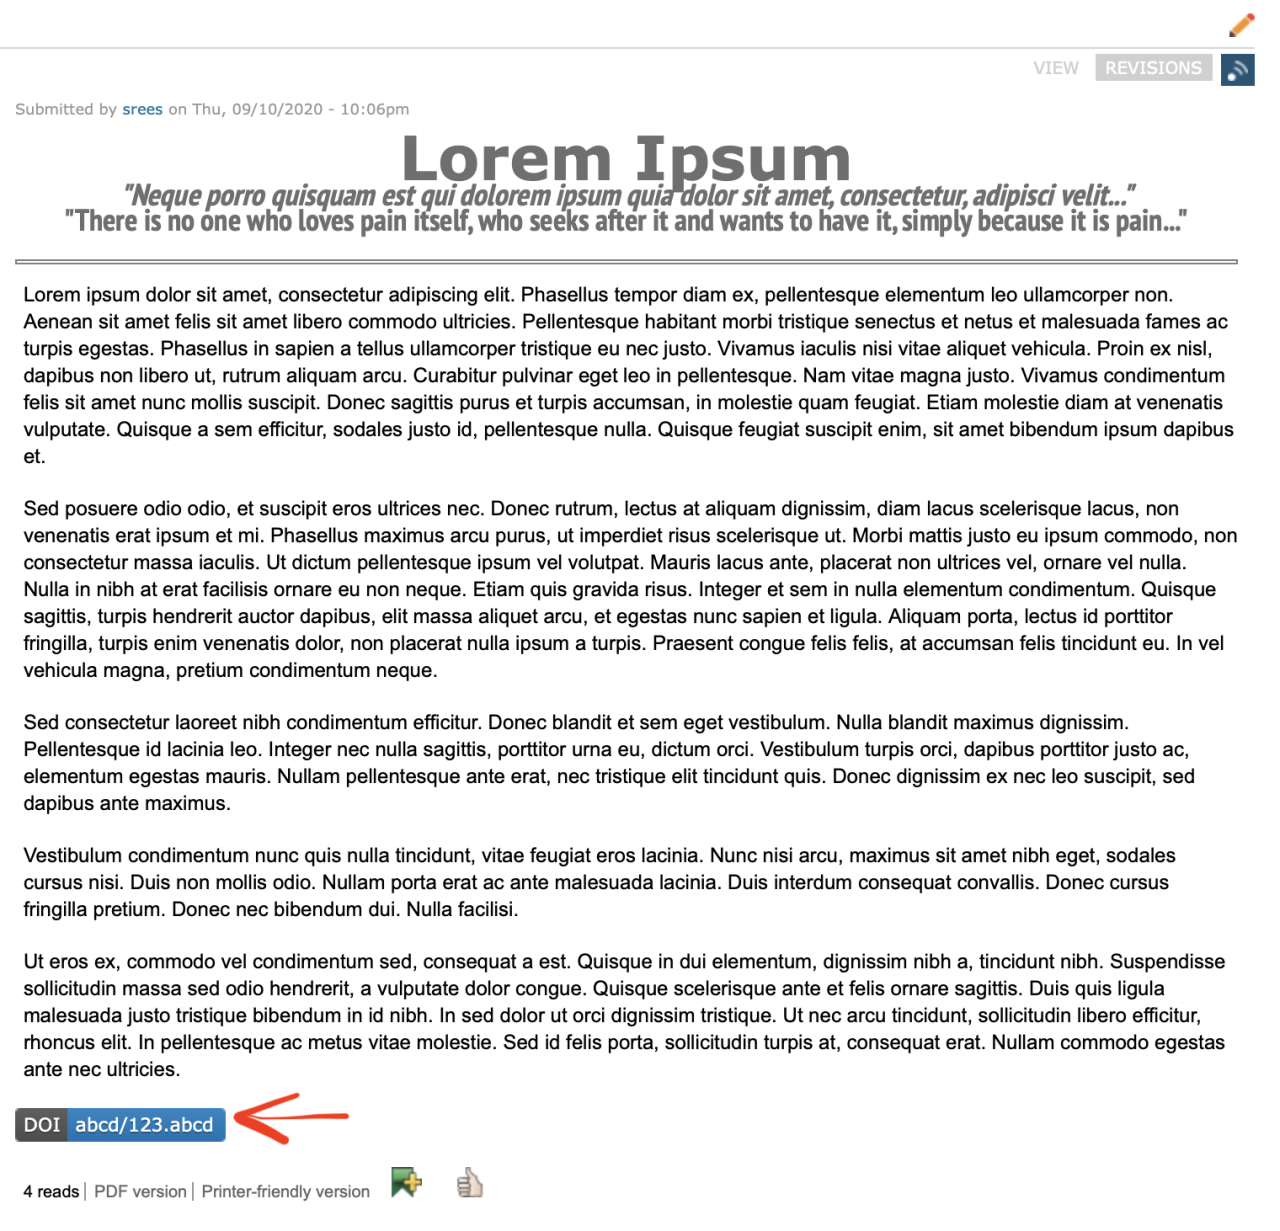
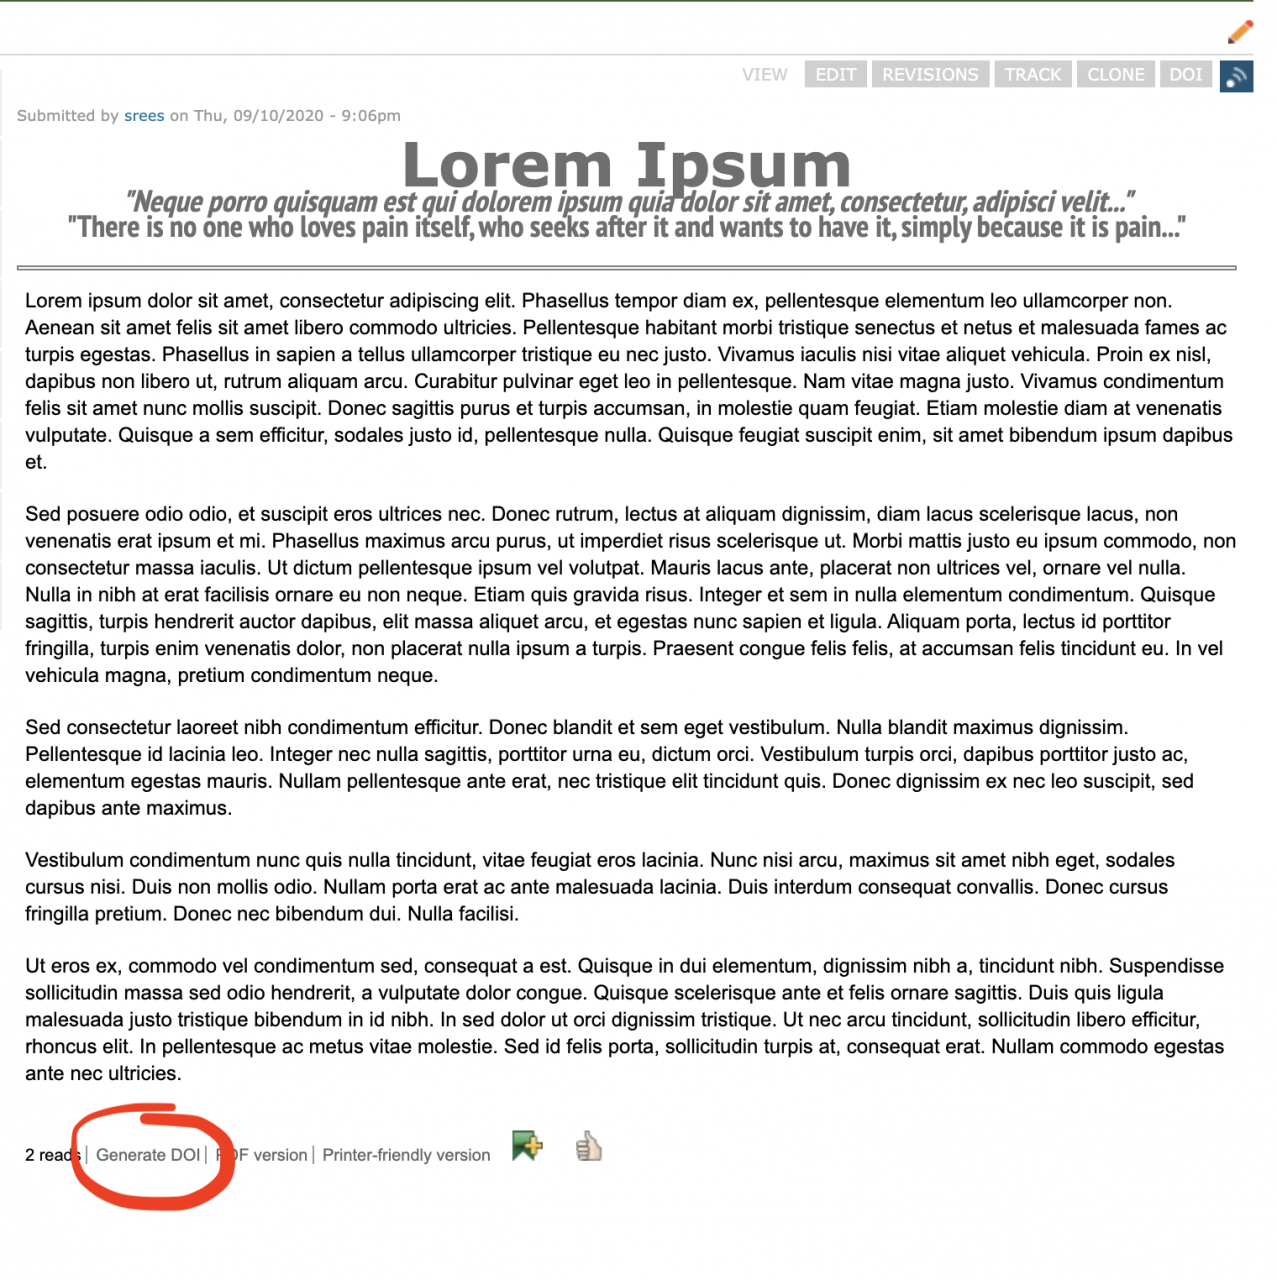
Content on the CPS-VO that has provided related DOI information will display a DOI tag at the bottom of the node as marked in the image below with the red arrow. People who wish to cite this content can utiliize this DOI information or can click on the tag to be taken to DOI.org to view more detailed information.
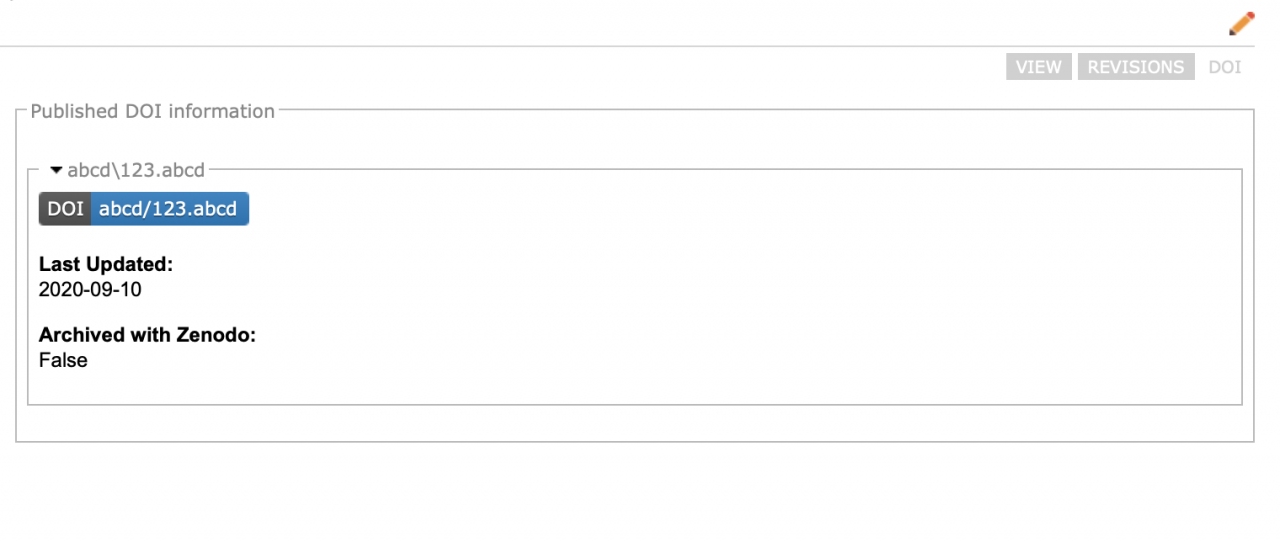
If your user account has permission to view extended details of the DOI information, you can access these details via the Zenodo tab at the top of the content. Pre-existing DOi information has very little extended information:
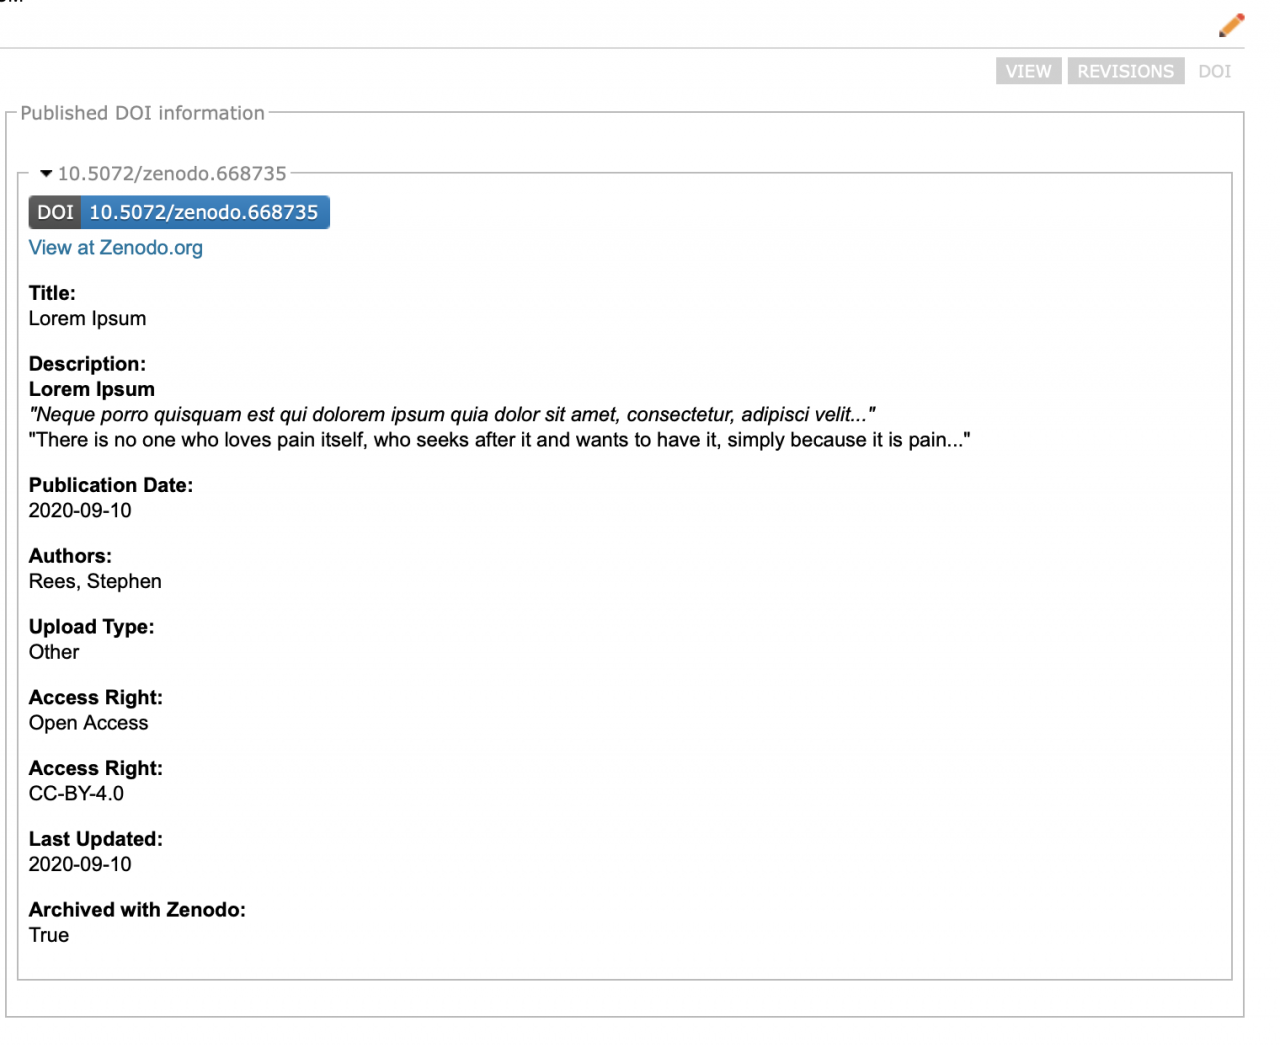
Zenodo archives will contain substantially more information, as well as a link to view the archive on the Zenodo website:
Requesting a DOI from another author
Content that does not yet have a DOI associated to it on the CPS-VO will have a link for requesting a DOI from the author if the following conditions are met:
- You have the necessary permissions to request a citable tag from the author
(currently Trusted User and above: learn more about roles here and check your Badges under 'My Account' to see which you have) - The content type has citations enabled for it
- The author has not disabled DOI/Zenodo for the particular piece of content
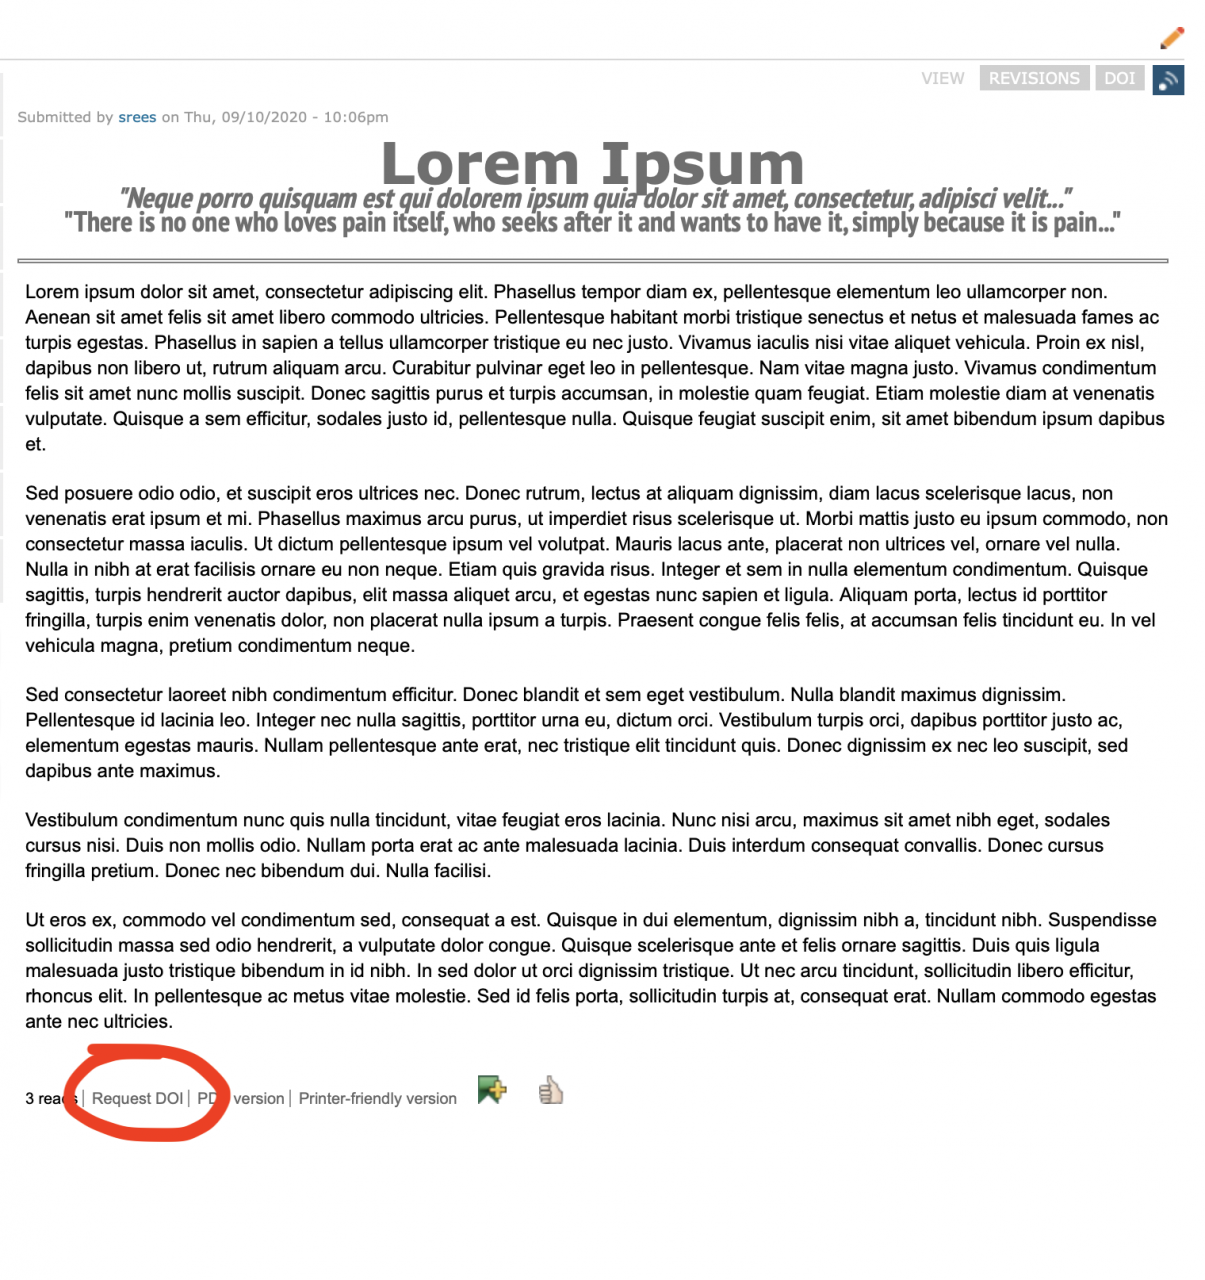
Following the link to 'Request DOI' will present you with the form below:
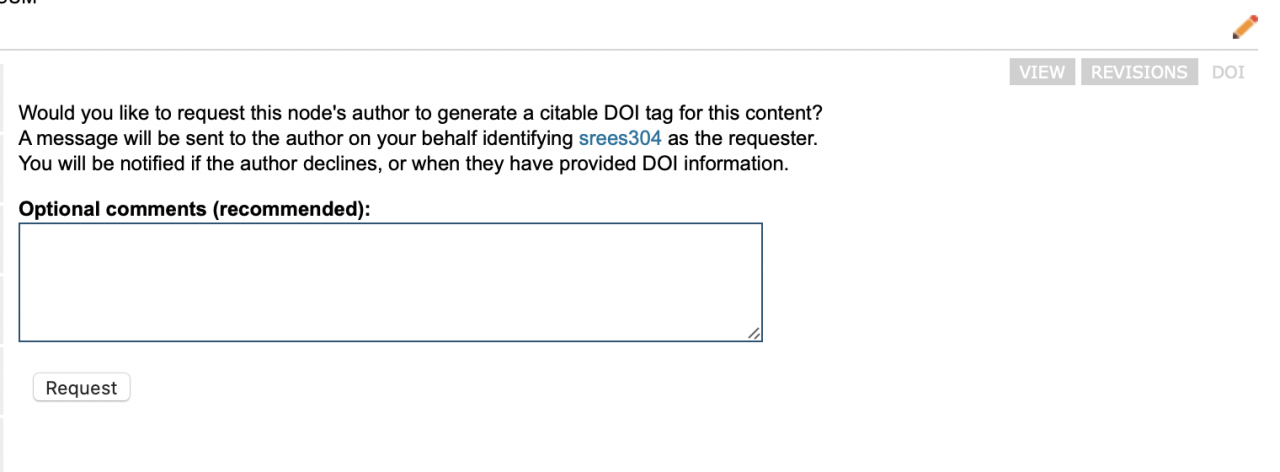
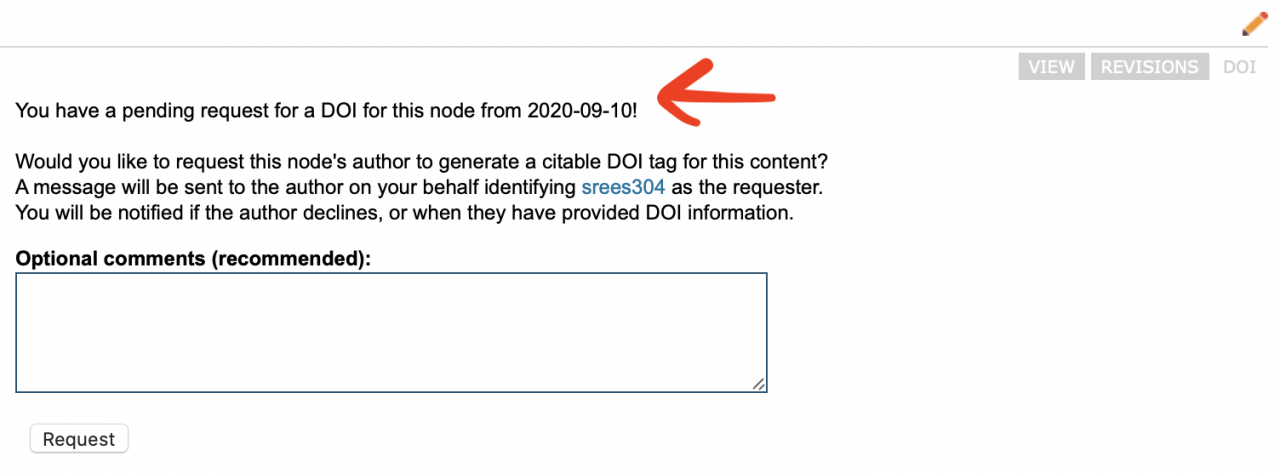
If you have previously requested a DOI for this content, there will be an additional message warning you about this. It is preferred that you do NOT repeatedly request a DOI as this will generate an email to the author each time; it remains available for extenuating circumstances.
You will be notified at the email address associated with your CPS-VO.org account when the author either denies your request or publishes a DOI for the node as requested.
Dealing with a DOI request from another user
If you have authored content on the CPS-VO, you may receive an email from our 'announcements' email address informing you that a user has requested a DOI be generated for content authored by you. This email will contain the user name of the requester with a link to their account, the name of the content involved with a link to that, any comments from the requester, and links to the Zenodo tab for adding a DOI as well as a link to directly deny the request. You will be required to log in to access the Zenodo or denial links. Logging in will also make more information available to you when viewing the requesters account page, if you are a Trusted User or better role.
Viewing the 'Zenodo' tab for your content will have an additional message at the top if you have pending requests:
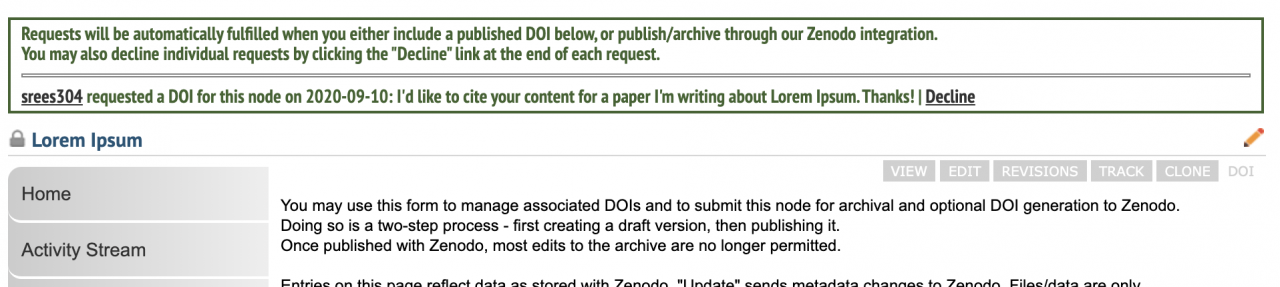
As the message indicates, publishing an archive or submitting a pre-existing DOI will automatically fulfill all pending requests. When requests are fulfilled or denied, the requesters will receive an email informing them.
It is possible that you might receive a request for a DOI, and not have sufficient permissions to add or generate a DOI on the CPS-VO. If this occurs, please apply for elevated "trusted user" status via the "Contact Support" link under the "Home" tab in the global menu at the top of every CPS-VO page.
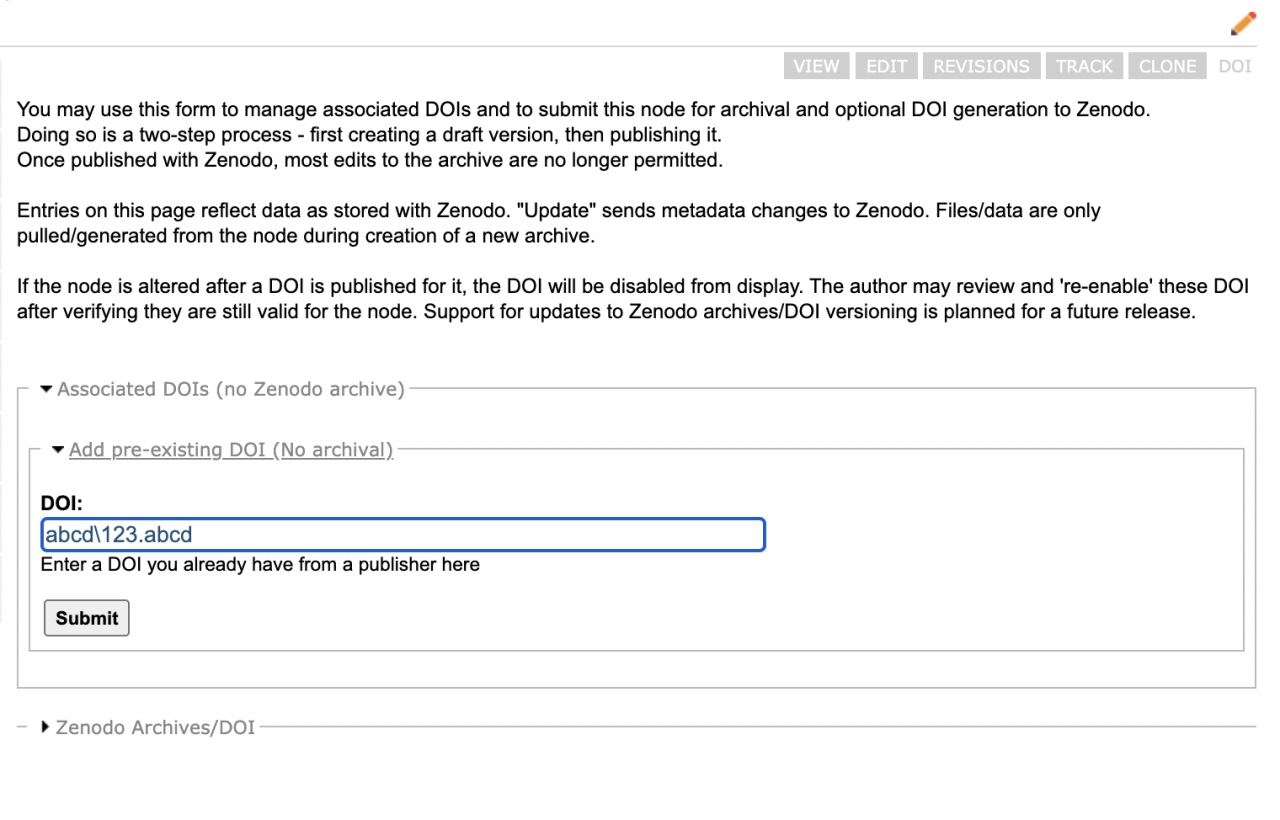
Adding an existing DOI record to your content
Often content on the CPS-VO will reflect work published elsewhere, and you may wish to tag your content with such DOI information. Users that have permission to manage their own DOI can manage the DOI information for enabled content types via the 'Zenodo' tab or the 'Generate DOI' link at the bottom of the content.
You will be presented with two expandable sections, the first of which 'Associated DOIs (no Zenodo archive)' you'll use for adding a pre-existing DOI. Simply enter the DOI in the form and submit, and it will be immediately visible on the node going forward for all users.
Please note that if you change the node after adding a DOI, the DOI will be disabled until you return to this form and confirm it is still valid for the content by clicking on 'Re-enable' button.
This type of DOI information CAN be deleted from the node.
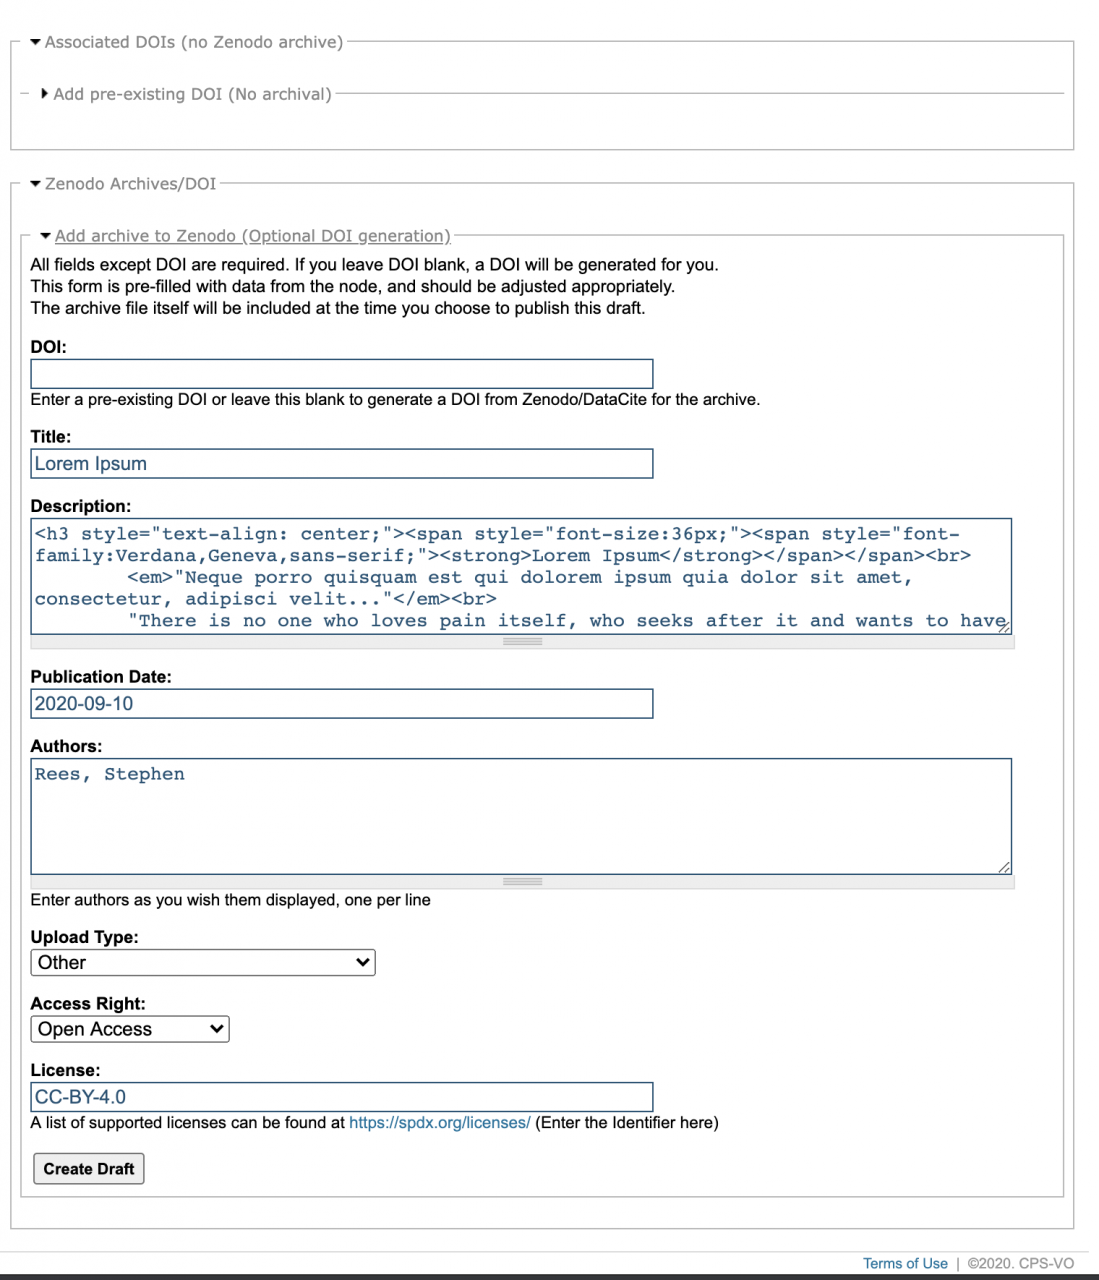
Generating an archive DOI with Zenodo
If you wish to archive content from the CPS-VO itself and generate a DOI from that archive, our Zenodo service integration can provide that.
For file content types, the file itself will be transmitted to Zenodo and archived. For other enable content types, a PDF of the node will be generated and archived with Zenodo. Currently there is a file size limitation of 100MB. If your file content is larger, this feature will not be available.
Users that have permission to manage their own DOI can manage the DOI information for enabled content types via the 'Zenodo' tab or the 'Generate DOI' link at the bottom of the content.
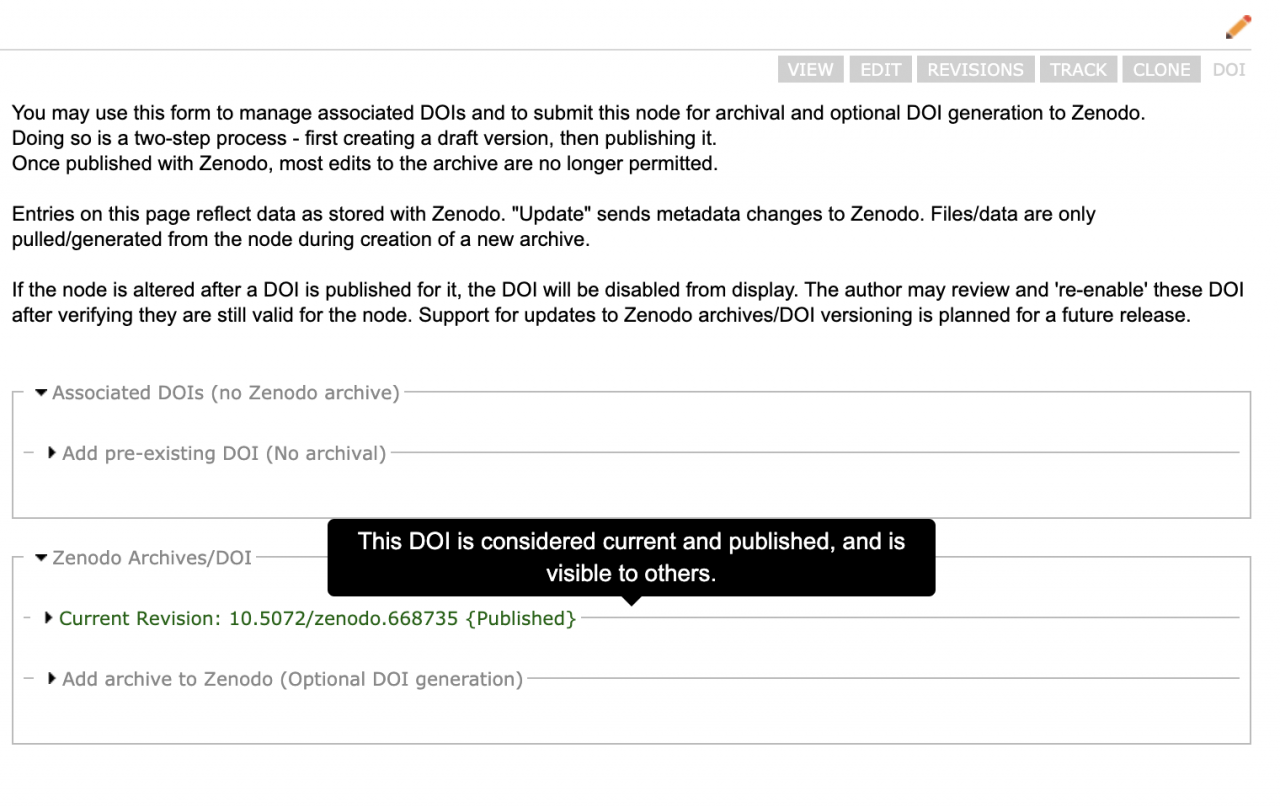
You will be presented with two expandable sections, the second of which 'Zenodo Archives/DOI' you'll use for adding a new archive. All fields are required.
New archive's fields are pre-filled with content from the node itself. Draft archives are filled with content as previously submitted to Zenodo! All can be edited as desired until it is published.
Publishing an archive with Zenodo is a two-step process - first is creation of the draft, and then after you are satisfied with it, publishing the draft. A draft archive that has been submitted to Zenodo will have a dark yellow heading with {Draft} in the title, and will look similar to this:
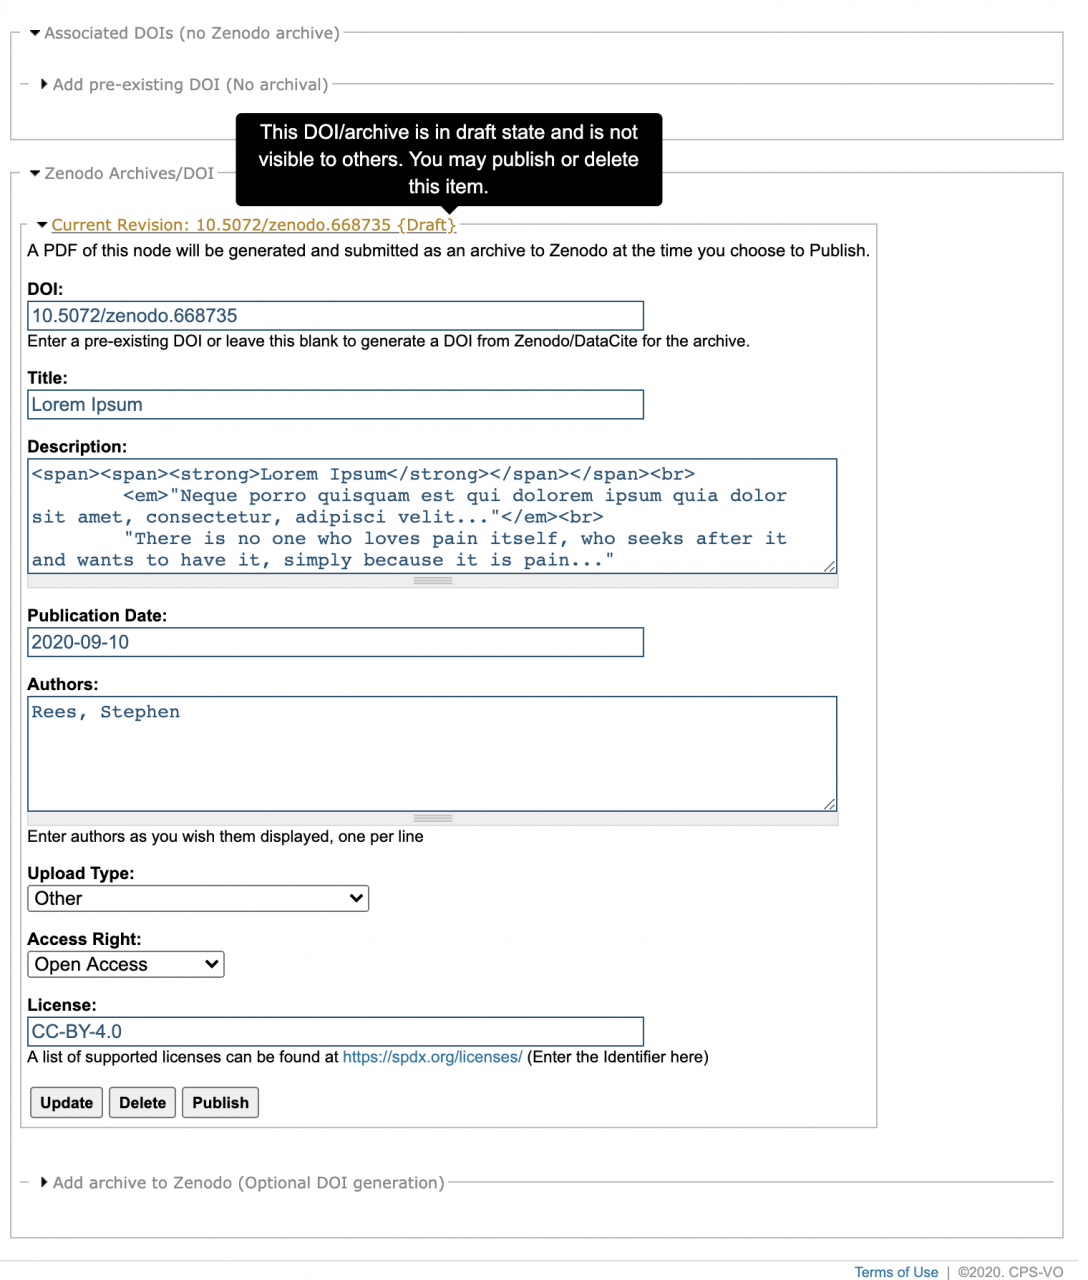
If you need to modify the data, please be sure to click 'Update'. The publish button does not submit form changes to Zenodo; it only publishes the last data that Zenodo received from us!
Published archives are permanent records with Zenodo and cannot be altered or deleted after being published! Once an archive is published, it will have a green header with {Published} and look similar to this:
Disabling DOIs/Zenodo for your content
In some cases, having DOIs or Zenodo options for your content does not make sense, or you simply may not wish to have it. For these situations, we have added the ability to explicitly disable the Zenodo feature for your content. When editing content for which the DOI/Zenodo feature is enabled, you will have an additional option you can check for completely disabling the Zenodo functionality for your node.
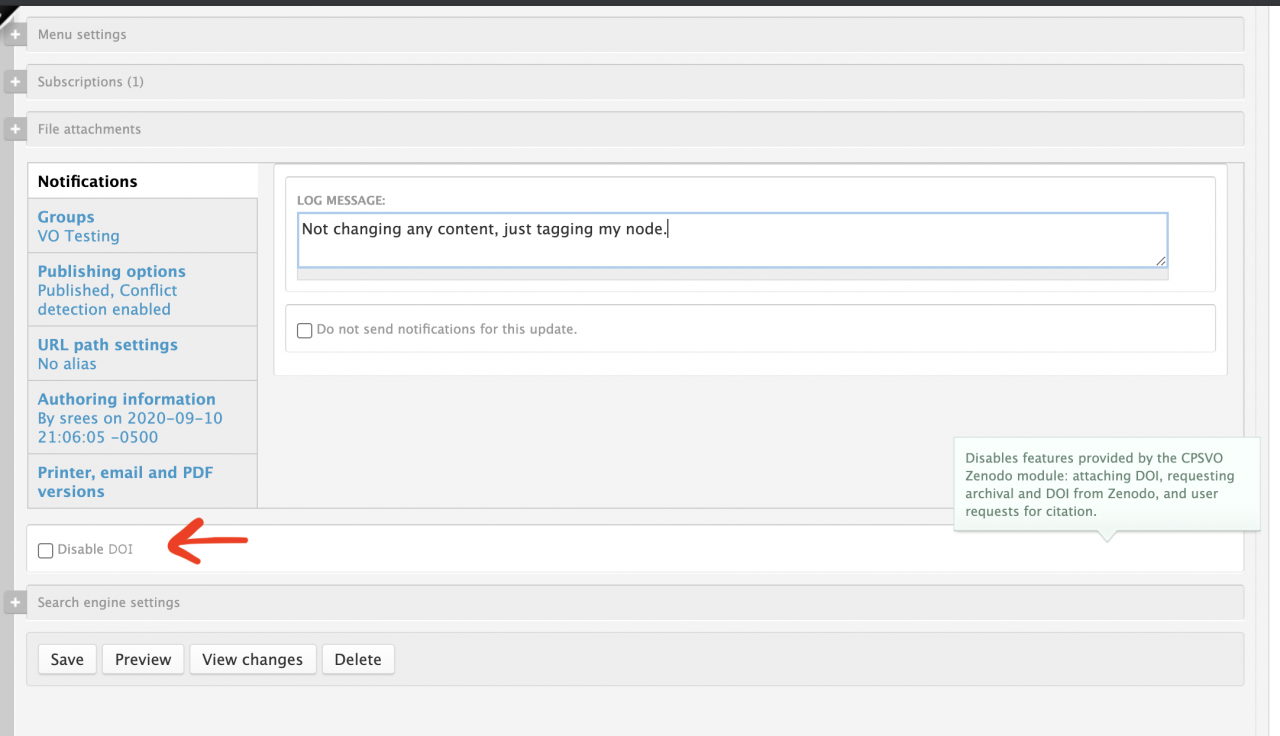
If the adminstrators of the CPS-VO disable Zenodo site-wide for a specific content type, any existing, valid, published DOI information will still be shown on the node until the node has been edited, thereby invalidating the DOIs.
Troubleshooting DOIs
The nature of DOIs requires that the content referenced cannot change. However, the CPS-VO has significant metadata for nodes that can be altered without substantively modifying the actual content the DOI refers to.
Our solution for this is to disable a DOI if the node has changed since the DOI was added/published. It will be hidden from view on the node page, but still be visible on the Zenodo tab to the author, with a red heading. The label showing 'Current Version' will be replaced with the revision information that matches what the DOI was published under:
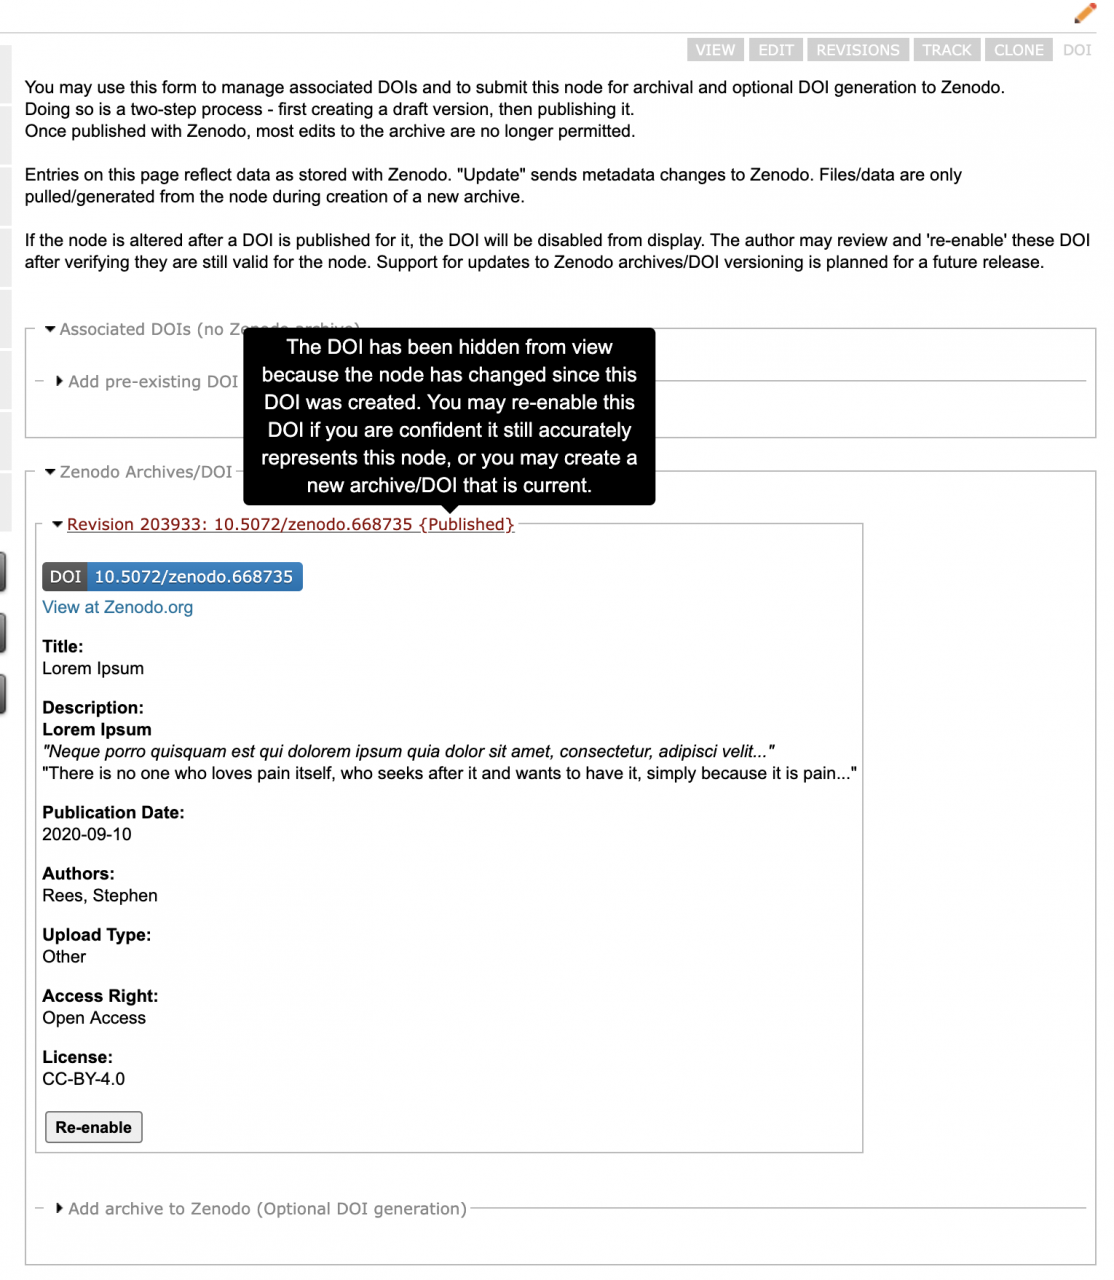
If you are confident that the content has not substantively changed and that the DOI is still an accurate representation of the content, you may re-enable the DOI and it will be flagged with the current version again.
Rarely, it is possible the CPS-VO will be out of sync with what is actually published on Zenodo. If you experience a situation where publishing an archive throws no errors but still doesn't seem to work, please use the 'Contact Us' page or the feedback tab with the specific node you are experiencing an issue with.