

Overview
This design studio allows a user to:
- Design the distribution system from scratch using the given objects in our part Browser.
- Generate the glm file from the designed pictorial network of a distribution system. A user can use the generated glm file ( which is the file used by gridlabD to simulate any distribution system) either to run on its own version of installed GridLab-D software or you can simulate it from software installed on our server.
- Convert the textual '.glm' file into GUI based pictorial representation of grid.
- Edit the model and generate the glm file from the edited file.
- Simulate the distribution system from GUI based.
- Save its work for lifelong in our remote repository.
Side notes:
- The installed version of Gridlab-D is 4.0.0 and it runs in a 64-bit Ubuntu Linux Virtual Machine on the server.
- A familiarity with Gridlab-D is expected for users to use this design studio.
- The design studio's front-end is based on WebGME modeling environment.
- It uses WebGME version 2.24.0.
- Some familiarity with WebGME is useful. (an Interested individual can refer the Webgme and Design Studio tutorial.) here
- References for Gridlab-D simulator, WebGME modeling environment, and the access page for the design studio are provided below.
Design Studio Use-Cases:
There are three main use-cases in which this design studio can be used:
1. Importing a Gridlab-D model file (.GLM) into the design studio and be able to graphically visualize and edit the Grid model.
2. Convert the edited currently laid out Gridlab-D model file and exporting the edited files are .GLM files.
3. Executing a Gridlab-D model file on the server using Gridlab-D simulator.
We will describe these three use-case in more details below.
1. Importing Gridlab-D model files:
When the user first logs in the design studio (at the reference link below), the initial screen shown is the WebGME modeling environment, which has no projects in it. This is shown below:
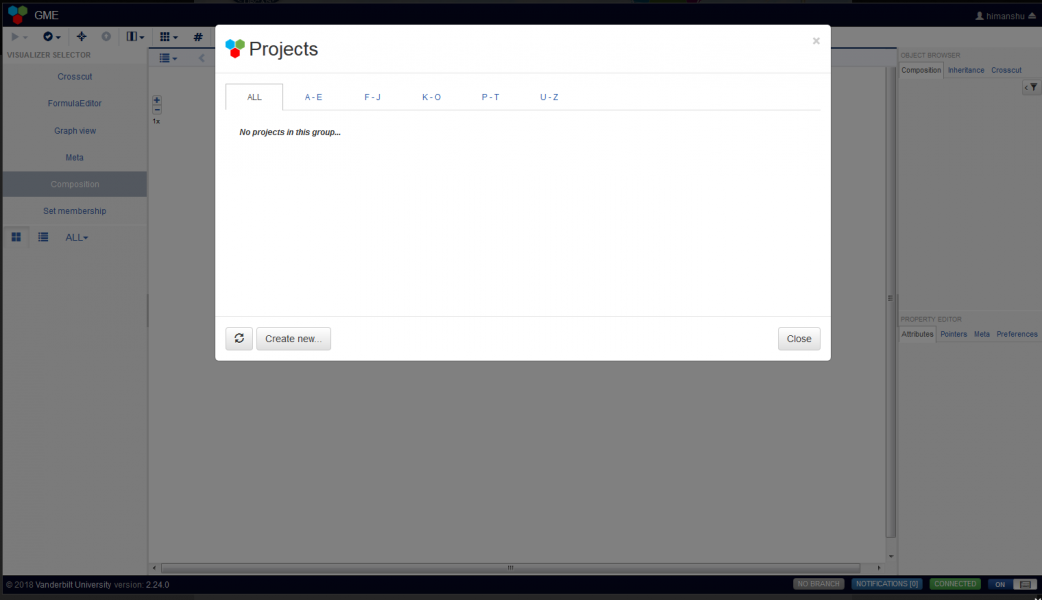
You can create new projects by clicking on the "Create new..." button. If you accidentally close this dialog, you can go to top-left "GME" icon, from where "New Project..." can be selected as below:

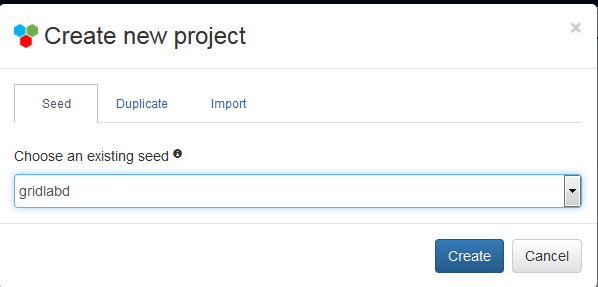
Once you click on New project..., you can specify a name of the project, e.g. "IEEE_13_Node_Test_Feeder_Project" and choose "Create..". On the next screen, you need to select a seed model (which contains the modeling language, or the metamodel). Select "gridlabd" here as shown below and then choose "Create":
An initial project (IEEE_13_Node_Test_Feeder_Project) is created as shown below:
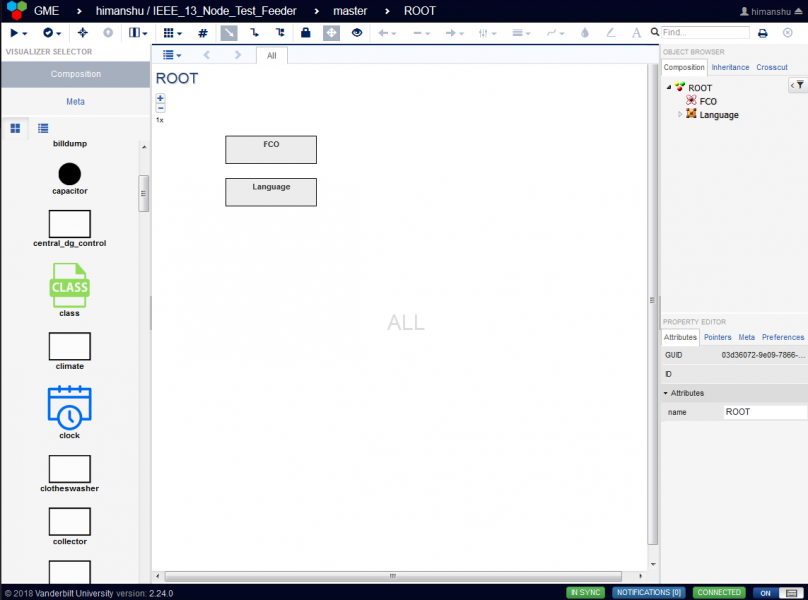
This is the main panel where you can import a Gridlab-D Model (.GLM) file. As now the modeling language is loaded, you can see all the modeling elements available on the left-hand side in the part browser. The default view shown is the "Composition" diagram for the model.
The metamodel (or the modeling language) for this design studio was created using the object class description generated from Gridlab-D itself. Therefore, if a new version of Gridlab-D needs to be supported in the future, the language needs to be automatically updated using one of our existing tools. The metamodel can be seen by clicking on the "Meta" link below the "Composition" link on the top-left. The metamodel shows the class definitions and their attributes, which resemble the object definitions of Gridlab-D. The metamodel is (partially) shown in the figure below:

Before proceeding with the import, please go back to the "Composition" view by clicking on the "Composition" link in the top-left.
Next, from the top-left click the play button, and select "ImportGLM" plugin to be executed as shown below:

The dialog shown, allows you to select a locally existing GLM file for rendering in the design studio. You can also specify a few parameters on the dialog such as how many seconds it should wait for nicely laying out the grid model automatically in the design studio. This dialog is shown below. If you don't have an existing.GLM file, one can find from the Gridlab-D simulator, which comes with a number of models. The Gridlab-D simulator reference can be found at the bottom of this page. An example GLM file is also available for download in the references below (When you download this file from the reference below, remove the .bin extension and replace it with .glm extension).

Here we have some setting that a user can change. These are metadata for importing glm file. Default values are already stored and a user can use this plugin without changing any metadata. Interested user can alter it as per their need. 'Enable debug output' let you listen to all messages thrown from the server during the process. It is generally used by a user who wants to debug the plugins. "Number of iteration for layout algorithm' is also used by the underlying plugin to iterate by given number of times to layout the whole distribution system. 'Average distance for links in graph' determines the link length once the model is displayed. 'Side length of a node' determine the spacing between different nodes in the layout.
Once, the GLM file is selected, click on "Save & Run..." button and the model will be loaded in the design studio and laid out, where it can be edited as shown below:

Double-click on the "IEEE_13_Node_Test_Feeder" model to see its Grid model, as shown below:

As shown in the figure above, the attributes can also be updated in the model editor.
2. Editing and exporting Gridlab-D model files:
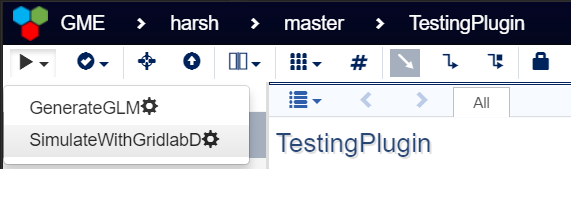
As shown in the figure above, a layed out Gridlab-D model also allows for editing the attributes of the model elements such as nodes, buses, houses, etc. Once you are satisfied with updating the GLM file, you can export the edited model as a new .GLM file and download it locally on your computer. To export the current model as a .GLM file select "GenerateGLM" plugin from the play menu in the top-left as shown below:

On the Generate GLM plugin dialog, select "Execute on Server" and also select the "Zip and Return Generated GLM" and the select "Save & Run..." button. Once finished, it will show a success message and a link to download the generated GLM file. You can also select the play menu again and click on "Show Results..." to see the generated (zipped) GLM file and link for you to download it.
3. Executing Gridlab-D model files:
Gridlab-D 4.0.0 is currently installed on the server and a model loaded in the WebGME editor can also be executed on the server using it. The model is first converted into a .GLM file and then sent to Gridlab-D simulator to execute it. In order to run the Gridlab-D model, select the play menu from top-left and select the "SimulateWithGridlabD" plugin (as shown in the use-case #2 above).
Once you run the plugin 'SimulateWithGridlabD', a dialogue will open, which will give a user the ability
1. to set select "Zip and return generated GLDoutput" on/off.
2. Another option to upload all the dependency ZIP file( i.e. player data and weather data) which is required for the glm file. all the files that need to be uploaded must wrap in the zip files. Name of zip files does not matter but the dependency player files and weather data files name must match with the name given in the glm file. Once the plugin 'SimulateWithGridlabD' runs, It upload all dependency on the server so the glm file can access it while running the simulation.

you can click the 'page' icon to upload the Zip files.
If there are no dependency files required for your glm then no need to upload any file, just leave this dialogue's element blank. But if you have only one dependency file, Zip it before uploading. As we are supporting only zip file for now.

If a user will select the select "Zip and return generated GLDoutput" to TRUE then the output of simulation will be returned to the user, once the simulation finishes. Press "save & Run..." to run the simulation. This will execute the model on the server (exactly like you might run the GLM file locally on your local computer) and capture the console output (STD::OUT and STD:ERR) as well as generated recorder output (csv files), XML file. Once silulation finishes, there would be a message window on right-top corner with status message "SimulateWithGridlabD finished with success!(click for details)".

This result display is designed to appear for a few seconds. After that, it will disappear. If the user wants to see the result they can click the drop down of 'play' button on the left-top corner and click 'show results...' to see the result.

Once you click the green status message/ click 'show result-> Details' the output dialog will open( as shown below). If a user has requested to "Zip and return generated GLDoutput" then there would be three artefacts of major interest( Generated Artifacts ).
- stdout: standard output
- stderr: standard error/warning ( Here the warning message is also captured in stderr file)
- simulation_sucess.tar.gz : This is a zip file and consist of all the simulation output( Like XML file) , generated glm file, and all recorder outputs and other data files.

As it is running the simulation, it also shows the notifications in the lower status bar, which can be expanded for detailed information.
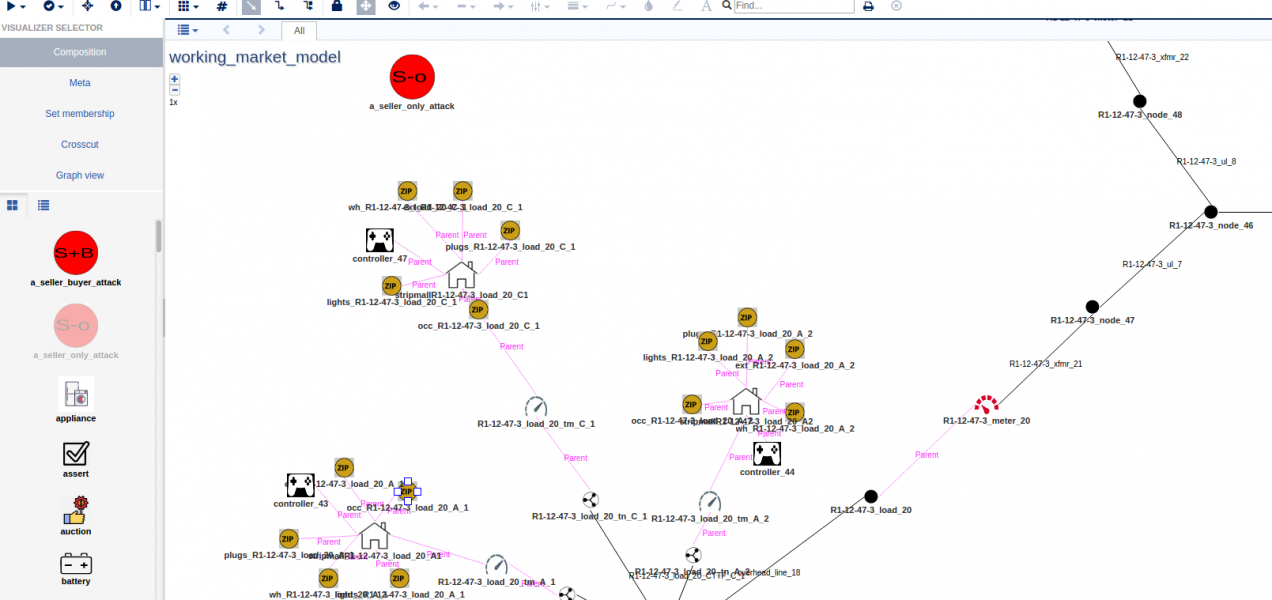
4. Market Attack:
Currently, we support two kinds of attack (1) Attack on seller bid price only (2) Attack on seller price and bidder price . To configure your grid for these attacks , you need to drag and drop component in your grid model. The component called 'a_seller_only_attack and 'a_seller_buyer_attack'.
The attack parameters can be changed to select the desired configuration of the attack. Then, run the simulation by running 'SimulatewithGridlabD' plugin. You will get notification messages about the status of the simulation. Once the simulation is done then you will get output at used end.
