
 Driving with a ps joystick
The goal of this tutorial is to drive the CAT Vehicle around in simulation, using a sixaxis controller. Example controllers are a USB Playstation controller, and are readily available in game shops.
Installation of additional packages
If you did not install the joystick packages, then make sure to do so (they can be found in the Installation page of the Wiki).
The Safety Signal
It is worth noting that any controller which is intended to move the catvehicle must publish on its topic faster than 5 Hz, or the CAT Vehicle stops operating.
The idea of "normally open, held closed" is common in automation where a human is controlling machinery which operates based on discrete commands. For example, a crane operator may tell a machine to move by holding down a button: if the button is released, the crane stops operating. For equipment that should operate "unless there is a problem" however, it is not safe to transmit messages when there is a problem---doing so means that if the link is lost to the safety controller, then messages about unsafety cannot arrive. In these designs, it is typical to send a command "Everything is fine!" and then if that message is lost, to assume there is a problem.
Thus, the so-called Dean Man's Switch, which we will call the Safety Signal. The cmdvel2gazeby.py node will send a value of Linear.X=0, if 200ms has passed and no new inputs for cmd_vel have been received. When this occurs, you will see an entry of
Seeing this message means that your cmd_vel data has been lost, or that perhaps there is a timing issue between machines.
Starting up the simulation
You can use the joysticks with any simulation launch file. For this launch, I will use the neighborhood.
If you want to visualize what is happening, use (in a new tab) either gzclient, or
rosrun rviz rviz
And load your .rviz file which will help you visualize the sensor data.
Starting up the joysticks
In order to launch the joystick nodes to control the vehicle in simulation, use
This actually launch two nodes, one to get data from the controller, and the other to map those data into cmd_vel inputs.
joy/joy_node
This is a standard ROS joystick node, which publishes messages of kind sensor_msgs/Joy to the /joy topic.
catvehicle/joy2cmdvel.py
In this node, we listen to /joy and map the data from that stream to cmd_vel (geometry/Twist messages), in order to make the car drive.
No data are sent when nothing is touching the controller. We will use this for a "timeout" when we write the driver for the joystick for our car. First, let's establish the mapping for the axis inputs to the vehicle. The image of which buttons are which is shown below for a PS2 controller:
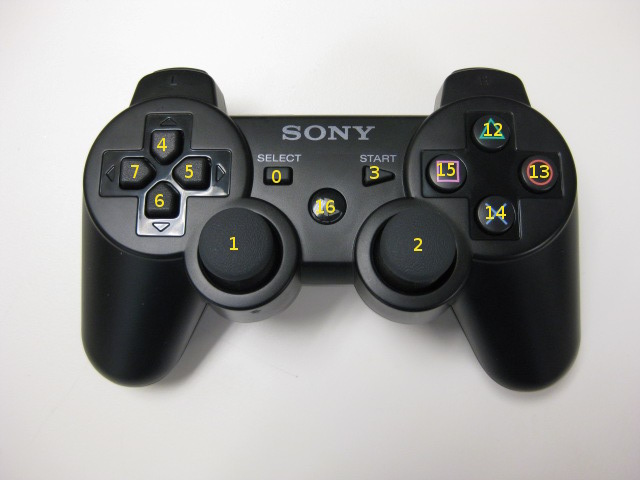
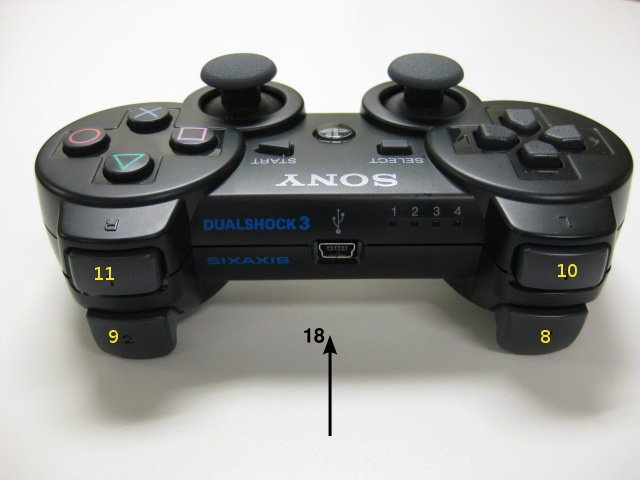
Images from http://wiki.ros.org/ps3joy under Creative Commons 3.0 license.
Making the car drive
We'll be using the left and right axes here to map to steering (on the left) and desired velocity as a percent of maximum velocity (on the right) for very, very low-level control.
In order to prevent bad behaviors from emerging we will have maximum values set by the joystick controller that we use as a percentage of our inputs. The max/min values of those can be shown by running the help message.
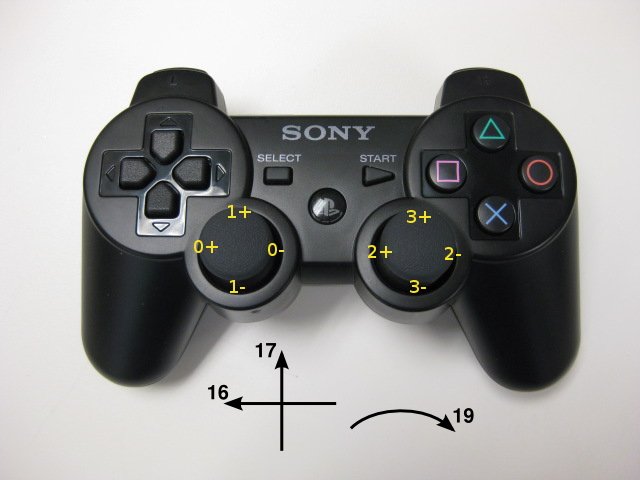
Based on the 3rd picture, we see that we are interested in
- axis[0] -> positive is turn left, negative is turn right
- axis[3] -> positive is forward velocity, negative for reverse velocity
Note that negative values are set to 0 if sent to the CAT Vehicle physical platform, even though they are implemented in the simulator.
This results in a mapping like the following to the catvehicle/cmd_vel topic:
Thus, we use the left axis to control steering, and the right axis to control velocity.
azcar_sim (deprecated)
The below instructions are for v1 of the software and are deprecated which means they will be removed.
Installation of additional packages
If you did not install the joystick packages, then make sure to do so (they can be found in the Installation page of the Wiki).
The Safety Signal
It is worth noting that any controller must enter its values faster than 5 Hz, or the CAT Vehicle stops operating.
The idea of "normally open, held closed" is common in automation where a human is controlling machinery which operates based on discrete commands. For example, a crane operator may tell a machine to move by holding down a button: if the button is released, the crane stops operating. For equipment that should operate "unless there is a problem" however, it is not safe to transmit messages when there is a problem---doing so means that if the link is lost to the safety controller, then messages about unsafety cannot arrive. In these designs, it is typical to send a command "Everything is fine!" and then if that message is lost, to assume there is a problem.
Thus, the so-called Dean Man's Switch, which we will call the Safety Signal. The cmdvel2gazeby.py node will send a value of Linear.X=0, if 200ms has passed and no new inputs for cmd_vel have been received. When this occurs, you will see an entry of
/azcar_sim/cmdvel2gazeboazcar_sim timed out waiting for new input, setting velocity to 0.Seeing this message means that your cmd_vel data has been lost, or that perhaps there is a timing issue between machines.
Starting up the simulation
You can use the joysticks with any simulation launch file. For this launch, I will use the neighborhood.
$ roslaunch azcar_sim azcar_neighborhood.launchIf you want to visualize what is happening, use (in a new tab) either gzclient, or
$ rosrun rviz rvizAnd load your .rviz file which will help you visualize the sensor data.
Starting up the joysticks
In order to launch the joystick nodes to control the vehicle in simulation, use
$ roslaunch azcar_sim joystick.launchThis actually launch two nodes, one to get data from the controller, and the other to map those data into cmd_vel inputs.
joy/joy_node
This is a standard ROS joystick node, which publishes messages of kind sensor_msgs/Joy to /joy topic.
azcar_sim/joy2cmdvel.py
In this node, we listen to /joy and map the data from that stream to cmd_vel (geometry/Twist messages), in order to make the car drive.
No data are sent when nothing is touching the controller. We will use this for a "timeout" when we write the driver for the joystick for our car. First, let's establish the mapping for the axis inputs to the vehicle. The image of which buttons are which is shown below for a PS2 controller:
Images from http://wiki.ros.org/ps3joy under Creative Commons 3.0 license.
Making the car drive
We'll be using the left and right axes here to map to steering (on the left) and desired velocity as a percent of maximum velocity (on the right) for very, very low-level control.
In order to prevent bad behaviors from emerging we will have maximum values set by the joystick controller that we use as a percentage of our inputs. The max/min values of those can be shown by running the help message.
Based on the 3rd picture, we see that we are interested in
- axis[0] -> positive is turn left, negative is turn right
- axis[3] -> positive is forward velocity, negative for reverse velocity.
Note that negative values are not interpreted by the CAT Vehicle physical platform, though they are implemented in the simulator.
This results in a mapping like the following to the azcar_sim/cmd_vel topic:
rostopic pub -1 /robotname/cmd_vel geometry_msgs/Twist -- '[axis[3]*velmax, 0.0, 0.0]' '[0.0, 0.0, axis[0]*tiremax]'Thus, we use the left axis to control steering, and the right axis to control velocity.